Crochet parandi can range from restrained long-strand braid accessories to heavily decorated floral pieces filled with leaves, pearls, tassels, and metallic accents. That variety makes choosing a design less about finding one favorite color and more about deciding how much decoration, movement, bulk, and length you actually want beside a braid.
These 16 ideas use public tutorials from 16 different YouTube creators. The collection includes direct laccha-dori styles, lotus and mixed-flower designs, wedding-oriented pieces, long Punjabi braid tassels, no-sew construction, and ghungroo-accented versions. Along the way, the planning notes focus on practical differences such as attachment space, strand stretch, motif orientation, embellishment weight, and how the accessory behaves when hanging rather than lying flat.
Quick List
- Crochet Adjustable Floral Strand Parandi
- Crochet Flowing Laccha-Dori Parandi
- Crochet Lotus-Focal Braid Parandi
- Crochet Leafy Flower-and-Tassel Paranda
- Crochet Color-Rhythm Flower Paranda
- Crochet Pearl-Centered Leafy Parandi
- Crochet No-Sew Vine-and-Tassel Parandi
- Crochet Wedding Flower Parandi
- Crochet Longline Punjabi Tassel Parandi
- Crochet Mixed Garden Flower Parandi
- Crochet Ghungroo-Accent Punjabi Parandi
- Crochet Slim Laccha-Dori Parandi
- Crochet Braid-Integrated Flower Paranda
- Crochet Statement Floral Pranda
- Crochet Delicate Floral Strand Parandi
- Crochet Bead-Optional Lacha-Dori Parandi
Plan the Attachment and Drop Before the Decoration
A parandi is judged while hanging with a hairstyle, so its working length should begin at the point where it actually joins the braid rather than at the top of the wearer’s loose hair. The braid itself changes the apparent hair length, and large flowers or tassels can extend the visual drop farther.
Before fixing every motif, hold a temporary strand against the intended hairstyle. Check where the upper attachment sits, how much crochet will disappear into the braid, and where the final decoration should finish. If several tails hang independently, also decide whether you want an even lower edge or deliberately staggered ends. There is no single measurement that works for every hairstyle, wearer, or parandi construction.
Match Yarn and Motif Density to the Movement You Want
Yarn substitution can change much more than color. A thicker or firmer yarn may increase flower scale and make long strands feel more substantial, while a softer yarn may create more movement but also allow greater stretch. Repeating dimensional flowers along the full length can likewise add considerably more bulk than using a few accents around otherwise open cords.
Make one representative flower, leaf, or short strand before committing to the whole layout. Let that sample hang vertically and assess its scale against the braid. For mixed-motif designs, arrange all decorative components before permanent attachment. This reveals crowded areas, inconsistent motif sizes, and flowers that overlap once gravity changes their orientation.
Treat Pearls, Beads, Bells, and Tassels as Functional Details
Hard embellishments can add sparkle and movement, but each one also becomes an attachment point and a possible place for yarn, hair, jewelry, or embroidered fabric to catch. Temporarily position beads, pearls, or ghungroo-style pieces and gently move the accessory before securing the final layout.
The upper area generally benefits from being easier to handle because it must work with the braid. Heavier visual detail can then be concentrated lower down where it remains visible. Check small embellishments carefully after finishing, and omit detachable pieces where they would not be appropriate for the intended wearer. For care, follow the yarn manufacturer’s recommendations rather than assuming every decorated parandi can be washed in the same way.
Crochet Adjustable Floral Strand Parandi
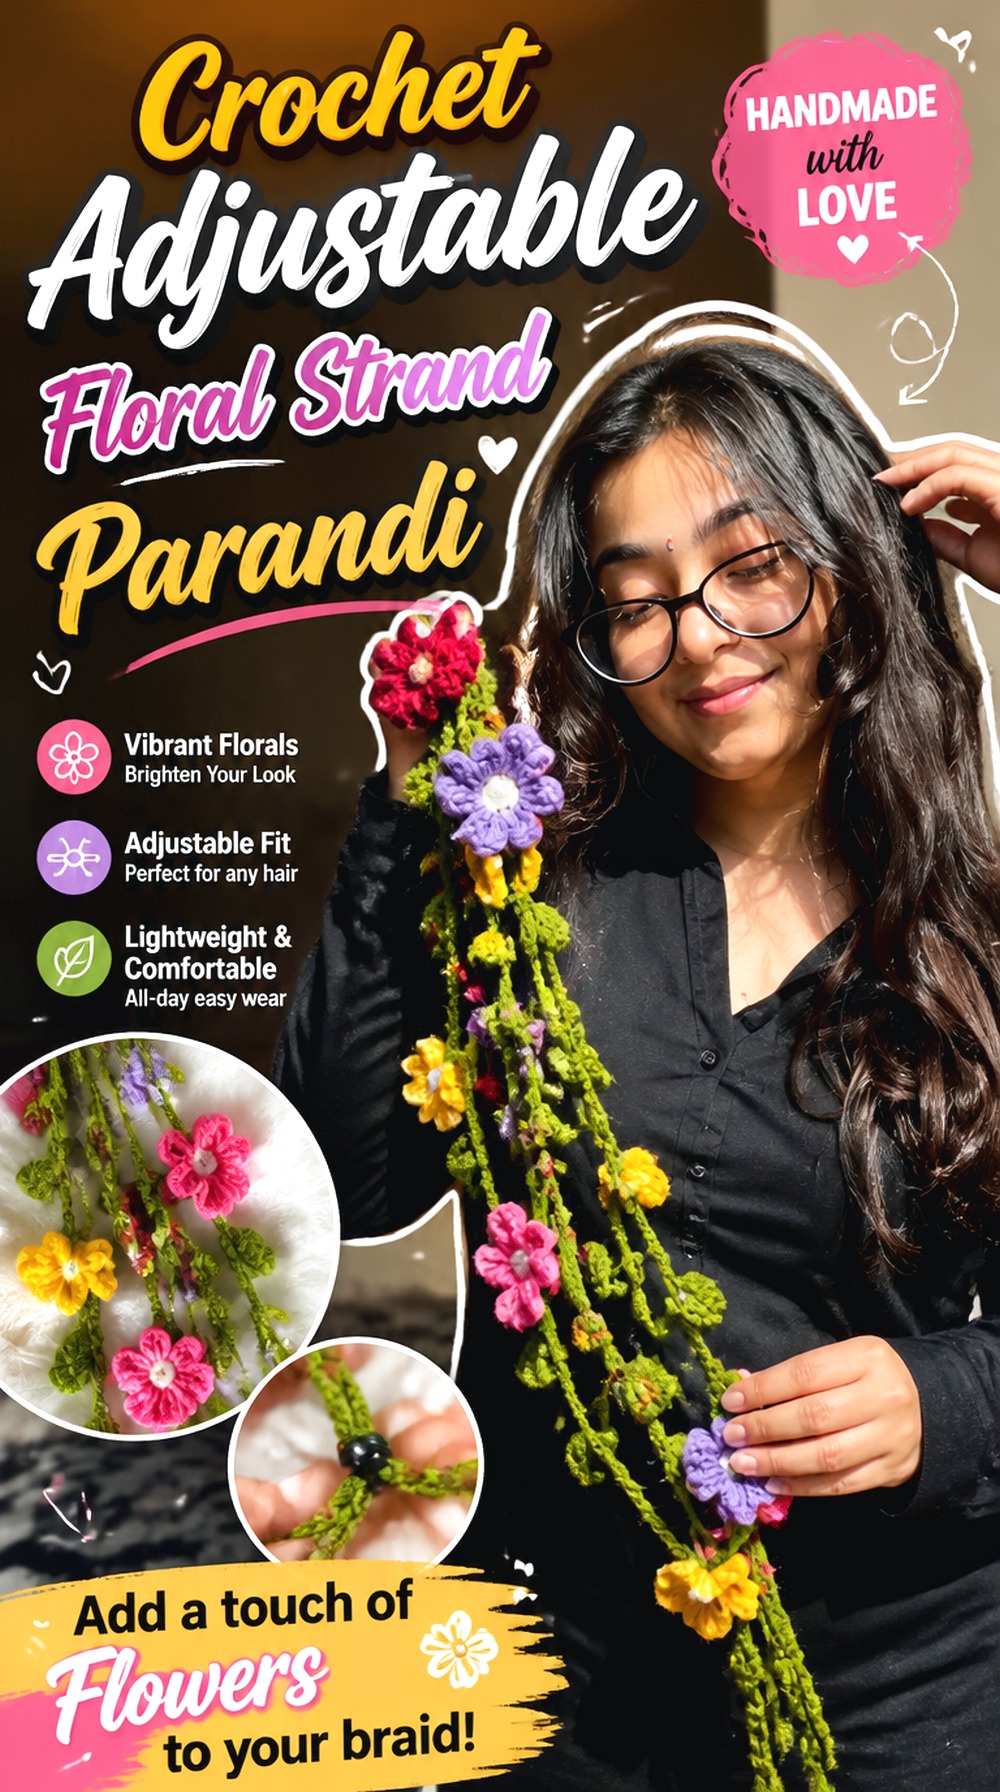
This long floral style is useful when the final drop needs to be planned around a particular braid rather than copied from one fixed sample. Crochet Diaries specifically notes that the project length can be customized and also discusses flexibility in yarn choice.
The appeal is the open vertical structure: flowers can decorate the strands without turning the entire accessory into a dense garland. Compared with the fuller floral pieces later in the collection, this version gives the braid itself more visual space. It is a practical direction when you want floral color and movement but still prefer a relatively light-looking silhouette.
Measure From the Point Where the Crochet Enters the Hair
A length measured from the crown can be misleading if the accessory will not actually begin there. Mock up the braid first and place a temporary strand at the intended connection. Then judge the lower finish from that point. This also helps you decide whether flowers should begin immediately below the attachment or farther down where they will remain more visible instead of disappearing inside the braid.
Keep the Floral Spacing Open Enough to Read
Flowers that look comfortably separated on a table can overlap once several strands hang together. Arrange the unfinished accessory vertically and look at it from normal hairstyle distance. If several blooms merge into one patch, increase the spacing rather than automatically reducing the motif size. Keeping some undecorated strand visible can make each flower easier to recognize while preserving the long parandi silhouette.
Check a Substitute Yarn for Vertical Stretch
If you change yarn, compare the strand in a relaxed position with the same piece held vertically. A stretchy fiber or loose structure may lengthen once flowers and tassels are added. That does not automatically make it unsuitable, but it can shift the final drop. Sampling before completing every strand is much easier than shortening an already decorated accessory.
Crochet Flowing Laccha Dori Parandi

This version keeps more attention on the long cords and flowing finish than on dense flower coverage. Crochet with Khalida presents the project specifically as a parandi, laccha dori, or paranda and emphasizes a neat, flowing result.
That streamlined direction works well when the outfit or hairstyle already carries strong decorative elements. Instead of asking multiple motifs to compete for attention, the yarn strands themselves establish the vertical line. Color can still be bold, but consistency of length, tension, and lower finishing becomes more noticeable because there are fewer large flowers available to disguise irregularities.
Long Strands Make Tension Differences More Obvious
A small tension change may barely show in a flower but can become visible across a long narrow cord. Let each strand hang periodically instead of assessing it only while crocheting on a flat surface. Compare neighboring lengths before adding the final decoration. If one strand twists or contracts differently, dealing with the cause before assembly produces a cleaner group of hanging cords.
Leave the Upper Connection Relatively Uncluttered
The top portion has a practical role inside the hairstyle. Decorative flowers positioned too close to this point can make the attachment bulkier than necessary or hide inside the braid. Test the undecorated upper section first. Once you know how much length is needed for comfortable positioning, the visible decoration can begin below that working area.
Original Tutorial and Creator Credit
Creator: Crochet with Khalida
Crochet Lotus Focal Braid Parandi
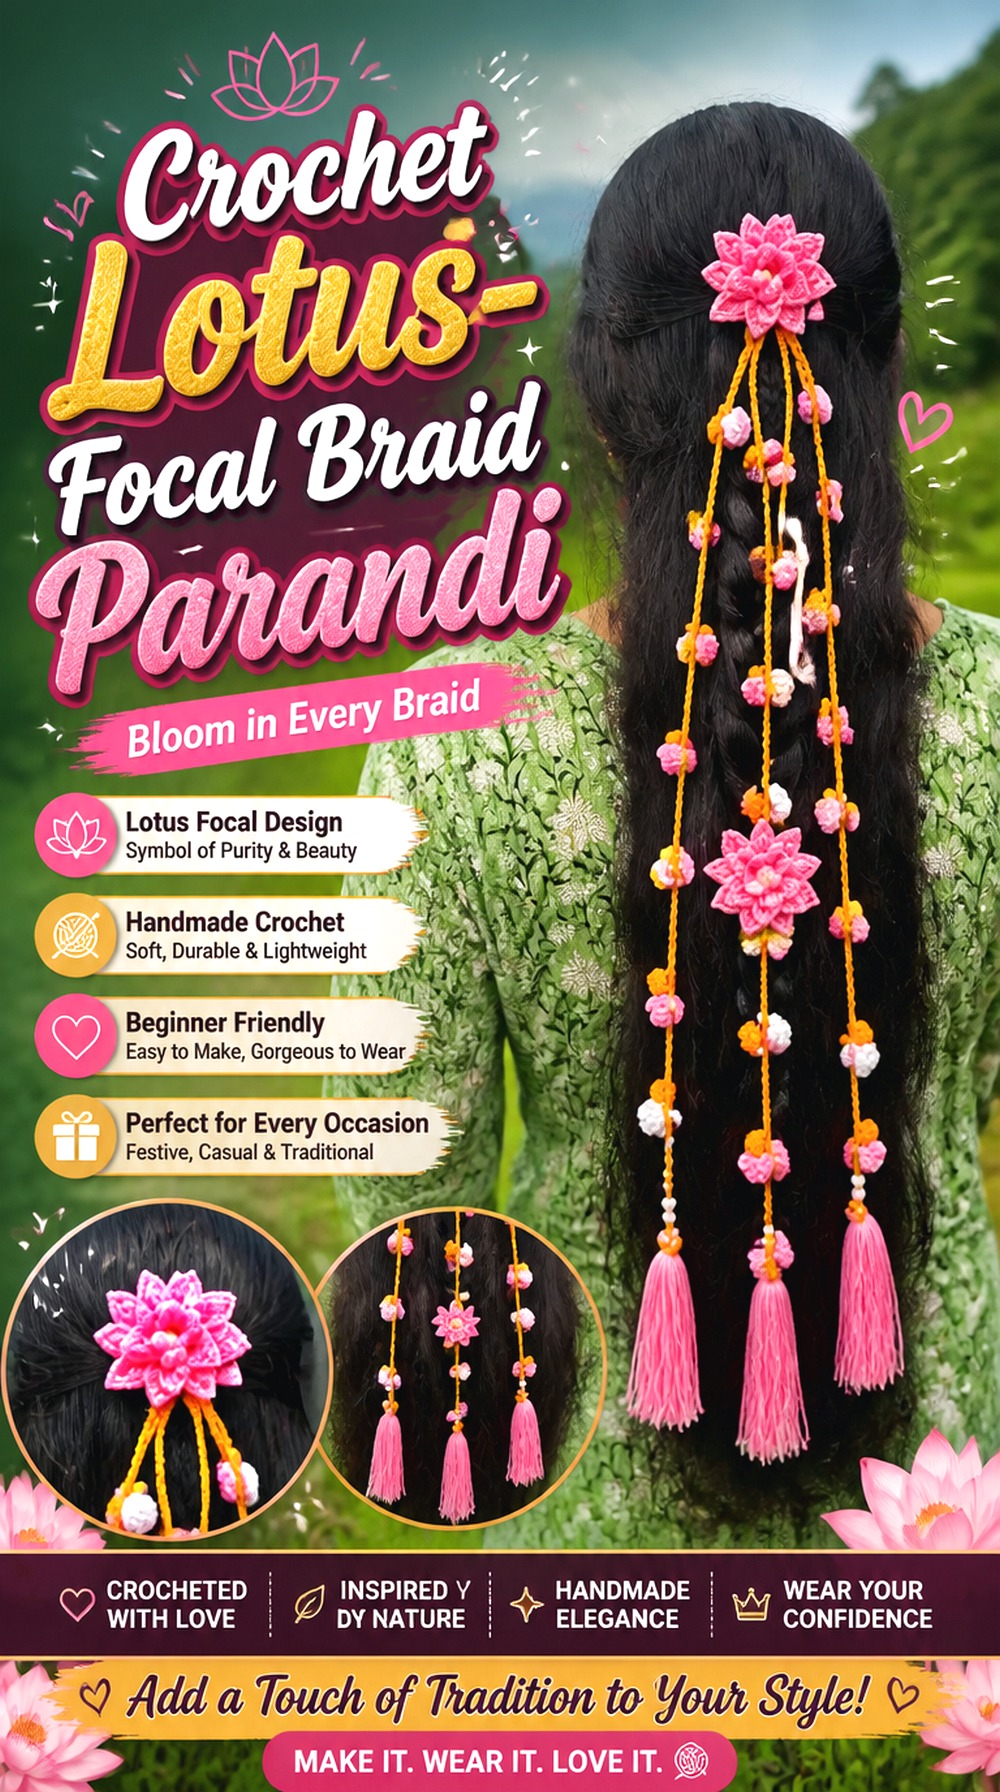
A recognizable lotus gives this parandi a stronger motif identity than a general assortment of blossoms. Stuck In Loops has a tutorial specifically centered on a crochet lotus parandi/laccha dori, making it a direct project match.
This style works when you want the floral theme to be obvious from a distance rather than created through many small, unrelated flowers. A broad dimensional motif naturally occupies more visual space, so the design benefits from restraint around it. Let the lotus establish the theme, then use simpler strands, leaves, or lower decoration to support that focal point rather than competing with it.
Give the Lotus Enough Space to Hold Its Shape
Raised or layered petals can disappear visually when another large motif presses directly against them. Complete one flower and assess its real finished diameter before planning the full arrangement. Hang several proposed components vertically and check for overlap. Increasing space between large flowers often creates a clearer design than trying to fit more motifs into the same length.
Keep Supporting Details Visually Quieter
If the lotus is supposed to be recognizable, avoid surrounding every bloom with equally dominant beads, oversized leaves, and additional large flowers. Smaller transitional elements can connect the composition while allowing the lotus shape to remain readable. This hierarchy is especially helpful against braided hair, where texture already creates a visually active background.
Plan From the Actual Finished Motif, Not an Assumed Scale
Changing yarn, hook, or tension can alter the size and firmness of any crochet flower. Make the representative lotus first and compare it with the intended braid. That sample tells you whether several flowers can fit comfortably or whether fewer, more widely spaced motifs will produce a better proportion. Avoid planning the whole accessory around another maker’s finished dimensions unless you are using the same verified specifications.
Original Tutorial and Creator Credit
Creator: Stuck In Loops
Crochet Leafy Flower and Tassel Paranda
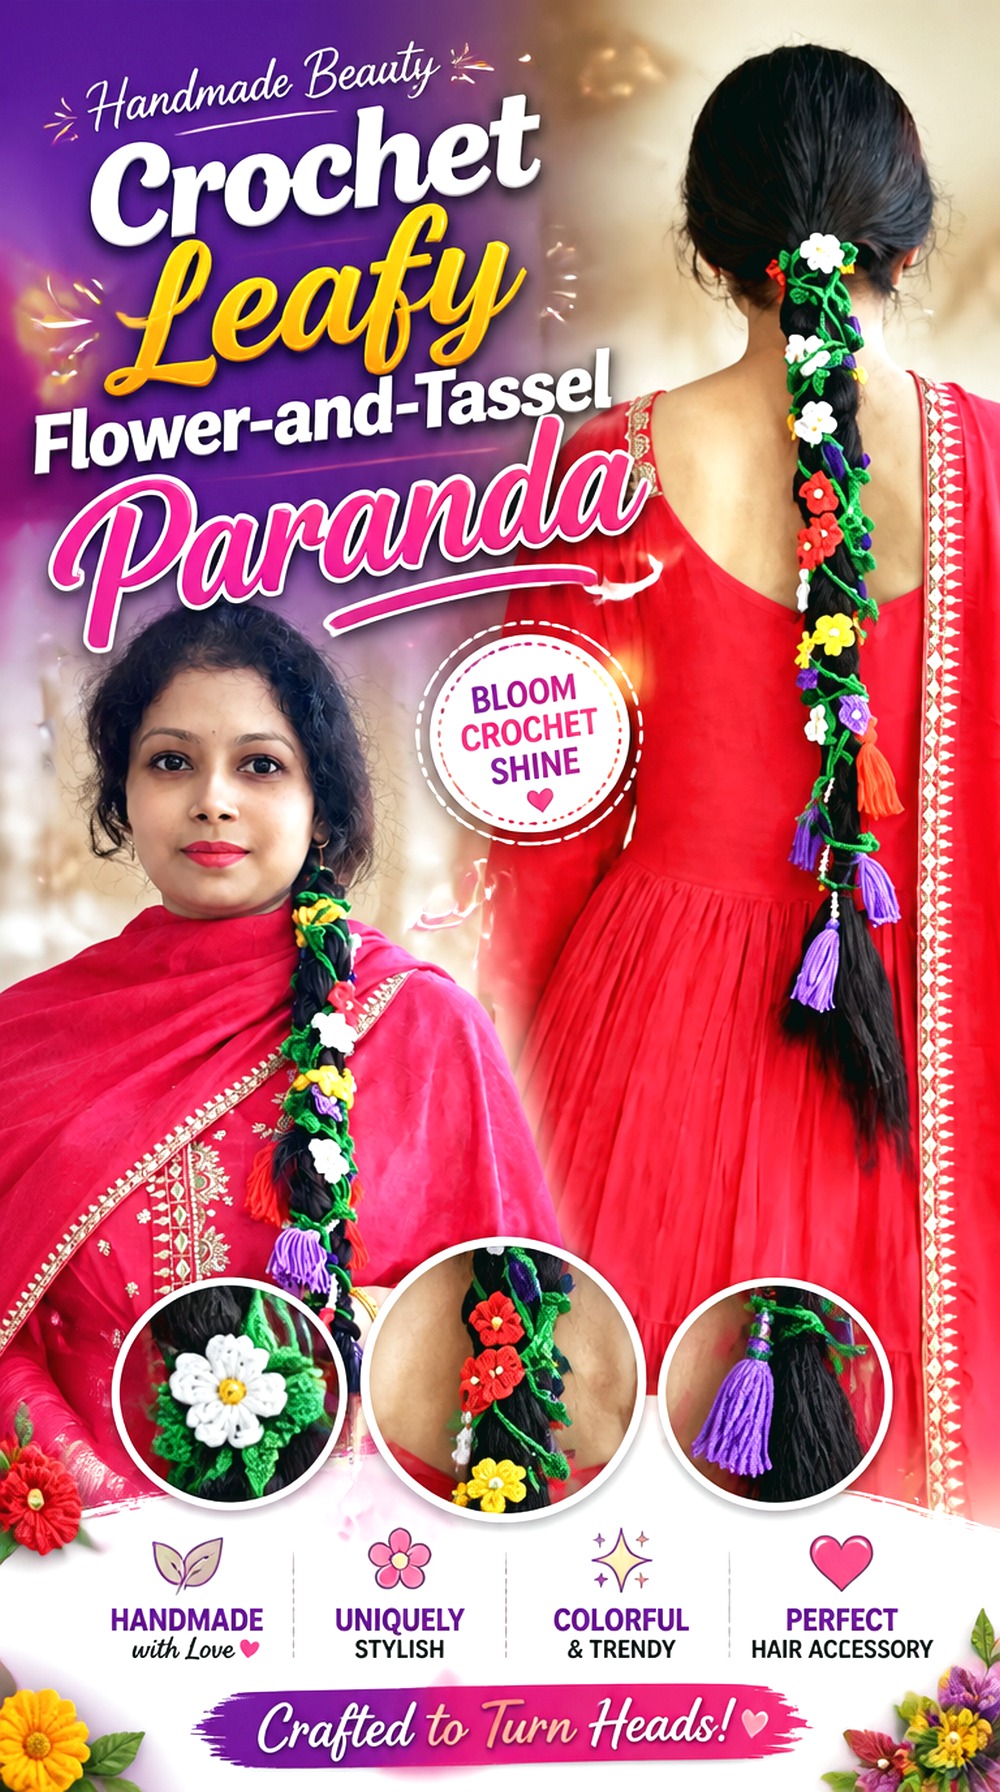
Nitya Uphaar’s tutorial shows a handmade crochet paranda built around flowers, leaves, and tassel-like finishing, giving this project a more botanical top-to-bottom character than the cleaner laccha-dori options.
The useful design question is how to distribute those elements without making every section equally dense. Leaves can provide direction between flowers, while the lower tassels create a recognizable endpoint. This works well for readers who want a richly decorated braid accessory but still want separate motifs to remain visible rather than merging into a continuous floral band.
Rotate Leaves to Create Direction Along the Strand
Leaves influence the way the eye travels down a floral parandi. Before permanently attaching them, lay out the complete accessory and vary their direction deliberately rather than letting every leaf point identically. Then hang the piece to check whether any leaf folds over a neighboring flower. A composition that feels natural horizontally can change noticeably once gravity pulls every motif downward.
Make the Tassels the Clear Ending
Tassels are most effective when they visually finish the strands rather than competing with an equally heavy cluster immediately above them. Compare the tassel scale with the flowers before final assembly. If the tassels dominate everything else, reduce their visual weight or give the nearest flowers more separation. If they disappear, the lower arrangement may need a clearer transition.
Test How the Upper Section Sits With a Braid
The creator also shows the paranda in its intended hair-accessory context. Before finishing every leaf and flower, check which side of the upper strand naturally faces outward during braiding. Directional motifs placed without that test can rotate toward the hair and hide the details you intended to display.
Original Tutorial and Creator Credit
Creator: Nitya Uphaar
Crochet Color Rhythm Flower Paranda
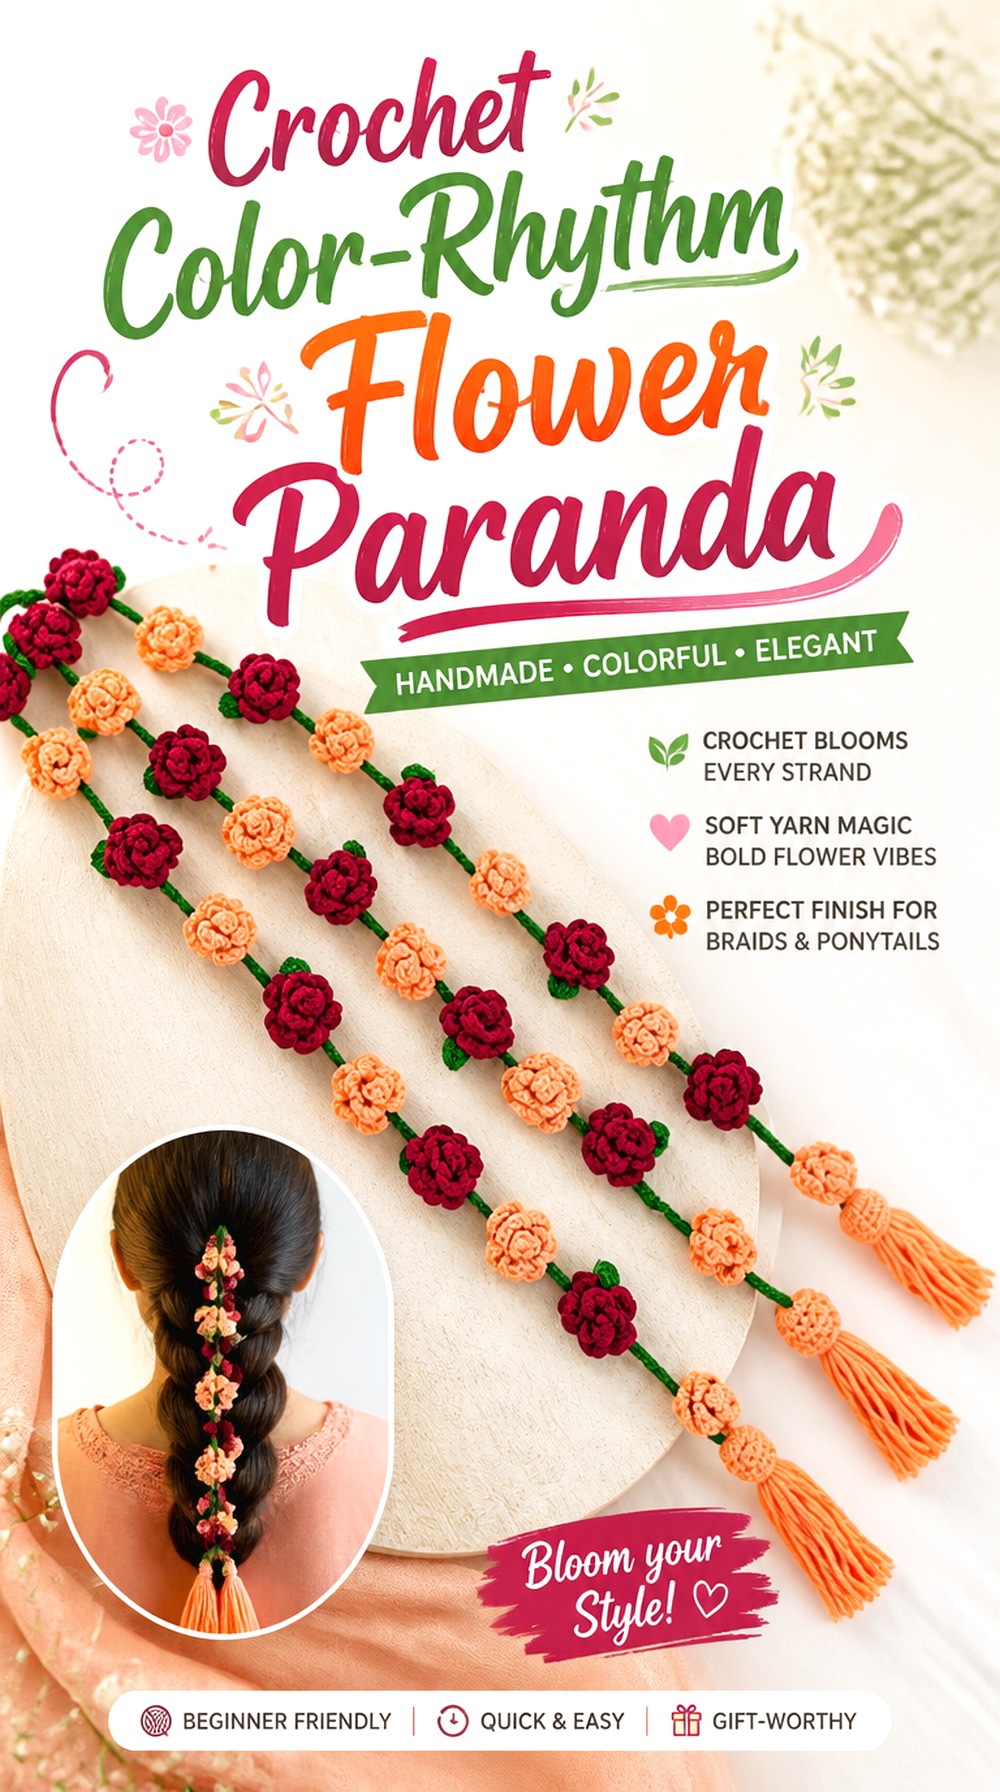
This idea puts repeated colorful flowers at the center of the design. Sonia’s wool world has a public tutorial specifically for a crochet flower paranda/hair accessory, so the source is a direct match rather than a floral-garland adaptation.
Because the motifs repeat, the most important variation comes from their color order and spacing. A deliberately mixed palette can feel lively without looking random when there is some repeated visual logic. This version differs from the lotus style because no single flower needs to dominate; instead, the entire sequence becomes the decorative feature.
Build a Color Sequence Before You Attach Anything
Make the required flowers first and place them in their proposed order along the strands. This reveals accidental clusters that are difficult to notice while working one motif at a time. A repeated anchor shade, an alternating sequence, or a deliberate gradient can all work; the key is deciding the relationship between colors before the joins make rearranging inconvenient.
Compare Repeated Blooms for Scale Consistency
When one flower design appears again and again, changes in tension become easier to notice. Place the finished motifs together before assembly. If one bloom is noticeably larger, decide whether it can become an intentional lower focal point instead of inserting it randomly into an otherwise even sequence. Consistency matters more in repetition-led designs than in deliberately mixed garden arrangements.
Let Some Strand Remain Visible
A flower paranda does not need every inch covered with petals. Open intervals can separate colors, preserve flexibility, and help individual flowers remain distinguishable against textured hair. Hang the proposed layout beside the braid before closing those gaps. You may find that a slightly more open arrangement reads more clearly than a heavily packed one.
Original Tutorial and Creator Credit
Creator: sonia’s wool world
Crochet Pearl Centered Leafy Parandi
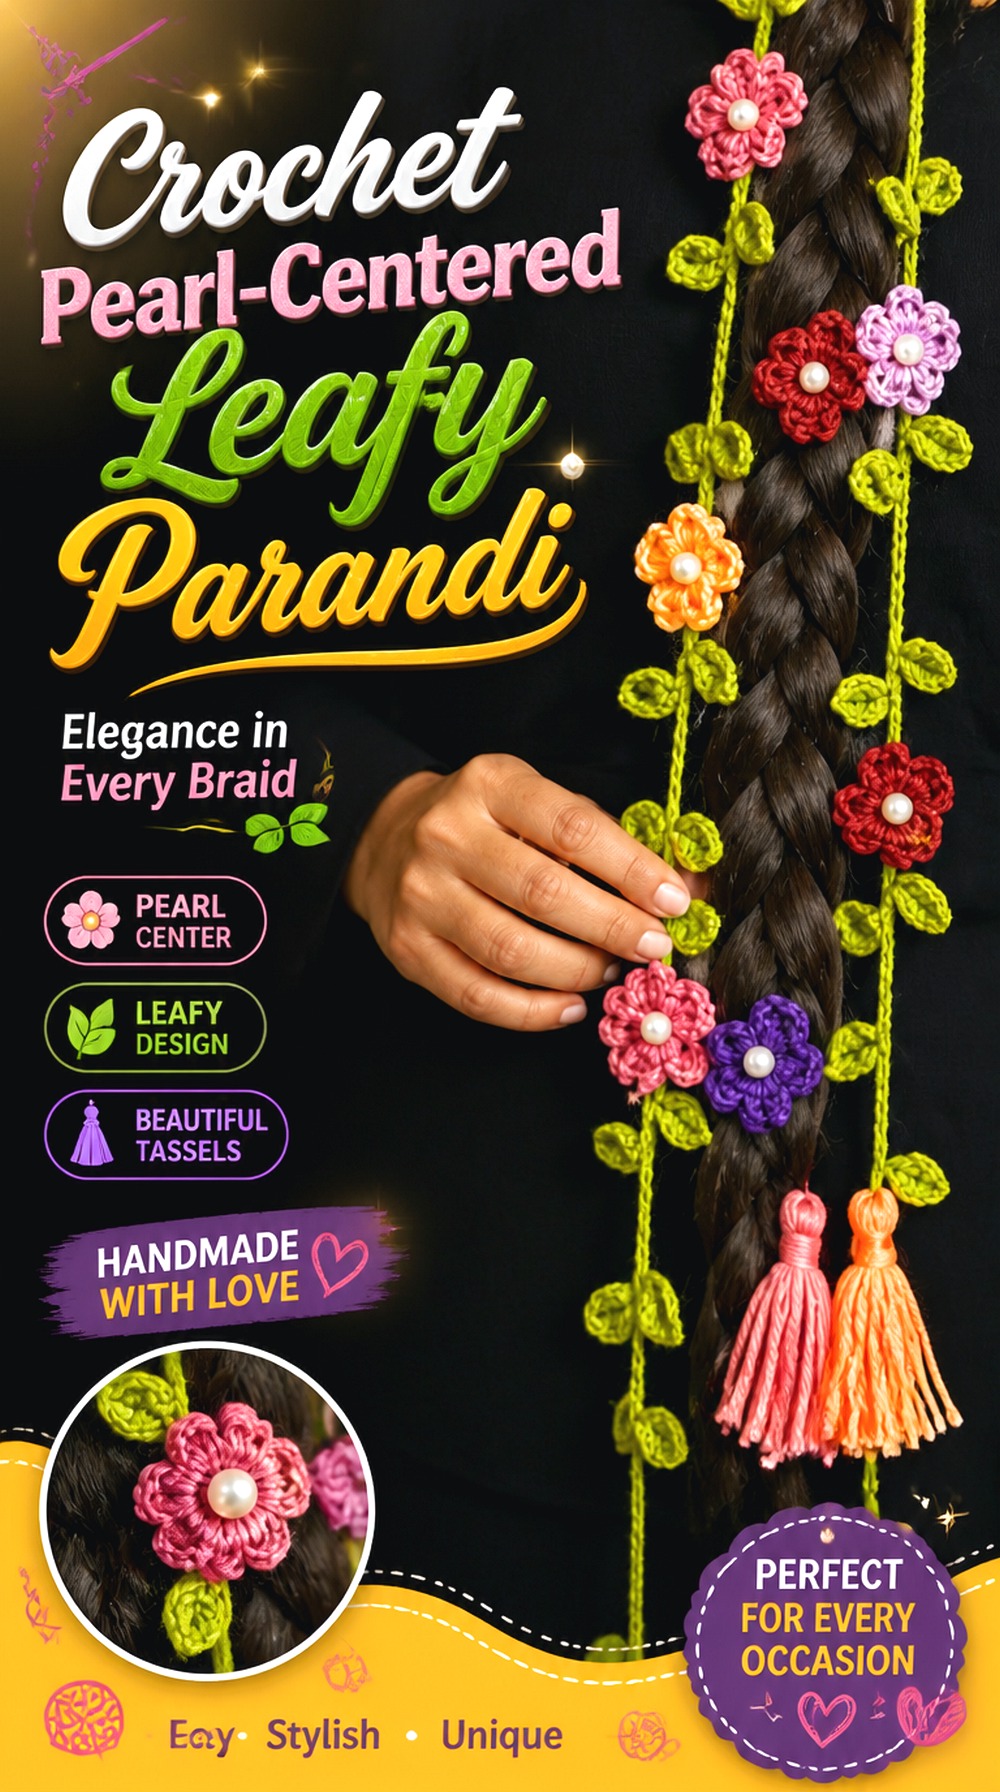
Amna’s Creations demonstrates a crochet paranda that includes flowers, leaves, and pearl decoration, which gives this version a jewelry-like accent without turning the entire accessory into hard embellishment.
Pearl centers make individual blooms more noticeable because they create small reflective focal points. That means spacing and attachment become more important than in an all-yarn design. This is a good direction when you prefer a polished floral finish but still want leaves and crochet texture to remain visually dominant. It is noticeably different from a tassel-heavy Punjabi style because the decorative interest is distributed across the flowers themselves.
Use Pearls as Highlights Rather Than Continuous Decoration
One reflective center per bloom can make the flower shape easier to read. Adding more hard decoration everywhere may reduce that effect by making the whole strand equally shiny. Arrange the flowers first, then decide whether additional pearls are actually needed. The best balance depends on the outfit and hairstyle, especially when earrings or embroidered fabric will appear close to the braid.
Leaves Can Separate Reflective Focal Points
A leaf between two pearl-centered flowers creates visual separation without introducing another bright accent. Use those quieter shapes as connectors when the flower sequence begins to look crowded. Check the arrangement vertically because gravity may pull the leaves over the pearl centers. Small adjustments before permanent attachment can keep both components visible.
Inspect Every Small Embellishment After Finishing
A moving hair accessory puts repeated motion through its connections. Check each pearl and decorative join individually once assembly is complete. Also consider the intended wearer before adding small detachable components. When such embellishments are not appropriate, an all-yarn flower center preserves the basic floral layout without introducing the same small hard parts.
Original Tutorial and Creator Credit
Creator: Amna’s Creations
Crochet No Sew Vine and Tassel Parandi
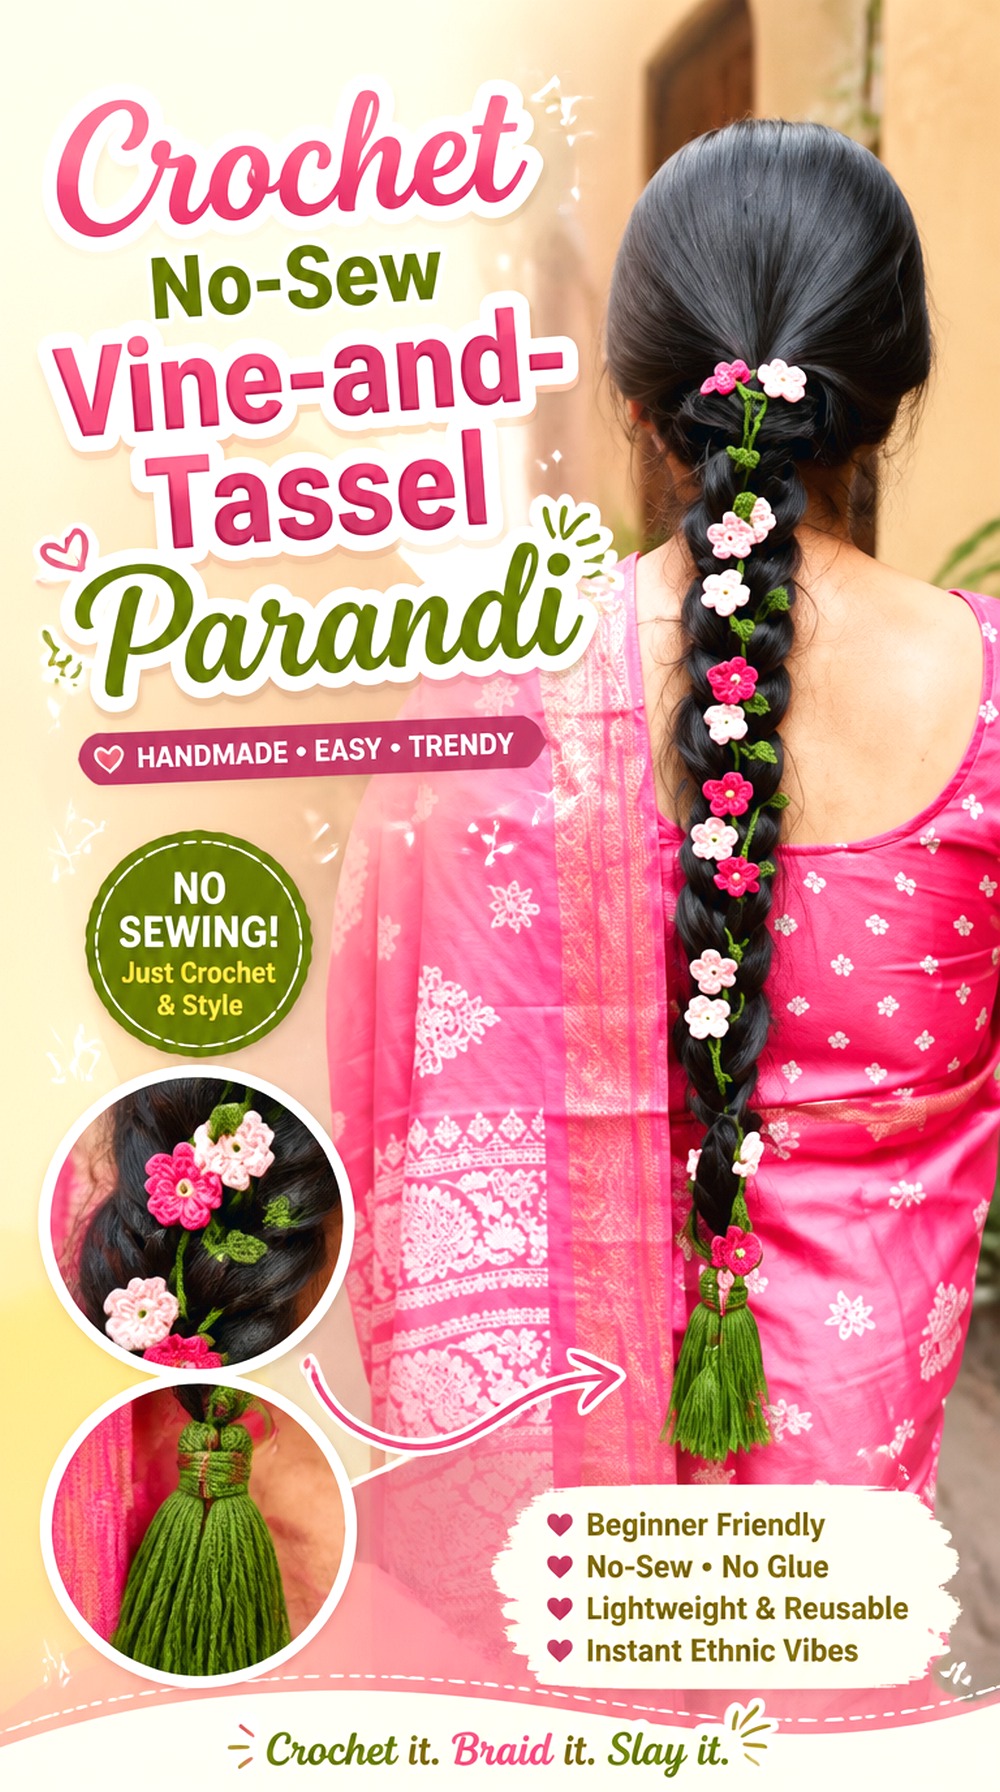
The main distinction here is construction rather than color. Cute Crochet’s parandi tutorial is presented as a no-sew design and includes the flower, vine, assembly, and tassel concept, making it useful for crocheters who prefer a more integrated structure.
A connected vine can create a continuous visual flow that differs from a parandi assembled from many separately sewn motifs. The trade-off is that spacing and orientation may need to be judged as the work develops, because there is less opportunity to reposition every flower later. This makes vertical checking especially useful throughout the project.
Integrated Construction Rewards Early Spacing Decisions
When motifs form as part of the continuing structure, you cannot rely on later sewing to move every flower into a better position. Let the work hang at intervals and watch how the motifs turn. If two flowers repeatedly face inward or collide, correcting the spacing while that area is still accessible is easier than trying to manipulate the completed accessory.
Keep the Vine Flexible Enough for the Hairstyle
A decorative vine can look neat while lying straight yet resist the curves created by braiding. Gently bend the developing section by hand and assess whether the flowers fold naturally with it. If a region becomes too rigid, adding still more dense decoration there may compound the problem. Flexibility is a functional part of this particular parandi style.
Recheck the Structure After the Tassels Are Added
Lower tassels alter the way long strands hang. Once they are in place, suspend the parandi from the upper attachment and check whether one section twists, stretches, or pulls noticeably farther down. This is a practical finishing inspection rather than a claim about strength. The completed vertical position tells you more than the project lying flat on a work surface.
Original Tutorial and Creator Credit
Creator: Cute Crochet
Crochet Wedding Flower Parandi
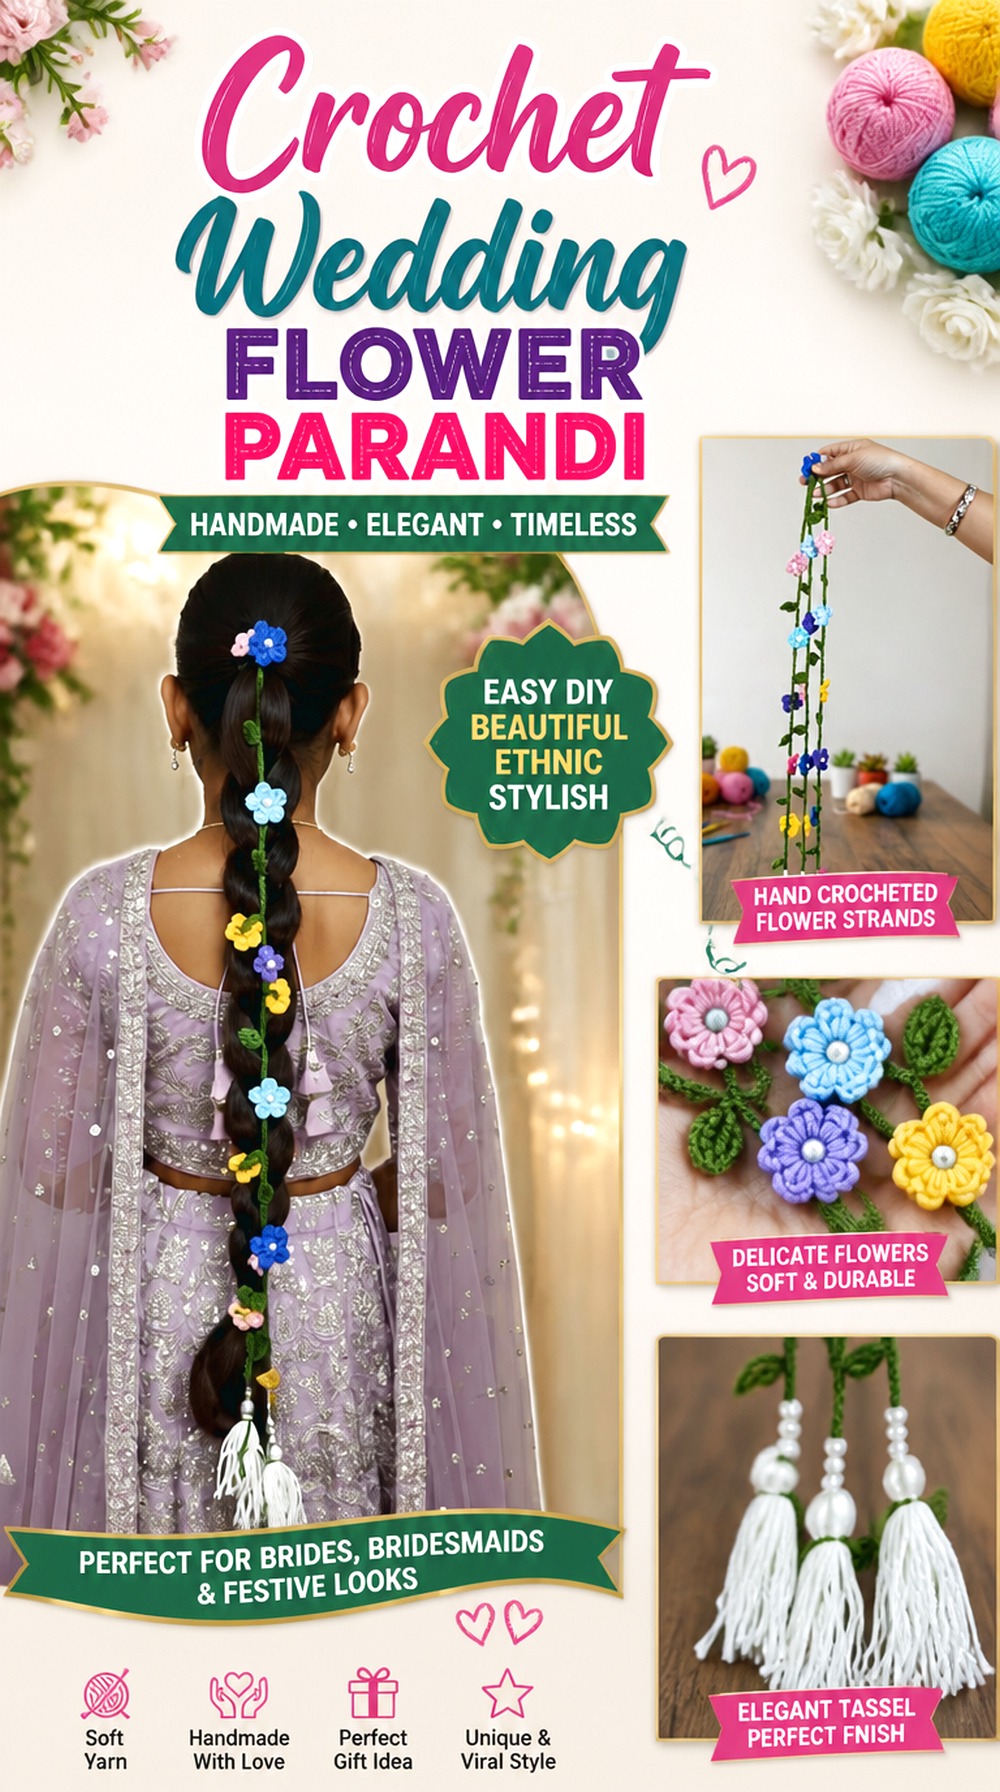
Gharwalikahani presents this crochet flower parandi specifically as a wedding hair accessory, with beads or pearls included among the possible decorative materials. That makes it useful for thinking about the parandi as one part of a larger festive hairstyle rather than an isolated crochet object.
The design can carry noticeable floral detail, but coordination matters. Earrings, embroidered clothing, hair pins, flowers, or a dupatta may already introduce substantial texture. A parandi that leaves a little visual space can sometimes integrate more successfully than one with decoration packed continuously from top to bottom.
Test the Layout With the Intended Hairstyle
Do not finalize the most important flowers while looking only at the loose accessory. A wedding braid may include added volume, pins, or other decorations that hide sections of the parandi. Temporarily place the unfinished piece with the hairstyle and identify which areas remain visible. Concentrate your strongest floral details there instead of spending them inside the braid.
Space Pearls So the Flowers Still Lead
Pearls can catch light and become more prominent than expected. If they are used around every available gap, the strand can read as a line of reflective points rather than a floral crochet accessory. Position the flowers first and use pearls where they reinforce the design. View the arrangement in both daylight and normal indoor light before adding more.
Check Contact With Jewelry and Embroidered Fabric
A wedding hairstyle may bring the parandi close to earrings, decorative pins, or textured clothing. Move the finished accessory gently beside those items and look for obvious catching points. Smooth yarn tails, exposed loops, and loosely attached embellishments deserve attention before wear. Removing one troublesome decorative piece can be more practical than accepting repeated snagging.
Original Tutorial and Creator Credit
Creator: Gharwalikahani
Crochet Longline Punjabi Tassel Parandi

This project shifts the emphasis from dense flowers back to the long braid-extension silhouette. Crocheter priyanka W🧶ऊN identifies the finished project as a handmade Punjabi crochet parandi/paranda and braid tassel accessory.
Choose this direction when the extended vertical line and lower movement matter more than decorating every section with flowers. Because the upper structure is comparatively restrained, differences in strand length and the balance of the final tassel become easier to see. It can be especially effective when you want the parandi to visually continue the braid rather than sit beside it like a floral garland.
Judge the Full Drop From the Back
A long parandi changes the proportion of the entire hairstyle. Put the braid and temporary accessory together, then view the result from the back at normal standing distance. The desired ending point depends on the wearer, attachment position, clothing, and styling preference. Avoid treating another project’s finished length as a universal target.
Let the Tassel Provide the Lower Focal Point
When the tassel is meant to create the strongest movement, the rest of the accessory does not need equally heavy decoration. A simpler upper line can make the ending feel more dramatic. Compare the completed strands against the intended outfit before deciding to add extra flowers or beads; the braid-and-tassel silhouette may already provide enough visual interest.
Compare Hanging Strands Before Final Joining
Multiple long strands should be evaluated together. Hold them from their shared attachment point and check whether one curls, stretches, or finishes substantially differently. If staggered ends are intentional, make the difference obvious enough to look designed. If you want an even finish, correct the strand balance before adding the final tassel elements.
Original Tutorial and Creator Credit
Creator: Crocheter priyanka W🧶ऊN
Crochet Mixed Garden Flower Parandi
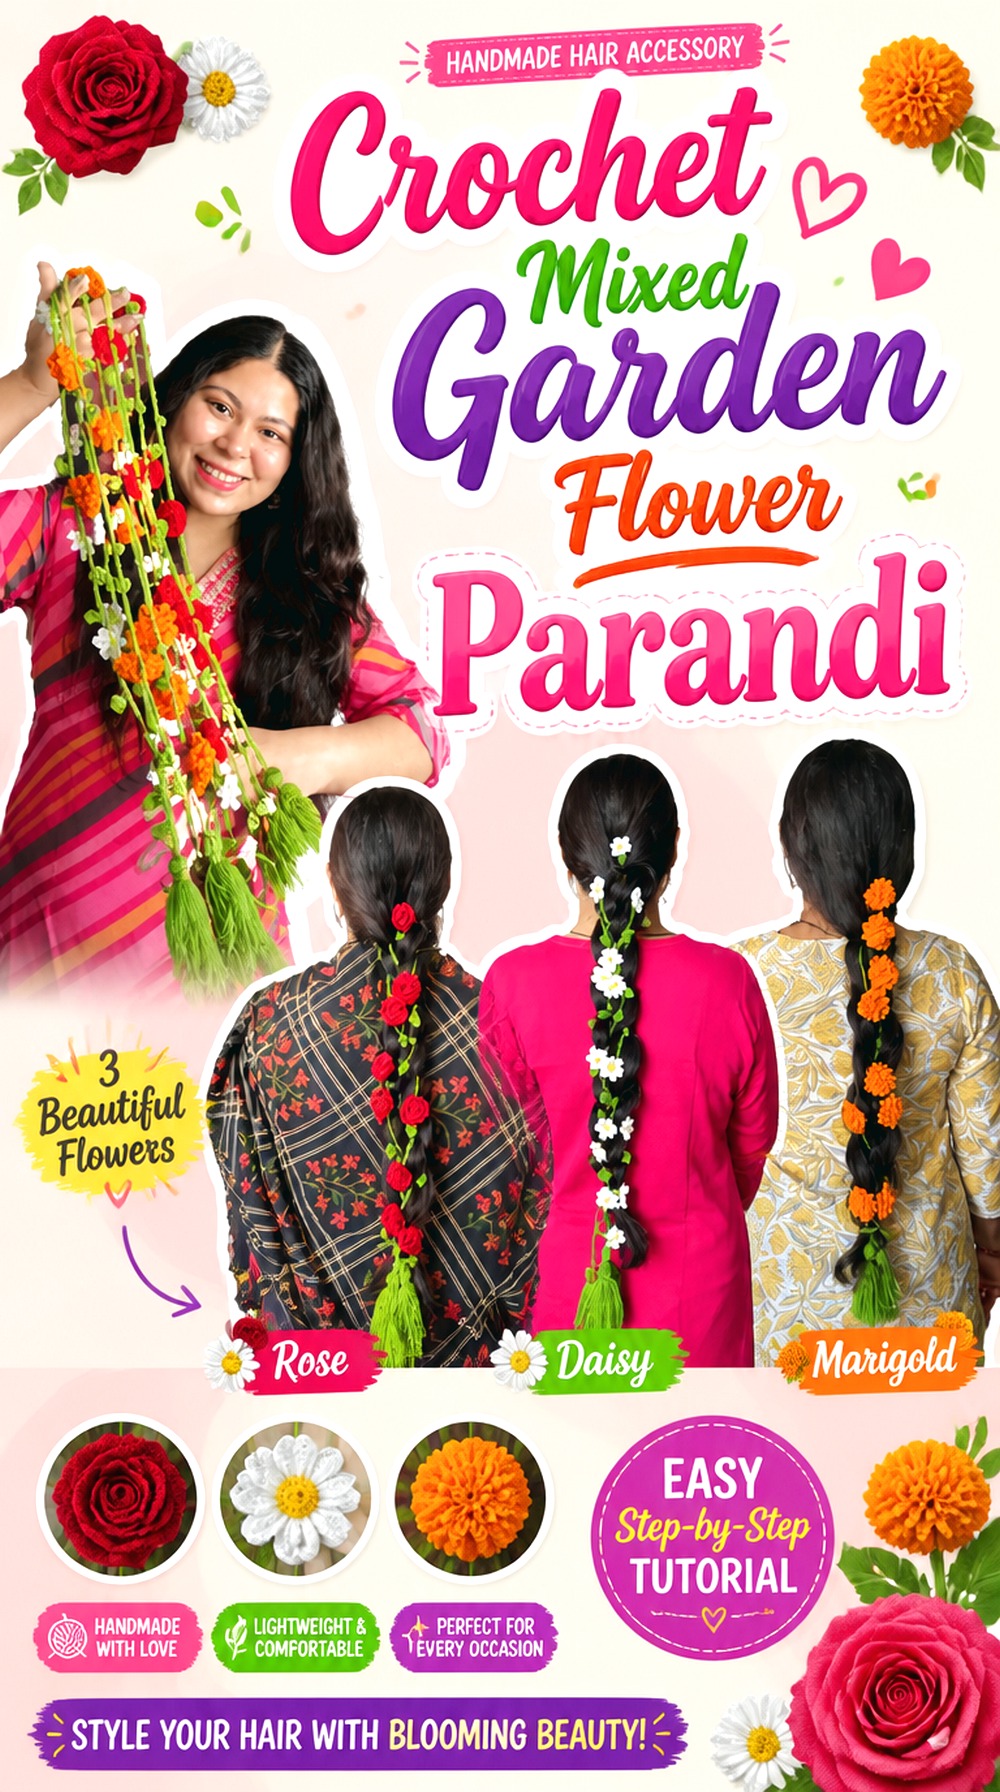
Sara’s Art Diary has a direct parandi tutorial built around rose, marigold, and daisy motifs, giving this idea the broadest flower vocabulary in the collection. Rather than repeating one blossom, the accessory can read like a small garden running through the braid.
The challenge is keeping the mixed motifs cohesive. Roses, daisies, and marigold-style flowers have different visual densities, so equal spacing does not necessarily create equal visual weight. This design suits readers who enjoy variety and want each section of the parandi to offer a slightly different detail rather than repeating the same flower continuously.
Establish a Main Flower Before Mixing Everything
A multi-flower design becomes easier to organize when one motif appears often enough to anchor the arrangement. The others can then provide contrast. Lay out the complete set before assembly and decide which bloom should carry the rhythm. Without an anchor, a varied collection can begin to look like unrelated motifs placed on one strand.
Use Simpler Sections Between Dimensional Blooms
A layered rose beside another dense flower can create a thick section of crochet that dominates the braid. Leaves, open cord, or a flatter flower can provide visual breathing room. The spacing does not need to be mathematically regular; it should keep the larger shapes from obscuring one another when the piece hangs.
Coordinate the Lower Finish With the Flower Palette
Tassels or end details introduce another large patch of color. Before fixing them, hold the completed floral portion above the proposed finish. If the bottom introduces several unrelated colors, simplify it or repeat one shade already present in the flowers. This makes the ending feel connected to the garden theme rather than added as a separate project.
Original Tutorial and Creator Credit
Creator: Sara’s Art Diary
Crochet Ghungroo Accent Punjabi Parandi

Plakshi Jain | Crochet provides a tutorial specifically for a crochet ghungroo parandi, making this idea distinctly different from the pearl-centered and all-yarn floral versions. The metallic accents introduce movement and sound as well as shine, so their role should be considered more carefully than a purely decorative yarn motif.
This direction suits a parandi where the lower section should attract attention during movement. It can remain visually connected to traditional tassel styling while introducing a crochet base. Keeping the ghungroo accents selective helps preserve that balance.
Add Metallic Pieces After You Understand the Base
Finish enough of the crochet structure to judge its natural hang before deciding where metallic accents belong. Adding hard components early can make it harder to distinguish whether twisting comes from the yarn structure or the decoration. Once the base hangs predictably, temporary placement makes it easier to compare different ghungroo positions.
Listen and Watch During the Movement Test
A moving embellishment changes both appearance and sound. Gently swing the finished strands and observe whether the pieces repeatedly collide, tangle with yarn, or pull one tail lower than the others. Reducing the quantity or changing their spacing may improve the result. The aim is deliberate movement rather than simply maximizing the number of accents.
Keep the Upper Braid Area Easier to Handle
Metallic details are generally more practical where they remain visible and away from the working attachment area. Preserve enough plain or softer crochet near the top for positioning with the braid. This also reduces the chance of hard embellishments being buried inside the hairstyle, where they contribute weight without adding much visible decoration.
Original Tutorial and Creator Credit
Creator: Plakshi Jain | Crochet
Crochet Slim Laccha Dori Parandi
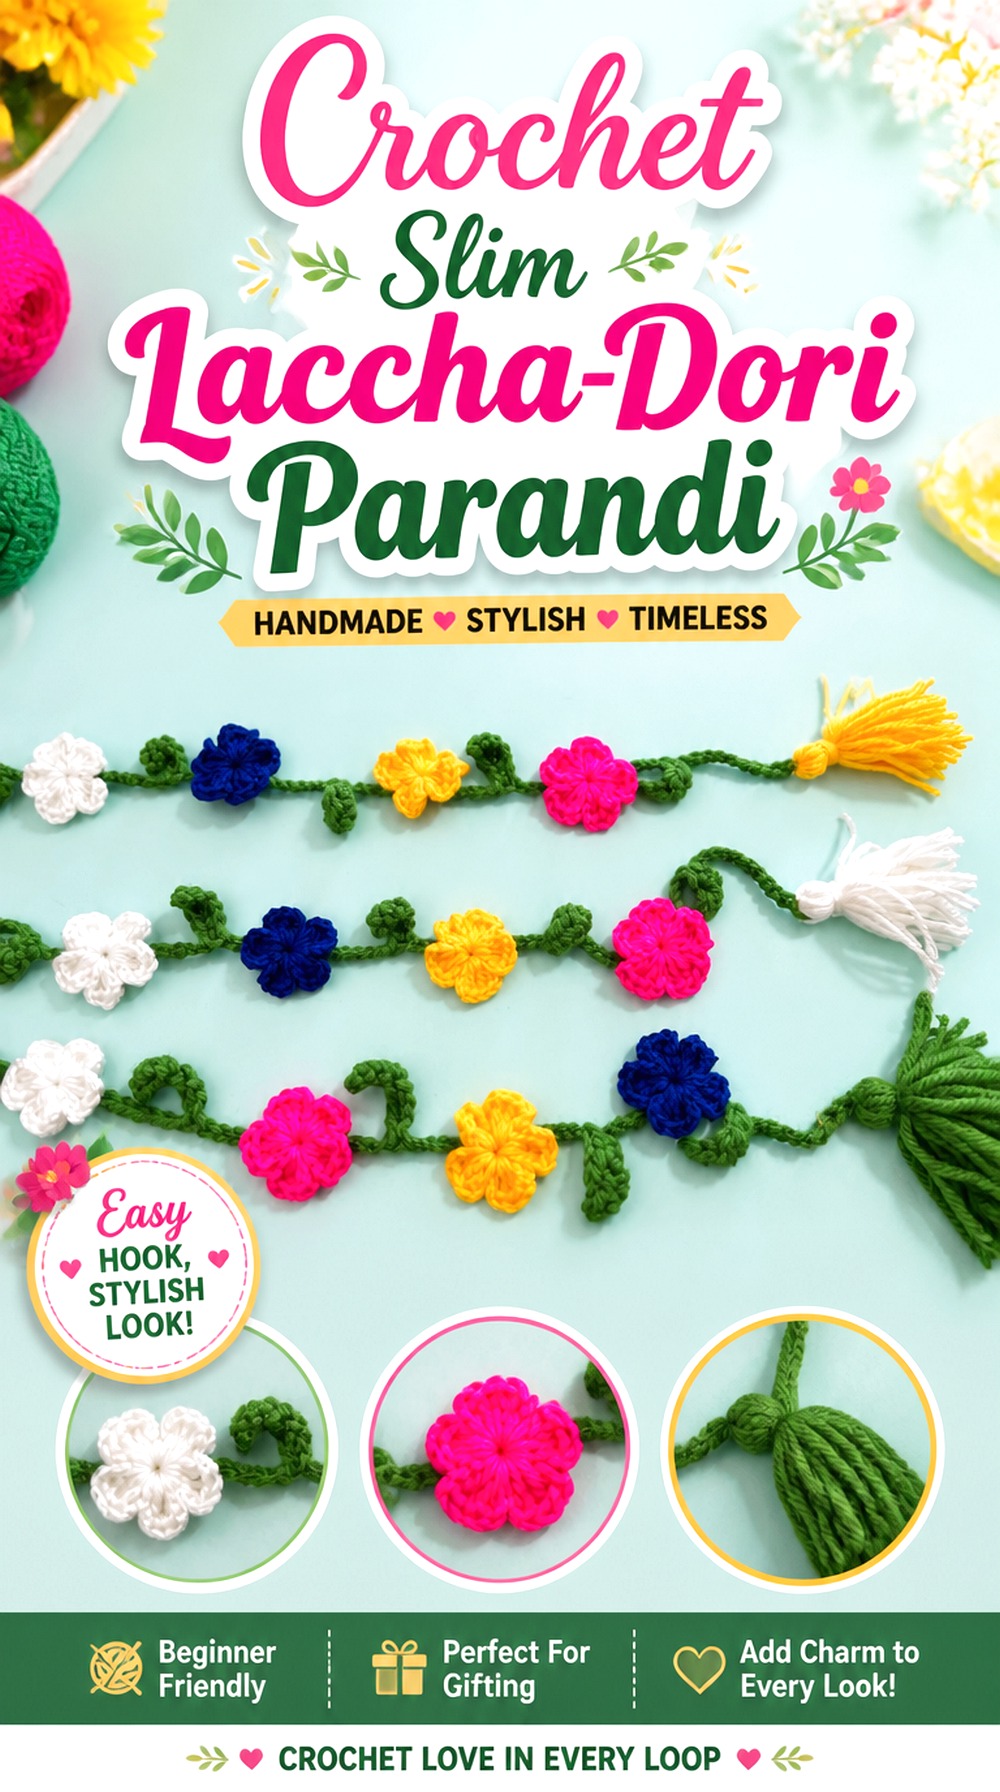
Crochetnook’s direct parandi/laccha-dori tutorial provides a good source for a narrower, strand-led interpretation where the overall line remains relatively clean. This is a useful contrast to the full mixed-garden and wedding flower designs.
A slim parandi can work particularly well when you want crochet texture without adding a broad floral band beside the braid. Because there is less visual mass, the workmanship of the connecting cords becomes more prominent. Straight hanging, consistent tension, and an intentional lower ending matter more than packing the design with extra motifs.
Check for Unwanted Twist Before Decorating the Ends
Narrow crochet cords can reveal directional tension by spiraling. Finish the main strands and let them hang freely before adding heavier decoration. If one consistently twists more than the others, determine whether reshaping is enough or whether tension changed during that section. Large tassels may conceal the bottom but will not correct a twisting strand above them.
Use the Slim Profile Deliberately
A narrow parandi offers more open space around the braid, which can be useful with patterned clothing, heavy earrings, or other hair decoration. Resist adding motifs simply because there appears to be empty strand. The negative space is part of what makes this version different from a full floral vine.
Keep the Ending Proportional to the Cords
An oversized lower cluster can make very slim strands look visually disconnected from their finish. Temporarily bundle the intended tassels or flowers beneath the cords and assess the transition. The goal is not necessarily a small ending, but one that looks supported by the scale of the structure above it.
Original Tutorial and Creator Credit
Creator: Crochetnook
Crochet Braid Integrated Flower Paranda
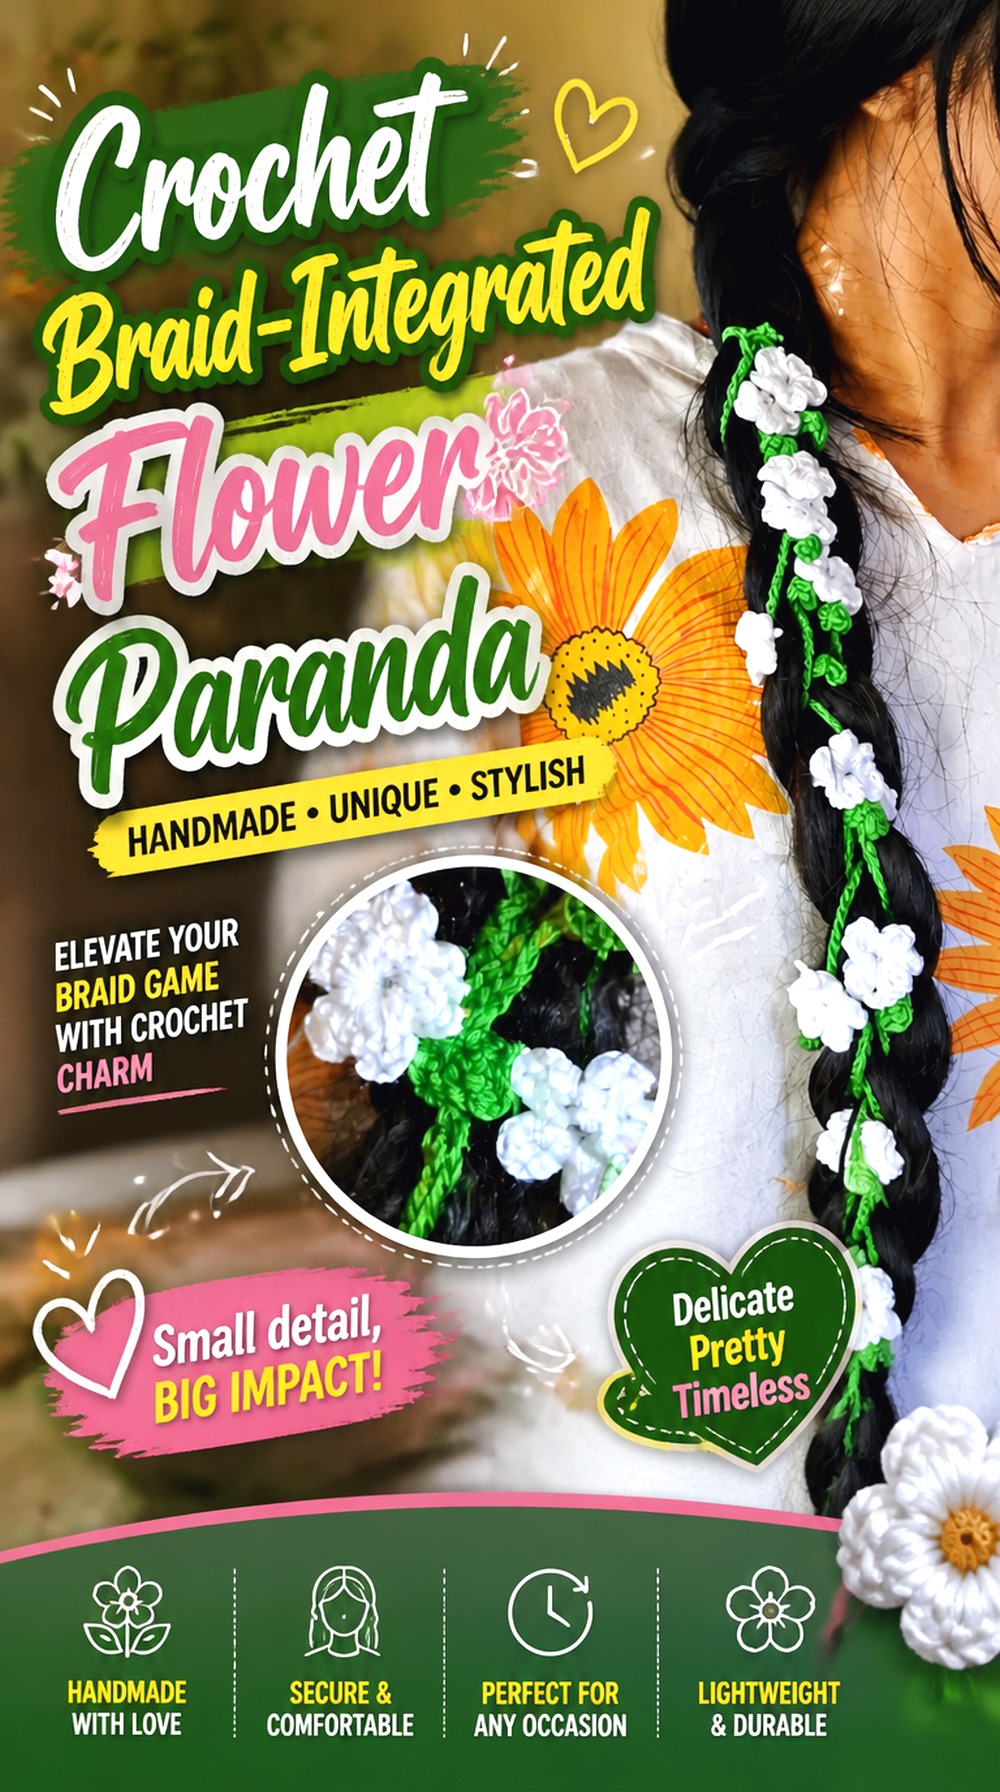
The @crochetwithDeepika tutorial presents a handmade crochet paranda specifically as a hair-braid accessory. This makes the interaction between the crochet piece and the braid the defining feature of this idea.
Instead of planning the paranda as a decorative strip first and thinking about attachment later, build the styling decision into the project from the beginning. Directional flowers should face outward after braiding, and enough undecorated material should remain near the connection to handle comfortably. This is especially useful when the crochet is meant to become visually integrated with the braid rather than simply hang beside it.
Practice the Hair Placement Before Final Assembly
Use a loose trial braid with the unfinished paranda. Watch which side turns outward and which areas disappear into the hair. That information tells you where to place directional motifs. A flower positioned perfectly on a flat work surface may rotate backward once its supporting cord follows the braid.
Save the Strongest Decoration for Visible Sections
The portion embedded in the braid does not need the same motif density as the exposed lower length. Identify the visible zones during the practice fit and concentrate flowers there. This reduces unnecessary bulk near the attachment while ensuring the time spent on decorative work actually contributes to the finished hairstyle.
Separate Lower Motifs So They Can Move Independently
If several tails finish with flowers or tassels, hang them together before securing the final arrangement. Lower decorations that constantly collapse into one cluster lose their individual shape. Increasing the separation or reducing the scale of one element can create a cleaner outline without changing the whole design.
Original Tutorial and Creator Credit
Creator: @crochetwithDeepika
Crochet Statement Floral Pranda
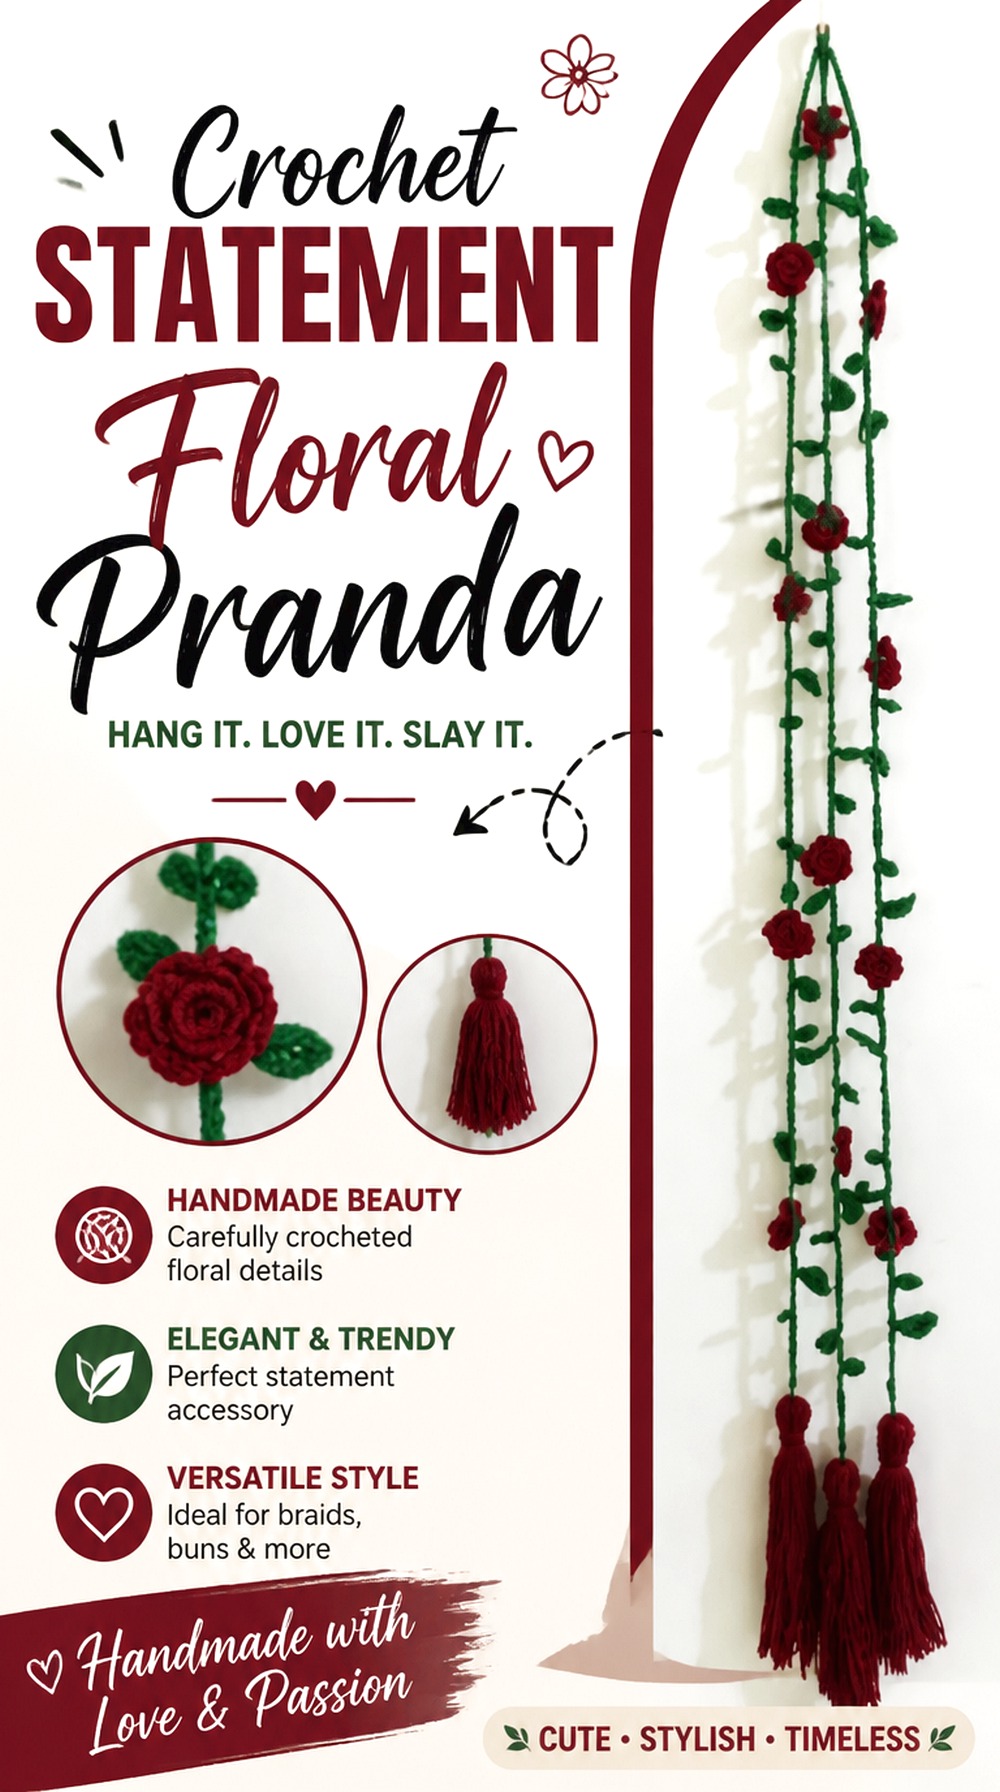
Devsha Textile’s tutorial directly covers a handmade crochet pranda and notes that the project can be customized through elements such as length, colors, flowers, and tassels. That flexibility makes it a strong base for a statement design with a deliberately concentrated focal area.
Rather than making every motif equally large or bright, choose where the strongest detail should appear. A dense lower flower cluster, pronounced tassel group, or high-contrast bloom can carry the design while the remaining structure supports it. This hierarchy helps a richly decorated pranda remain readable against braided hair.
Decide Where the Eye Should Land First
Lay the full accessory vertically and identify the section that should attract attention. If every flower has the same scale, color contrast, and spacing, no element becomes a true focal point. Increase detail in one zone and keep neighboring areas calmer. A statement piece often feels stronger because of contrast between busy and quiet sections, not because every inch is filled.
Use Color Contrast Against the Hairstyle, Not Just the Yarn Table
Two yarn shades that seem strongly different beside their skeins may behave differently against dark, light, or highly textured hair. Hold representative motifs near the intended hairstyle before committing to the full palette. If key flowers disappear visually, change their placement or surrounding colors rather than simply adding more decoration.
Inspect the More Complex Joins While Hanging
Statement styles tend to contain more attached components. Suspend the finished pranda and gently move it to see whether flowers flip backward, leaves twist, or yarn tails become visible. This inspection is about finishing quality rather than making an unsupported durability claim. Correcting the orientation of one important motif can noticeably improve the final composition.
Original Tutorial and Creator Credit
Creator: Devsha Textile
Crochet Delicate Floral Strand Parandi
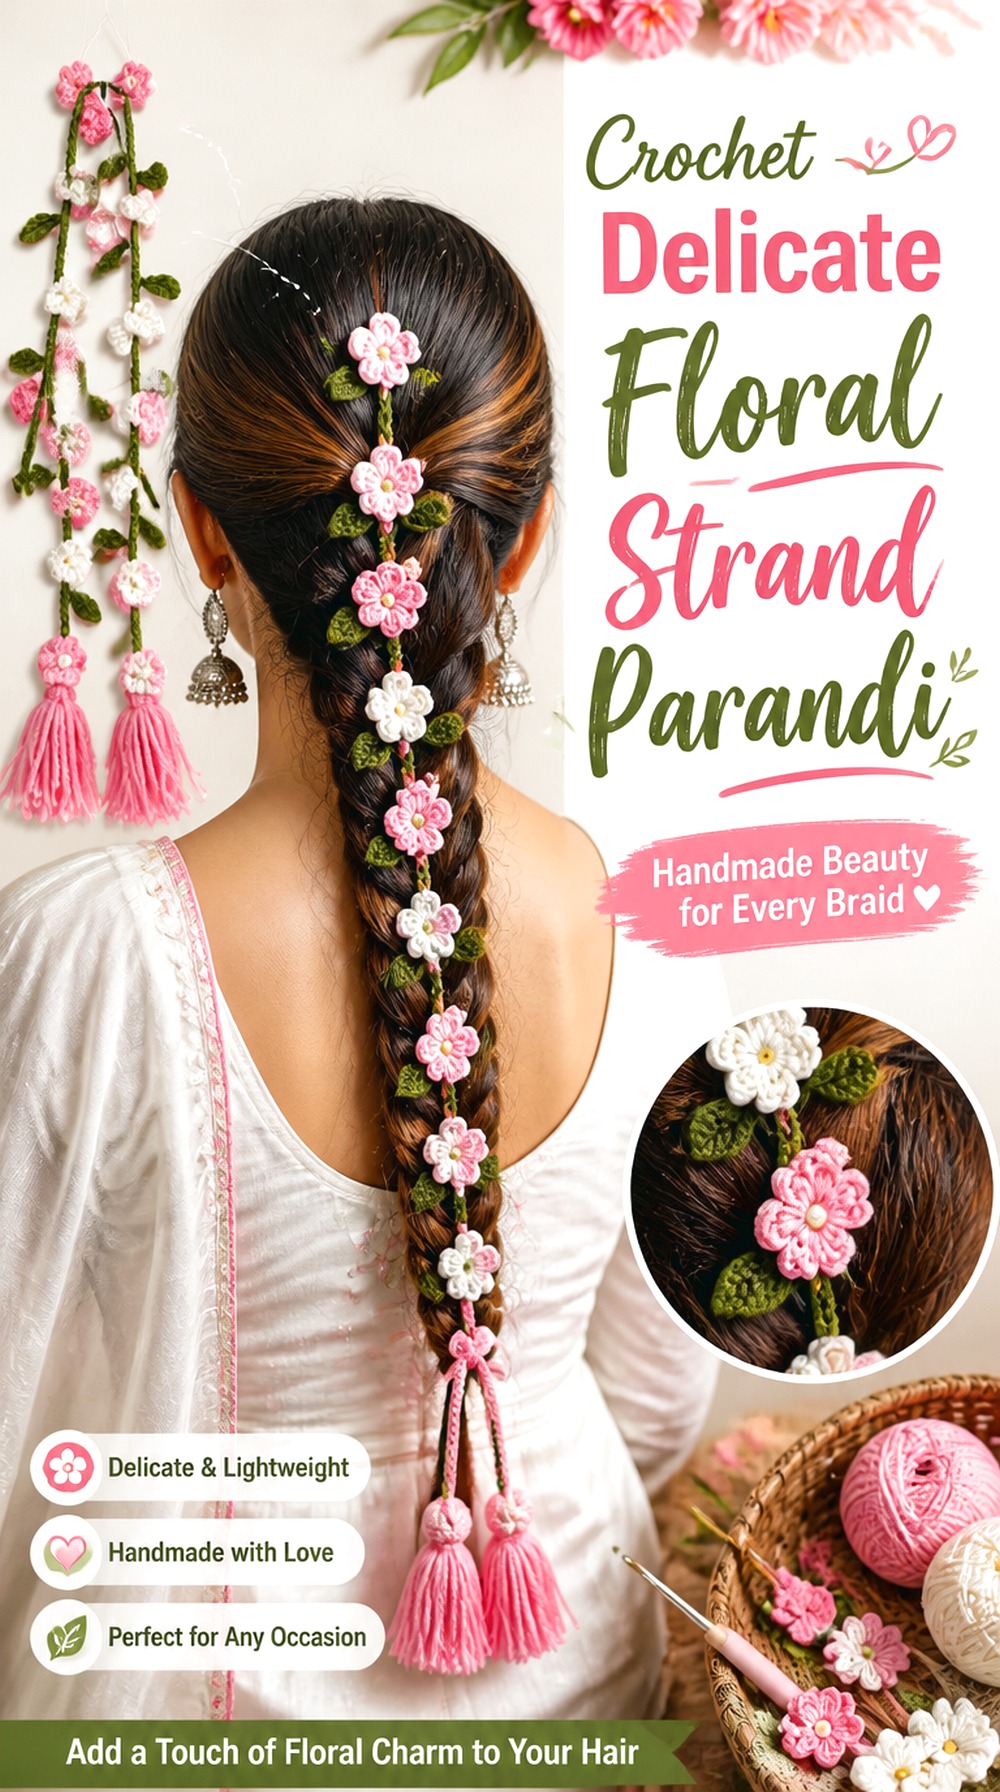
The ers creative art tutorial is a direct step-by-step crochet parandi video, making it useful for a lighter floral strand interpretation rather than an adaptation from another type of hair accessory.
For this idea, keep the decorative language delicate: smaller floral accents, visible connecting strands, and a controlled lower finish. The aim is not to compete with the statement pranda directly above it. Instead, this version works when you want flowers to punctuate the vertical line while preserving plenty of movement and open space between decorative areas.
Smaller Motifs Still Need Intentional Placement
Petite flowers can disappear into a braid if they sit exactly where the crochet becomes buried in the hair. Test the strand against the hairstyle and reserve the clearest motifs for exposed sections. If the flowers are small enough to be overlooked individually, a short deliberate grouping may create more impact than spacing all of them at equal intervals.
Preserve Enough Cord to Keep the Design Light
The open strand is part of the finished appearance, not unfinished space that must be filled. Compare the parandi from several feet away. If the floral elements still read clearly, adding more may only increase bulk. This is especially relevant when coordinating the accessory with a detailed outfit where a lighter hair decoration can provide contrast.
Finish Yarn Tails Where They Cannot Distract From the Fine Scale
Loose ends are more conspicuous on a sparse design because fewer motifs exist to hide them. Inspect the front and back of every flower connection and the transitions into lower strands. Clean finishing helps the delicate style look intentional when the parandi moves and different sides become visible.
Original Tutorial and Creator Credit
Creator: ers creative art
Crochet Bead Optional Lacha Dori Parandi

Zam Crochet’s public tutorial is specifically for a crochet parandi/lacha dori and lists beads or tassels as optional additions. That makes this final idea useful when you want a base design that can stay relatively plain or move toward a more embellished finish after the primary strands are complete.
The ability to decide on the decorative intensity later is the key difference. Make the braid accessory first, assess its length and movement, and then determine whether beads, tassels, or both actually improve the finished look. This staged decision reduces the chance of overdecorating before you know how the base behaves.
Evaluate the Plain Structure Before Choosing Extras
Once the main crochet work is complete, place it with the intended braid and outfit without any optional embellishments. A strong color combination or clean tassel silhouette may already supply enough interest. If the accessory needs another focal point, add one type of detail first instead of immediately combining every available option.
Place Beads Where They Will Not Interrupt the Attachment
Hard embellishments near the top can make the braid connection more awkward and may disappear inside the hair anyway. Keep the functional upper section easier to handle, then test beads farther down where they remain visible. Temporary positioning lets you compare the effect without committing to a crowded layout.
Decide Between Even and Staggered Ends Deliberately
A simple multi-strand parandi makes the relationship between the lower ends very noticeable. Hold all tails together and compare an even finish with a slightly staggered arrangement before adding tassels. Either can work, but accidental differences tend to look less polished than an obviously intentional pattern.
How the 16 Crochet Parandi Styles Compare
| If you want… | Start with… | Main planning priority |
|---|---|---|
| A cleaner traditional strand look | Flowing or Slim Laccha-Dori Parandi | Even tension and braid attachment |
| One recognizable flower theme | Lotus-Focal Braid Parandi | Motif scale and spacing |
| A rich botanical design | Leafy Flower-and-Tassel or Mixed Garden Flower Parandi | Visual hierarchy between flowers |
| Reflective accents | Pearl-Centered or Wedding Flower Parandi | Secure attachment and snag checks |
| Strong lower movement | Longline Punjabi Tassel or Ghungroo-Accent Parandi | Weight distribution and ending position |
| Less separate motif sewing | No-Sew Vine-and-Tassel Parandi | Tension and motif orientation during construction |
| A lighter floral result | Adjustable Floral Strand or Delicate Floral Strand Parandi | Open spacing and strand flexibility |
| Maximum customization | Statement Floral or Bead-Optional Lacha-Dori Parandi | Choosing one main focal feature |
Conclusion
The strongest crochet parandi choice depends on what you want to notice first in the finished hairstyle. Choose a laccha-dori or long Punjabi tassel style when flowing strands should dominate, a lotus design when one recognizable motif matters, or a mixed-flower version for a more botanical braid. Pearl and ghungroo accents create a dressier effect but introduce extra weight and attachment points, while no-sew and lighter floral strands offer different construction and visual trade-offs.
Whatever style you choose, test the attachment, vertical drop, motif orientation, and lower weight with the intended braid before final finishing. Then use the credited original tutorials for each creator’s exact construction details.
Frequently Asked Questions
How long should a crochet parandi be?
There is no universal finished length. The correct drop depends on where the accessory enters the braid, how long the finished braid is, the size of the tassels or flowers, and whether you want the parandi to stop near the natural hair or continue below it. Mock up the hairstyle first and measure from the actual attachment point rather than copying another maker’s final measurement.
Can I make a crochet parandi for shorter hair?
Potentially, but attachment becomes especially important when there is less natural braid available. Check how the selected tutorial integrates the parandi with the hair and whether its upper section can be secured comfortably at the intended point. Merely shortening the decorative strands does not necessarily solve an unstable attachment, particularly when the lower design includes heavy flowers, tassels, pearls, or metallic embellishments.
What yarn is suitable for a crochet parandi?
Start with the yarn specified by the tutorial when that information is available. For substitutions, judge the finished behavior rather than color alone. Make one flower, leaf, or representative strand and assess its flexibility, stitch definition, surface texture, scale, and vertical stretch. A yarn that produces crisp decorative motifs may create firmer cords, while a softer yarn can change both drape and motif definition.
Should I make the flowers before deciding their spacing?
Making at least one representative motif first is useful because its actual size may differ from what you expected. For designs using several repeated flowers, completing a group before final assembly also lets you compare scale and arrange the color order. Lay the motifs along the proposed strands, then hang the layout vertically so gravity can reveal overlaps that were not obvious on a flat table.
How can I keep a crochet parandi from looking too bulky?
Choose one feature to dominate rather than giving every section equal visual weight. For example, let the flowers lead and use smaller leaves, or keep the long strands simple and concentrate decoration near the tassels. Open intervals are useful design space. Also sample the intended yarn because changing fiber or thickness can increase the scale of every repeated motif and make a previously balanced layout feel crowded.
Are pearls, beads, or ghungroos suitable for every crochet parandi?
No. They can add shine, movement, or sound, but they also increase the number of hard components and attachment points. Position them temporarily and assess the accessory while hanging and moving. Check for obvious snag points and secure every embellishment appropriately. For a wearer for whom small detachable components are unsuitable, choose yarn-only centers and decorative crochet details instead.
How should I store a long crochet parandi?
Straighten the strands before storage and avoid crushing dimensional flowers beneath heavy objects. A long piece can be stored flat or loosely supported so the cords do not form tight bends. Keep tassels separated rather than knotting the entire accessory together. If cleaning is needed, follow the care guidance for the actual yarn and embellishments used instead of assuming that every crochet parandi tolerates the same washing method.