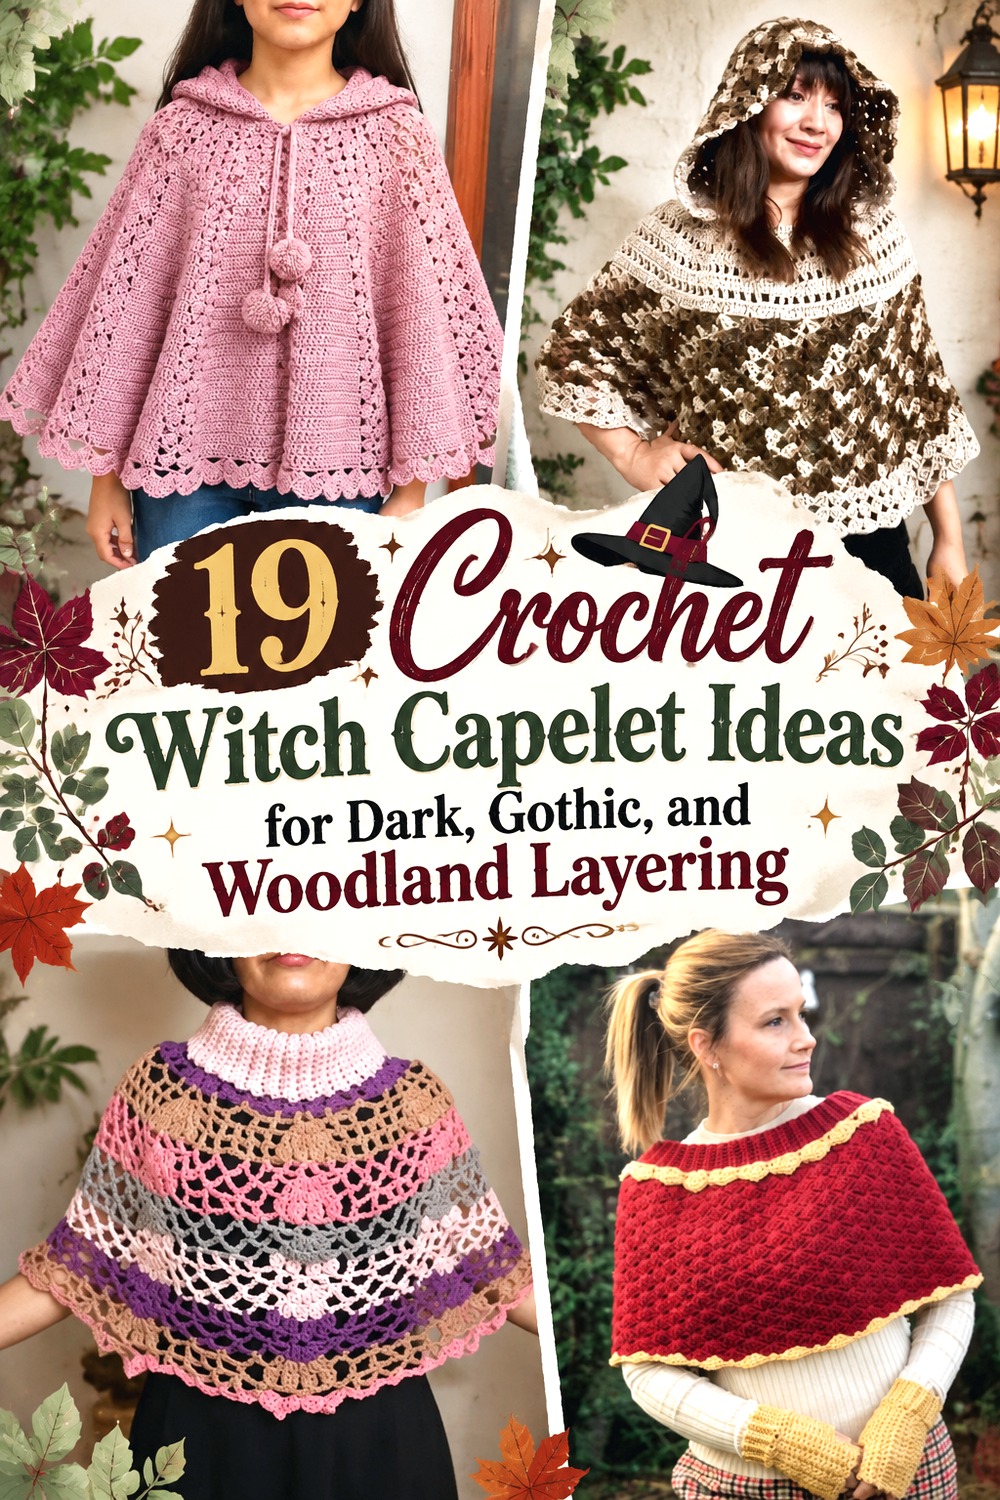

A crochet witch capelet can be much more than a black shoulder covering for Halloween. Depending on the construction, it can look like a compact Victorian mantle, a mossy woodland hood, a gothic mesh layer, a textured winter cape, or a relaxed bohemian wrap. Those differences also change how the garment fits, drapes, fastens, and works with the clothes underneath.
The 19 ideas below focus on genuinely different shapes and surfaces rather than color variations of the same cape. Some original tutorials are specifically capelets, while others demonstrate capes, poncho-capes, or shawls that offer a useful construction direction for witch-inspired styling. Use the credited creator tutorials for the exact construction, sizing, stitch counts, and assembly while using this guide to compare silhouettes and plan the version that fits your wardrobe.
Quick List
- Crochet Spiderweb Crescent Witch Capelet
- Crochet Moss-Hood Forest Witch Capelet
- Crochet Edwardian Ribbon-Tie Witch Capelet
- Crochet Antique Mantle Witch Capelet
- Crochet Braided-Cable Drawstring Witch Capelet
- Crochet Filet Fringe Gothic Witch Capelet
- Crochet Granny-Fringe Boho Witch Capelet
- Crochet Short-Row Highland Witch Capelet
- Crochet Cable-Yoke Winter Witch Capelet
- Crochet Box-and-Bow Openwork Witch Capelet
- Crochet Shell-Scallop Twilight Witch Capelet
- Crochet Draped Shell-Neck Witch Capelet
- Crochet Relaxed Shawl-Poncho Witch Capelet
- Crochet Fairytale Lace-Hood Witch Capelet
- Crochet Full-Hood Short Cloak Witch Capelet
- Crochet Top-Down Hooded Witch Poncho Capelet
- Crochet Minimal Shoulder Witch Capelet
- Crochet Lightweight Poncho-Shawl Witch Capelet
- Crochet Textured Fall Cowl Witch Capelet
Choose the Capelet Silhouette Before the Witchy Details
A hood, neckline, and hem shape usually influence the finished mood more than added moons, charms, or appliqués. A deep hood creates an immediate woodland or storybook silhouette. A short tie-front mantle feels more historical, while open filet or spiderweb fabric reads as gothic because the underlayer becomes visible through the crochet.
Think about everyday use too. Very short capelets preserve the waistline and work well over dresses, but they provide less upper-arm coverage. Poncho-like options offer more fabric and movement, though they no longer have the same compact Victorian proportion. If you want a piece that can move from October styling into ordinary fall outfits, choose one strong feature—hood, cables, lace, antique edging, or fringe—and keep the remaining details quieter.
Drape, Weight, and the Neckline Need to Work Together
Capelets hang from a relatively small area around the shoulders and neck, so yarn behavior matters. A dense cable cape made in a heavier yarn can feel substantially different from an airy filet cape made with a light yarn. Changing yarn weight without considering the construction can alter both size and how much the garment pulls downward.
Pay particular attention when a design includes a hood. The hood adds fabric behind the neckline and can shift the garment backward if your substitution becomes much heavier than the source version. Openwork has the opposite issue: it gives dramatic visual coverage but relatively little protection from wind. Swatch for more than stitch appearance. Hold the fabric vertically and notice whether it falls softly, stretches, stays rigid, or hides the texture you chose the project for.
Adapt General Cape Tutorials Without Guessing at Fit
Not every source below was designed specifically as “witch clothing,” and that is useful rather than limiting. A well-shaped neutral capelet gives you a stronger foundation than forcing themed decorations onto a construction that does not fit properly.
Keep structural changes conservative. Color, removable brooches, restrained fringe, contrasting edging, and styling are easier adaptations than changing a neckline or attaching an unrelated hood. If you want to shorten a larger cape, first determine where the tutorial establishes its shoulder shaping and repeat structure. Simply stopping early may leave a hem at an awkward point in the stitch pattern. When the source provides multiple sizes or adjustment guidance, use that information instead of assuming that adding or removing rows will preserve every proportion.
Crochet Spiderweb Crescent Witch Capelet
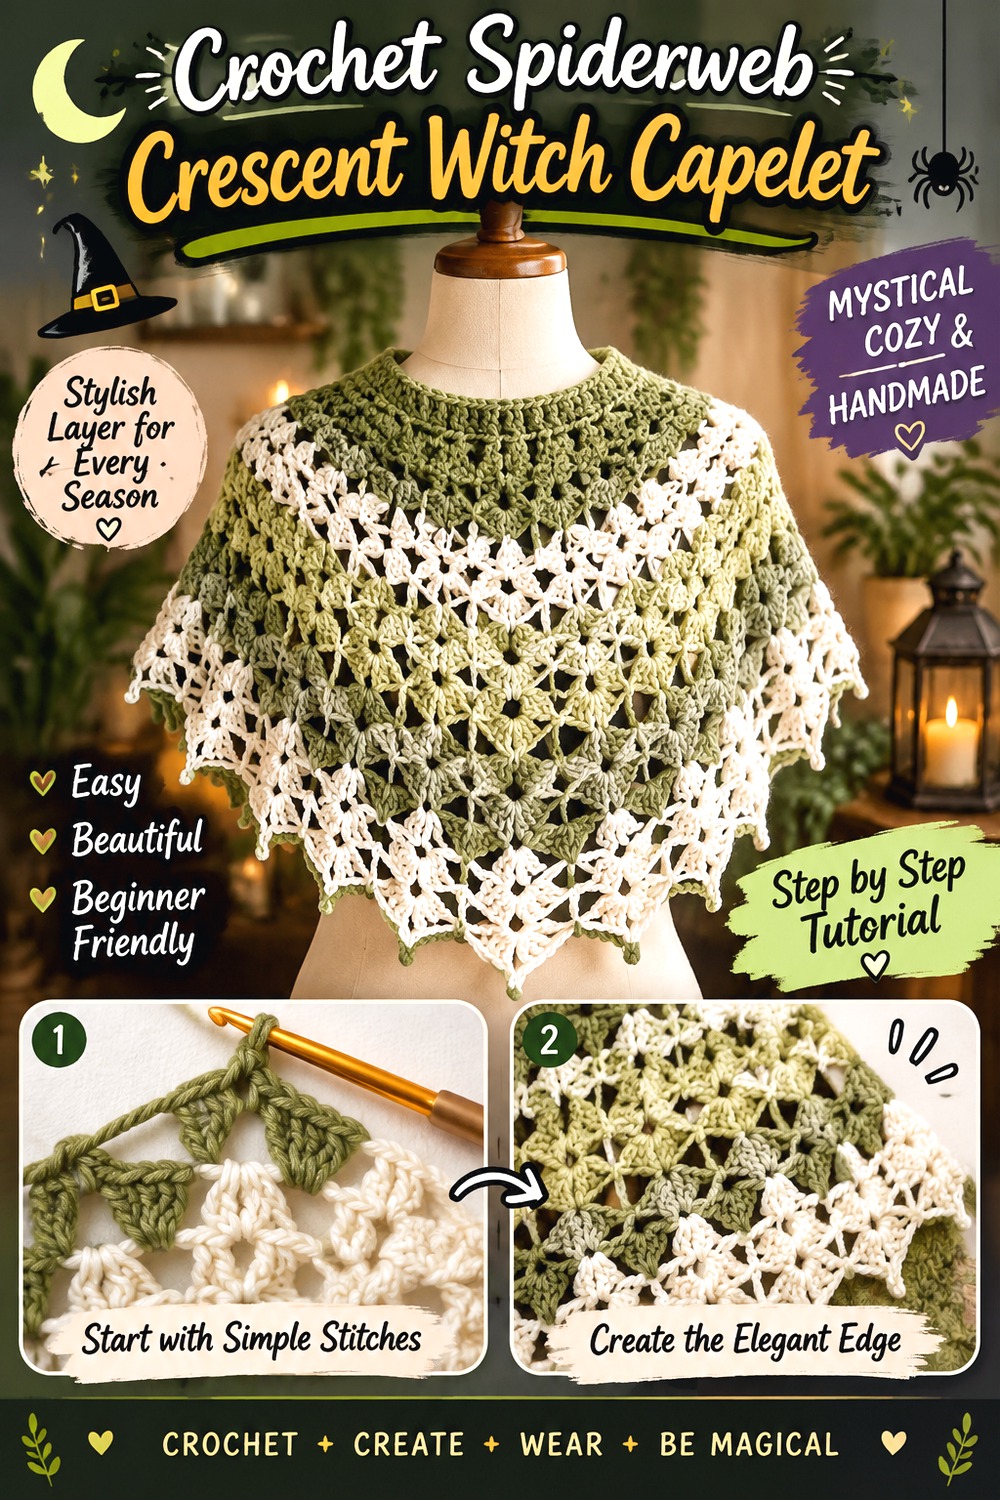
For the most unmistakably witchy openwork option, use a spiderweb shawl construction as a dramatic shoulder layer. Fiber Spider’s tutorial produces a web-shaped crochet shawl with radiating open spaces, giving the finished piece a strong Halloween and gothic identity without needing surface appliqués. It is technically a shawl rather than a purpose-built fitted capelet, so this idea suits readers who are comfortable wearing or arranging a shawl around the shoulders rather than expecting a structured neckline.
Black emphasizes the web, but smoky gray, bone, oxblood, dark violet, or deep green can make the geometry easier to see. The underlayer will remain an important part of the final look.
Contrast Determines How Clearly the Web Reads
Open spiderweb crochet can disappear against clothing that is too similar in value. Before committing to an outfit, place part of the finished fabric over several tops or dresses. Pale fabric beneath black crochet makes every opening obvious, while black over charcoal creates a quieter texture.
That choice lets the same cape shift between theatrical Halloween styling and subtler gothic layering without changing the crochet itself.
Keep Any Shoulder Fastening Lightweight
Because this source is a shawl construction, do not assume it can support a heavy cloak clasp at the throat. Open chain spaces can distort when concentrated weight is placed in one area.
If you want the piece to stay arranged like a capelet, first evaluate how it sits naturally. A light removable pin used through an appropriate denser section may be more suitable than adding permanent heavy hardware.
Original Tutorial and Creator Credit
Creator: Fiber Spider
Crochet Moss Hood Forest Witch Capelet
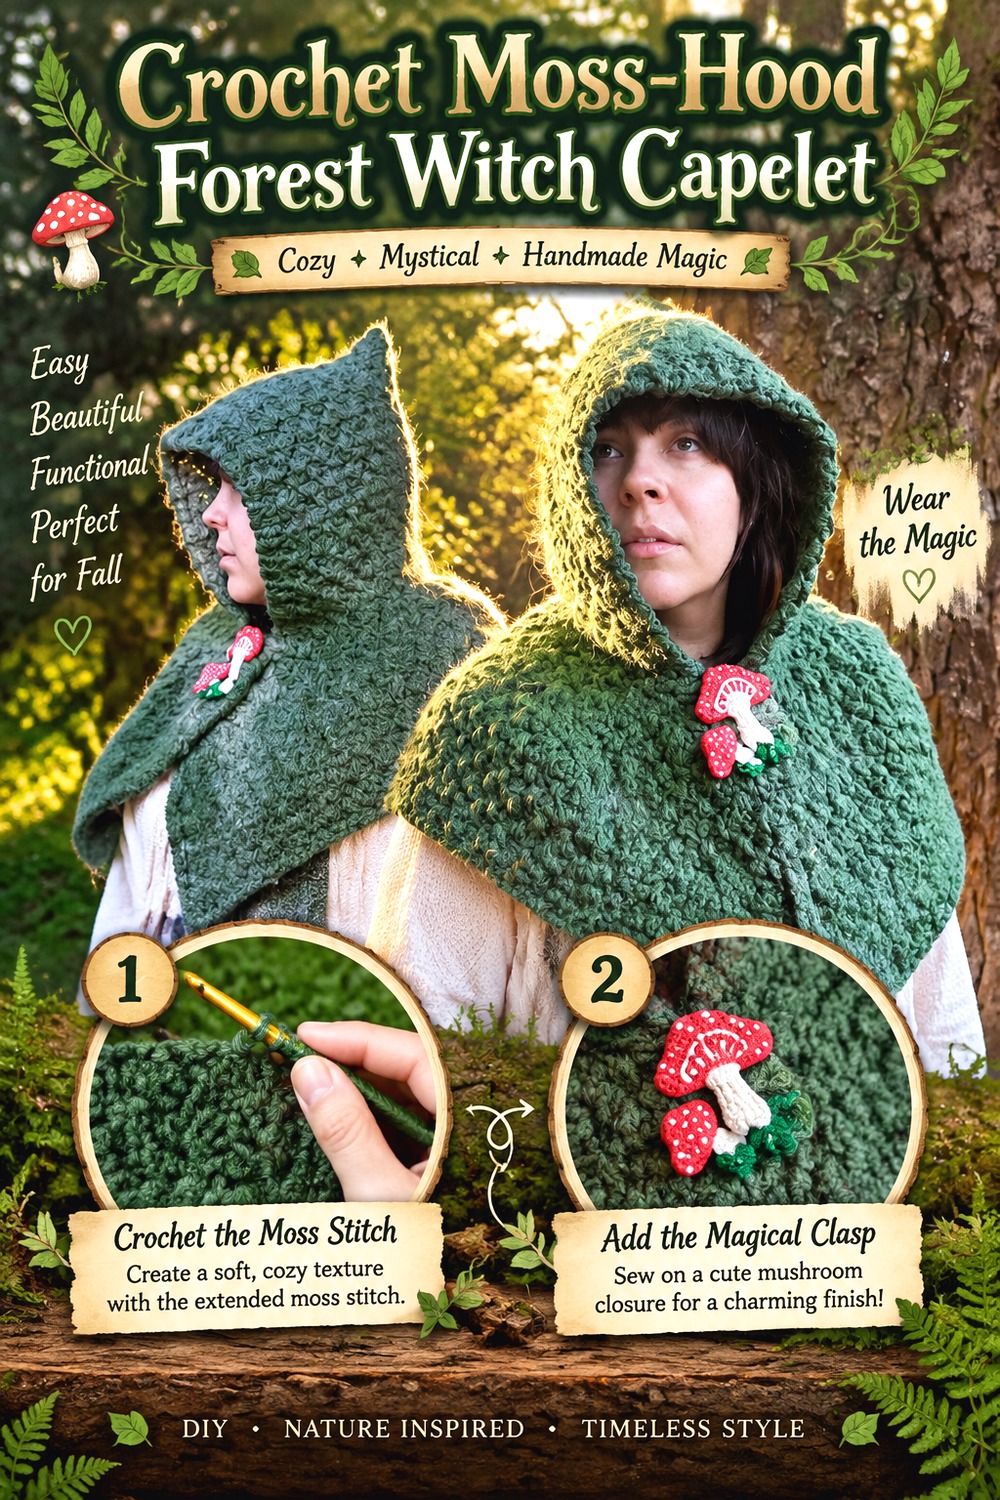
This compact hooded capelet already has the visual ingredients of a woodland-witch garment: a substantial hood, short shoulder coverage, and textured crochet rather than decorative motifs. Lizfaerie Crafts demonstrates the capelet using extended moss stitch, giving the surface a softly broken texture that suits forest-inspired colors particularly well.
Because the body remains relatively short, the hood becomes the main statement. That makes this a practical choice when you want obvious fantasy character without covering an entire dress, skirt, or layered outfit. Moss, peat, bark, charcoal, lichen, or blackened olive can reinforce the woodland direction while keeping the texture visible.
Judge the Hood in Both Positions
A hood should be considered both raised and lowered. When it is down, all of that fabric sits behind the neckline and can change the back view of a short capelet.
Watch the finished views in the tutorial and consider your usual hairstyle and underlayers. A hood worn over loose hair may behave differently from one resting over a bun, high collar, or scarf.
Let Small-Scale Texture Replace Extra Decoration
Extended moss texture already gives the garment visual depth. Heavily variegated yarn, several appliqués, fringe, and a large clasp can compete for attention instead of making it look more witchy.
A solid or lightly heathered dark shade allows shadow to form between the stitches. If you substitute yarn, compare the drape of your swatch with the creator’s finished fabric before committing to the whole capelet.
Choose a Closure That the Fabric Can Support
A decorative brooch can suit a forest-witch look, but hardware weight still matters. Test any optional closure before relying on it.
If a pin pulls the surrounding stitches downward or opens the fabric noticeably, move it to a denser area or choose a lighter fastening concept. The neckline should stay comfortable rather than becoming the anchor point for an oversized accessory.
Original Tutorial and Creator Credit
Creator: Lizfaerie Crafts
Crochet Edwardian Ribbon Tie Witch Capelet
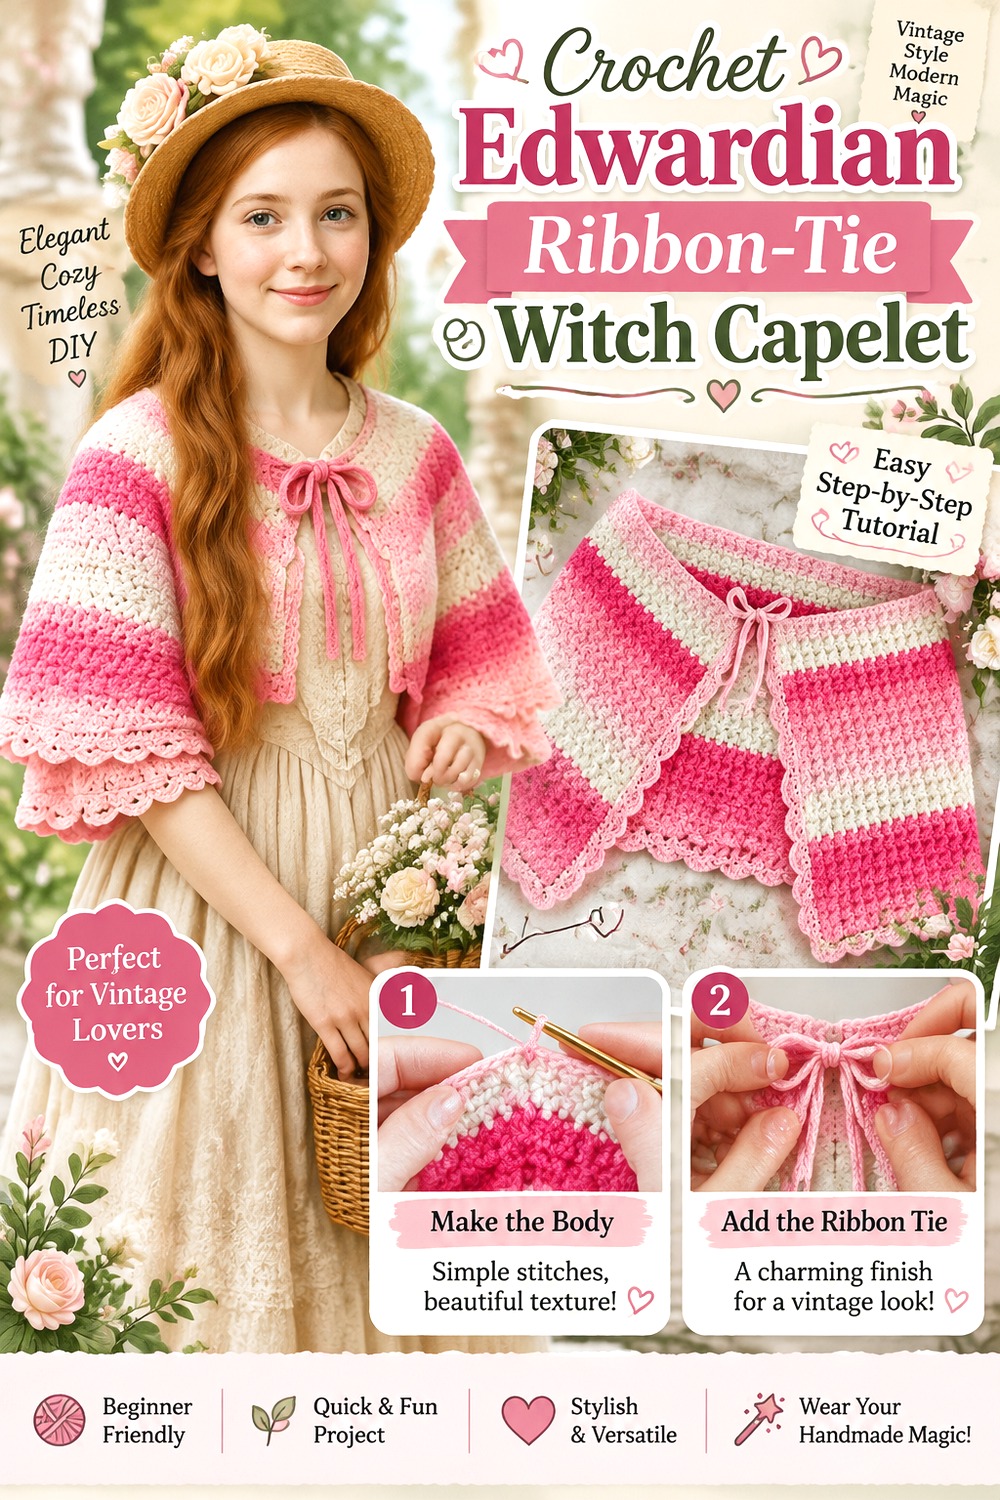
A short Edwardian-inspired capelet creates a quieter witch look built around period proportion rather than fantasy symbols. Selina Veronique Crochet’s tutorial pairs a compact rectangular form with a decorative lower edge and neckline ties, producing a garment that can sit naturally with dark-academic, romantic, or historical styling.
This is a good alternative to an oversized hood when you want the blouse, dress neckline, or jewelry underneath to remain visible. Deep plum, soot gray, faded berry, black tea brown, bottle green, or soft black can shift the feminine original toward a darker wardrobe without losing its vintage character.
Neck Ties Keep the Front Visually Light
Ties give the capelet a softer front than a large metal clasp. That can work particularly well with antique-inspired clothing, where the fastening becomes part of the historical line without dominating the garment.
Before adding a necklace, neck bow, or elaborate blouse collar, check how much visual detail is already gathered near the throat. One focal element often reads more clearly than three competing ones.
The Decorative Hem Needs Room to Fall
On a short capelet, the lower border occupies a large percentage of the entire garment. A decorative edge that becomes too stiff can therefore change the silhouette noticeably.
If you substitute yarn, make a small sample of the edging as well as the main fabric. You want the border to hang around the shoulders rather than flare outward like a rigid shelf.
Original Tutorial and Creator Credit
Creator: Selina Veronique Crochet
Crochet Antique Mantle Witch Capelet
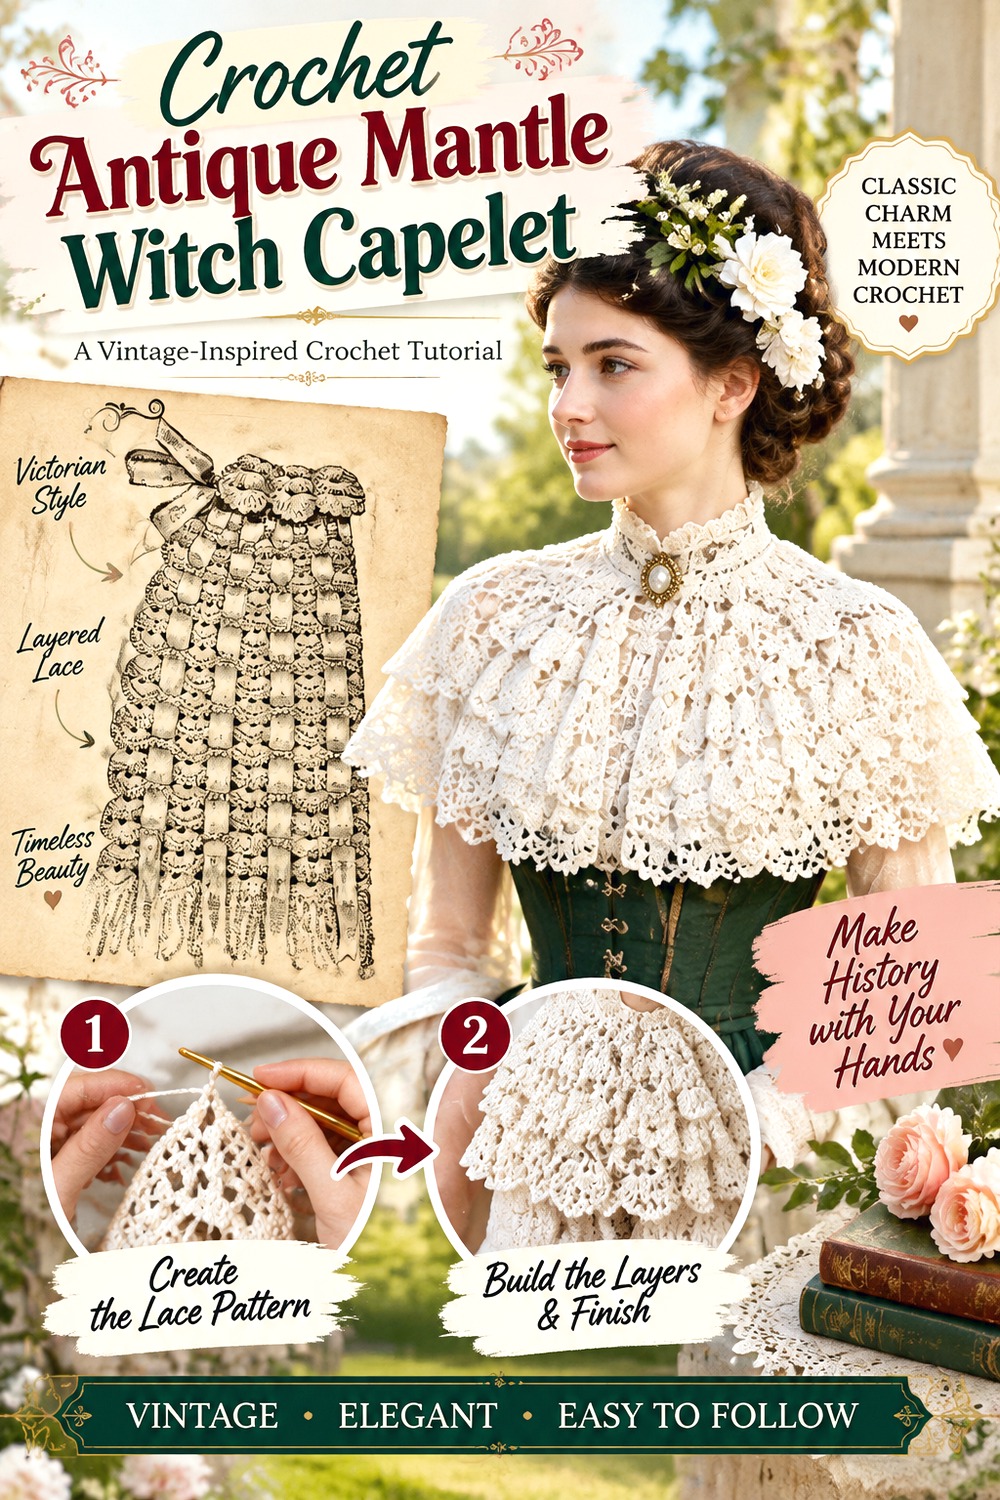
For a witch capelet that looks genuinely historical rather than simply “vintage-inspired,” this 1891 construction provides a different starting point. Just Vintage Crochet works from an antique capelet design, so the proportions and detailing come from a period source rather than a modern poncho shortened at the hem.
That makes the finished shape appealing for Victorian witch, dark-academic, folk-magic, historical costume, or theatrical wardrobe styling. Mourning black is an obvious direction, but antique cream, wine, faded mulberry, soot, or deep green can also highlight the old-fashioned form without relying on Halloween motifs.
Expect Period Proportions, Not Modern Poncho Coverage
Historical shoulder garments may sit closer, shorter, or differently around the arms than current loose wraps. Examine the creator’s finished presentation before choosing this project for warmth or practical outdoor wear.
If what you really need is generous arm coverage, one of the later poncho-cape options may be a better fit even if this silhouette is visually more dramatic.
Symmetry Matters More on an Ornate Mantle
Decorative vintage construction tends to make uneven finishing noticeable. Before adding optional styling details, lay the completed piece flat and compare the two front edges, neckline, and hem.
Small differences that disappear in a rustic cape can stand out on a formal historical mantle because the eye expects the decorative structure to remain balanced.
Keep the Outfit Underneath Relatively Quiet
A period capelet can already carry a lot of visual information. Pairing it with a simpler high-neck dress, blouse, fitted top, or long skirt allows the shoulder garment to remain the focal point.
If every layer includes lace, charms, trim, pattern, and jewelry, the historical silhouette can become difficult to see.
Original Tutorial and Creator Credit
Creator: Just Vintage Crochet
Crochet Braided Cable Drawstring Witch Capelet
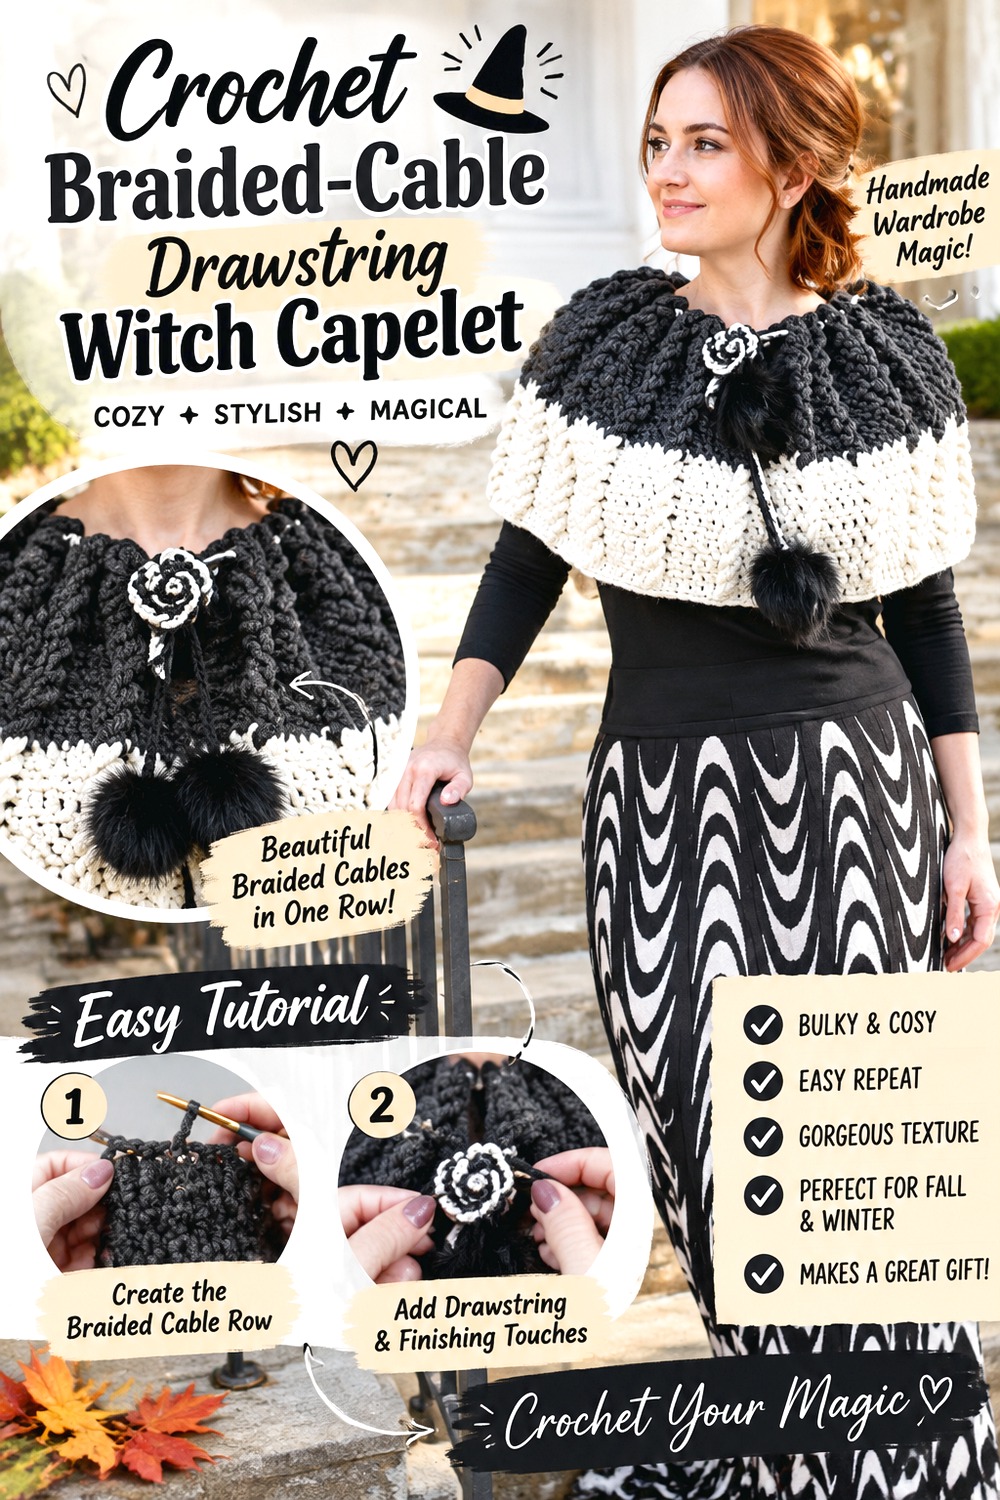
Nana’s Crafty Home uses thick braided cable texture and a gathered drawstring neckline to create a substantially different capelet from the lace and historical options above. The cable columns give the fabric enough depth that a dark solid shade can remain visually interesting without extra motifs.
In charcoal, blackened teal, deep burgundy, espresso, or dark forest green, the cape can move easily into winter-witch styling. The drawstring also creates a more casual and adjustable-looking neckline than a fixed vintage button or brooch, making this project useful when you want strong texture rather than delicate edging.
Bulky Cables Put More Visual Weight on the Shoulders
Large raised texture naturally makes the upper body appear more substantial. That can be exactly what you want for a dramatic winter outfit, but it is different from the light appearance of filet or spiderweb crochet.
Balance the capelet with relatively simple sleeves and bodice layers underneath so the cable surface remains clear instead of fighting with another highly textured garment.
Test the Drawstring Before Adding Heavy Ends
A drawstring gives you flexibility at the neckline, but any beads, tassels, or pom-pom alternatives add weight to its ends. Pull the closure into the position you expect to wear it and see where those ends fall.
If they swing against the chest or pull the opening too tightly, a simpler finish may work better for regular wear.
Stitch Definition Is the Main Feature Here
The braided effect depends on raised stitches being readable. Very fuzzy yarn or high-contrast variegation can soften the cable edges until the most distinctive feature becomes difficult to see.
For a dark version, compare a near-black swatch in daylight with a slightly lighter charcoal or heather. The latter may reveal substantially more texture.
Original Tutorial and Creator Credit
Creator: Nana’s Crafty Home | Tonya Bush
Crochet Filet Fringe Gothic Witch Capelet
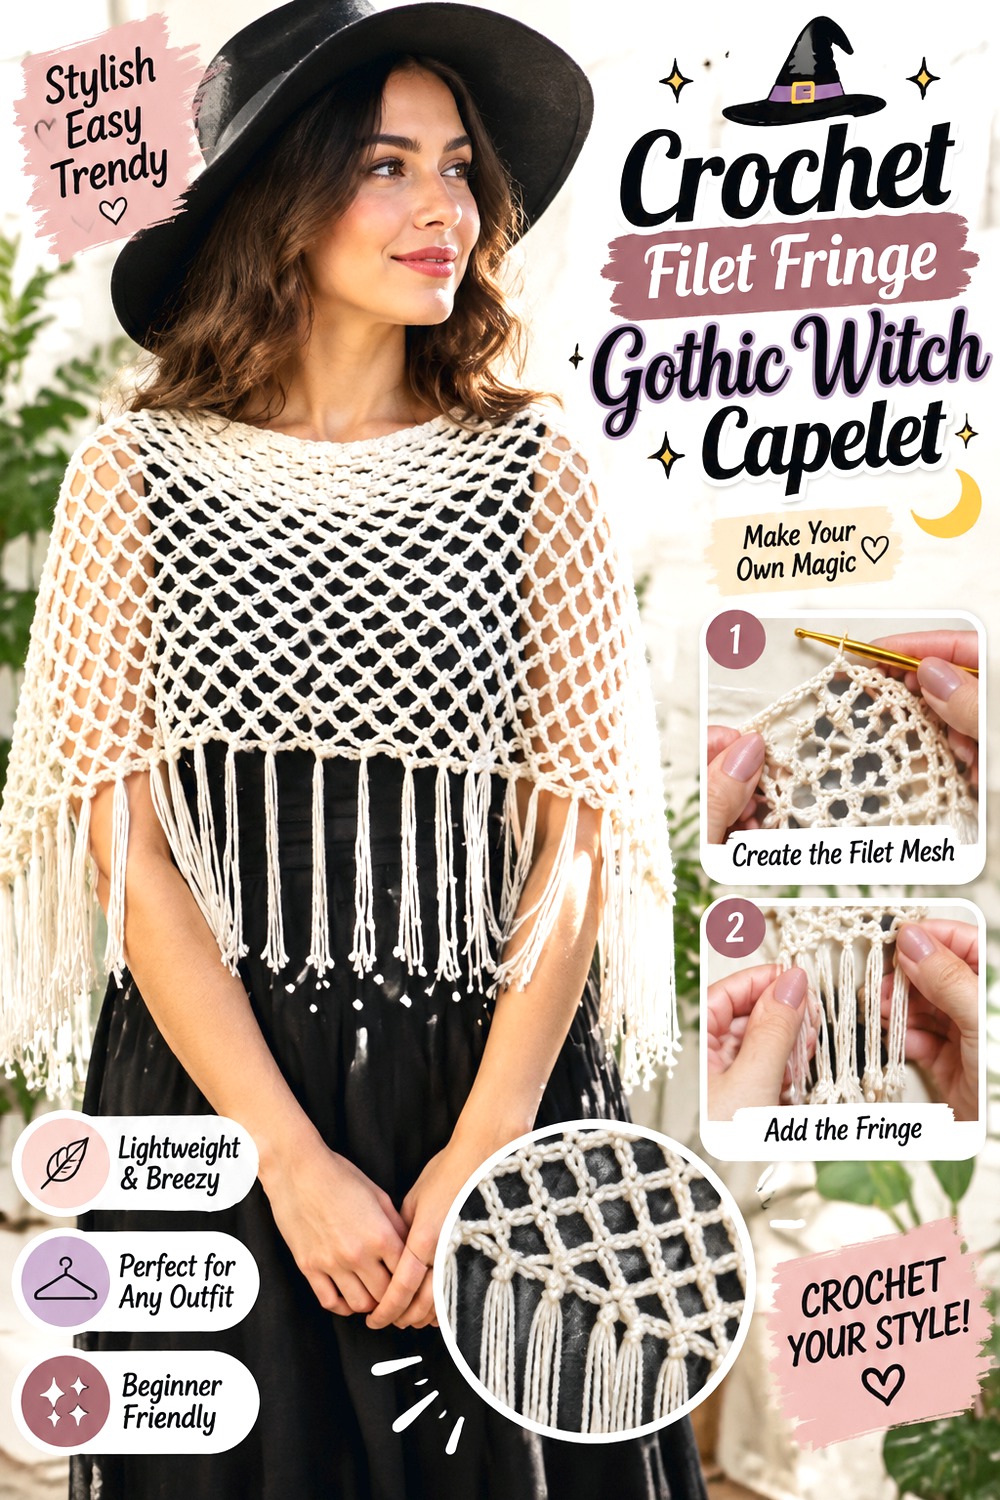
This filet-style capelet from Crazy Cool Crochet creates an airy mesh layer rather than a warm outer garment. The open fabric lets the clothing beneath show clearly, and the source design includes a fringe finish that adds extra movement around the lower edge.
For gothic styling, that transparency is an advantage. Black mesh over burgundy, bone, dark floral fabric, plum, or moss produces a layered effect that opaque crochet cannot. This option also suits transitional weather or indoor event wear when a heavy hooded cape would feel excessive.
The Underlayer Functions Like a Second Color
Because so much of the garment is open, the top or dress beneath it changes the entire appearance. Test the crochet against both high-contrast and tonal clothing before deciding which direction you prefer.
A pale layer makes every filet opening sharp and graphic. Black over charcoal creates a much subtler surface that may be easier to blend into everyday gothic clothing.
Fringe Extends the Silhouette Without More Fabric
Fringe can make a relatively short capelet appear longer while preserving the lightweight mesh body. That creates movement without adding another dense section of crochet.
For everyday use, consider where the fringe will land against handbag straps, belts, jewelry, or chair arms. A dramatic length may photograph beautifully but require more awareness during regular wear.
Lightweight Does Not Mean Warm
Mesh gives visual shoulder coverage, but large openings allow plenty of air through. Choose this version for appearance, layering, and movement rather than expecting it to replace a dense fall cape.
If warmth is important, compare it with the moss, cable, or cowl-neck options before deciding solely from the silhouette.
Original Tutorial and Creator Credit
Creator: Crazy Cool Crochet
Crochet Granny Fringe Boho Witch Capelet
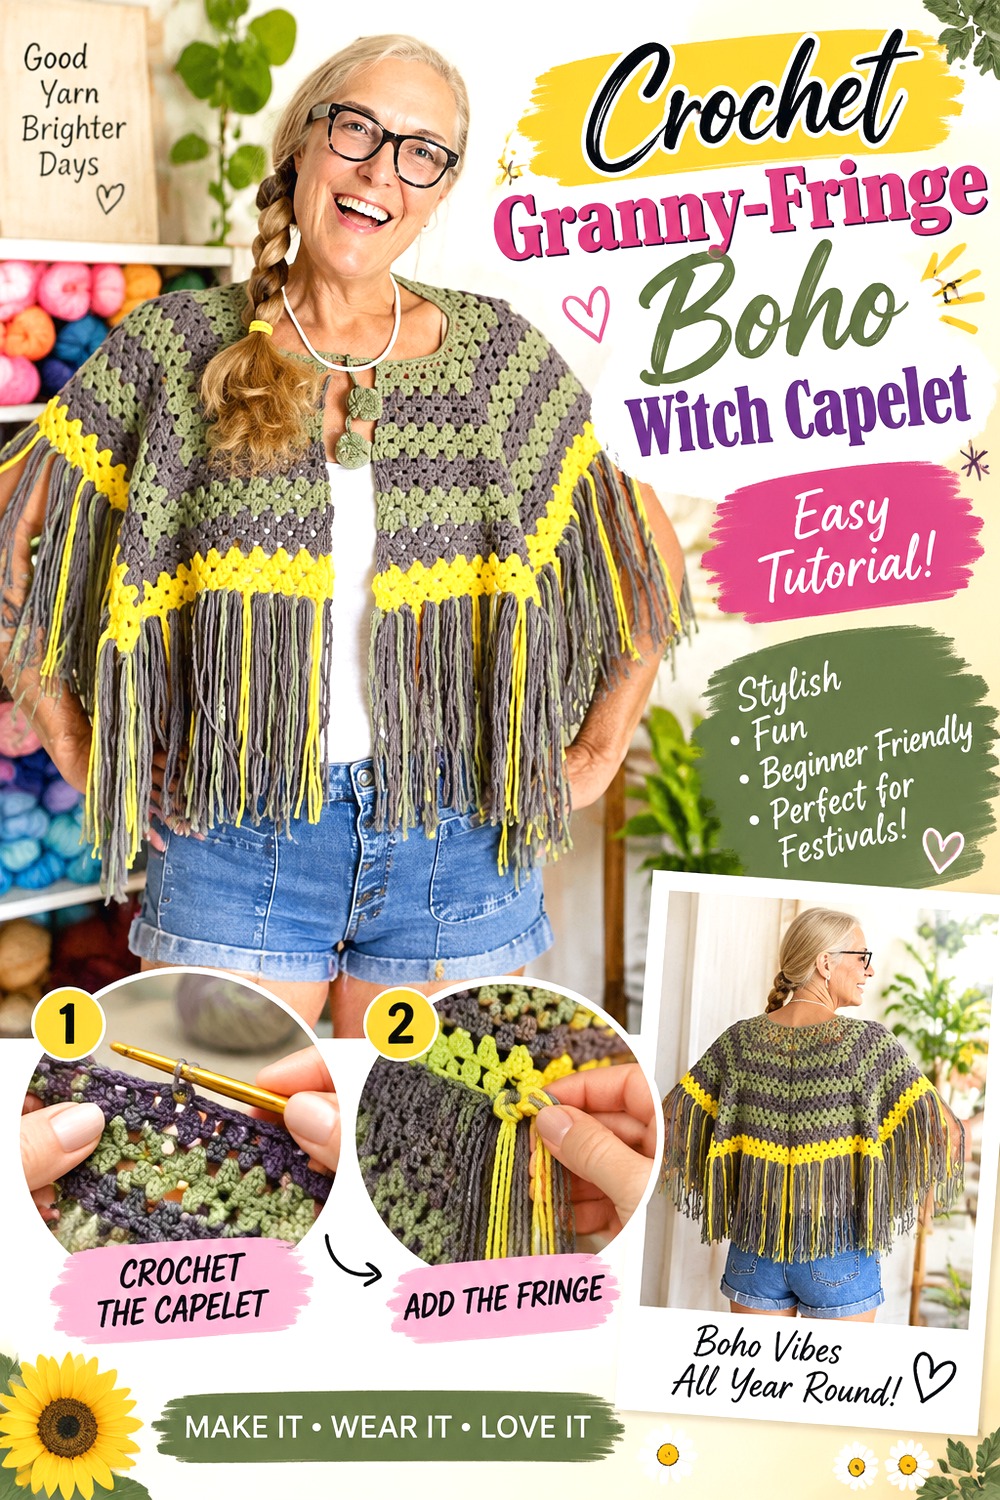
Whirledpeas00 Knits uses recognizable granny-style crochet with long fringe, giving this capelet a relaxed festival and bohemian shape rather than a historical or structured one.
A witch version can lean toward harvest, hedge-witch, or folk styling through a controlled palette rather than changing the construction. Consider combinations such as moss and charcoal, dried berry and espresso, rust and black, or several smoky purples. The granny structure makes every color change visible, so this project rewards palette planning more than the solid-texture capelets do.
Plan the Palette Before the First Several Color Changes
Granny crochet can become visually busy quickly when every section introduces a new unrelated shade. Decide whether you want a gradient, repeated stripe sequence, or dominant dark base with occasional accent colors.
That small amount of planning can keep the capelet looking intentional rather than like a random collection of autumn leftovers.
Fringe Changes Both Movement and Apparent Length
Long fringe creates a much more dramatic outline when walking, even though the crocheted body remains cropped. Before cutting all of the strands, attach a few temporary samples and view them over the clothing you expect to wear.
You may find that a slightly shorter fringe keeps the witchy movement while avoiding interference with bags or jewelry.
Original Tutorial and Creator Credit
Creator: Whirledpeas00 Knits
Crochet Short Row Highland Witch Capelet
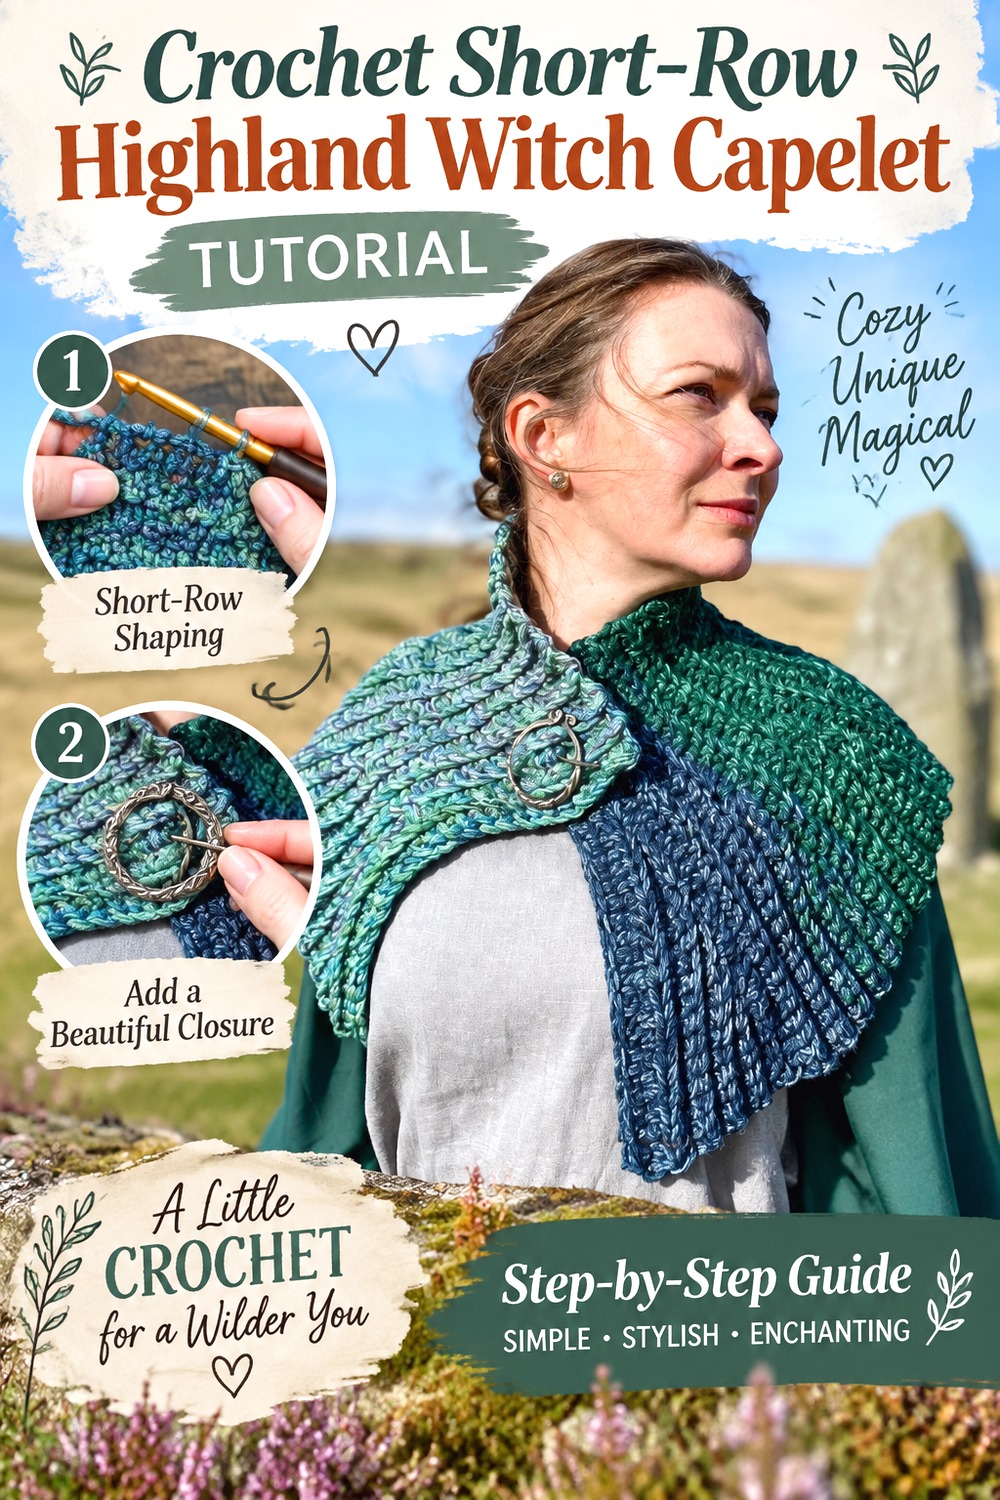
Ophelia Talks Crochet’s Brianna-inspired capelet brings a rustic historical-fantasy direction to the collection. The source tutorial uses short-row shaping and produces a compact shoulder garment associated with the Outlander-inspired look rather than a flat shawl simply wrapped around the body.
Heather gray, bracken brown, peat, dark rust, forest, or charcoal can move the finished shape toward a hedge-witch or Highland autumn wardrobe. Compared with the formal antique capelet, this style feels more outdoorsy and practical, especially when worn with boots, plain skirts, or simple knit layers.
Short Rows Deserve More Attention Than the Decorative Details
The shaping is what helps this capelet settle around the shoulders. If you are unfamiliar with short rows, focus on understanding where the fabric gains or loses depth before worrying about buttons or styling.
A beautifully chosen clasp cannot compensate for shaping that was accidentally skipped or altered.
Rustic Appearance Still Needs Neck Comfort
A tweedy or woolly-looking yarn may reinforce the Highland mood, but fiber feel matters when the edge sits close to the neck. Swatch and hold the material against bare skin if you expect the capelet to touch the throat.
A visually perfect rustic yarn is less useful if you only tolerate wearing it over a high collar.
Keep the Closure in Scale With the Capelet
A single visible button can carry plenty of character on a compact garment. Oversized hardware may pull the front downward or visually dominate the short body.
Choose the closure after seeing the completed neckline so its scale complements the actual capelet rather than the idea you had before crocheting it.
Original Tutorial and Creator Credit
Creator: Ophelia Talks Crochet
Crochet Cable Yoke Winter Witch Capelet
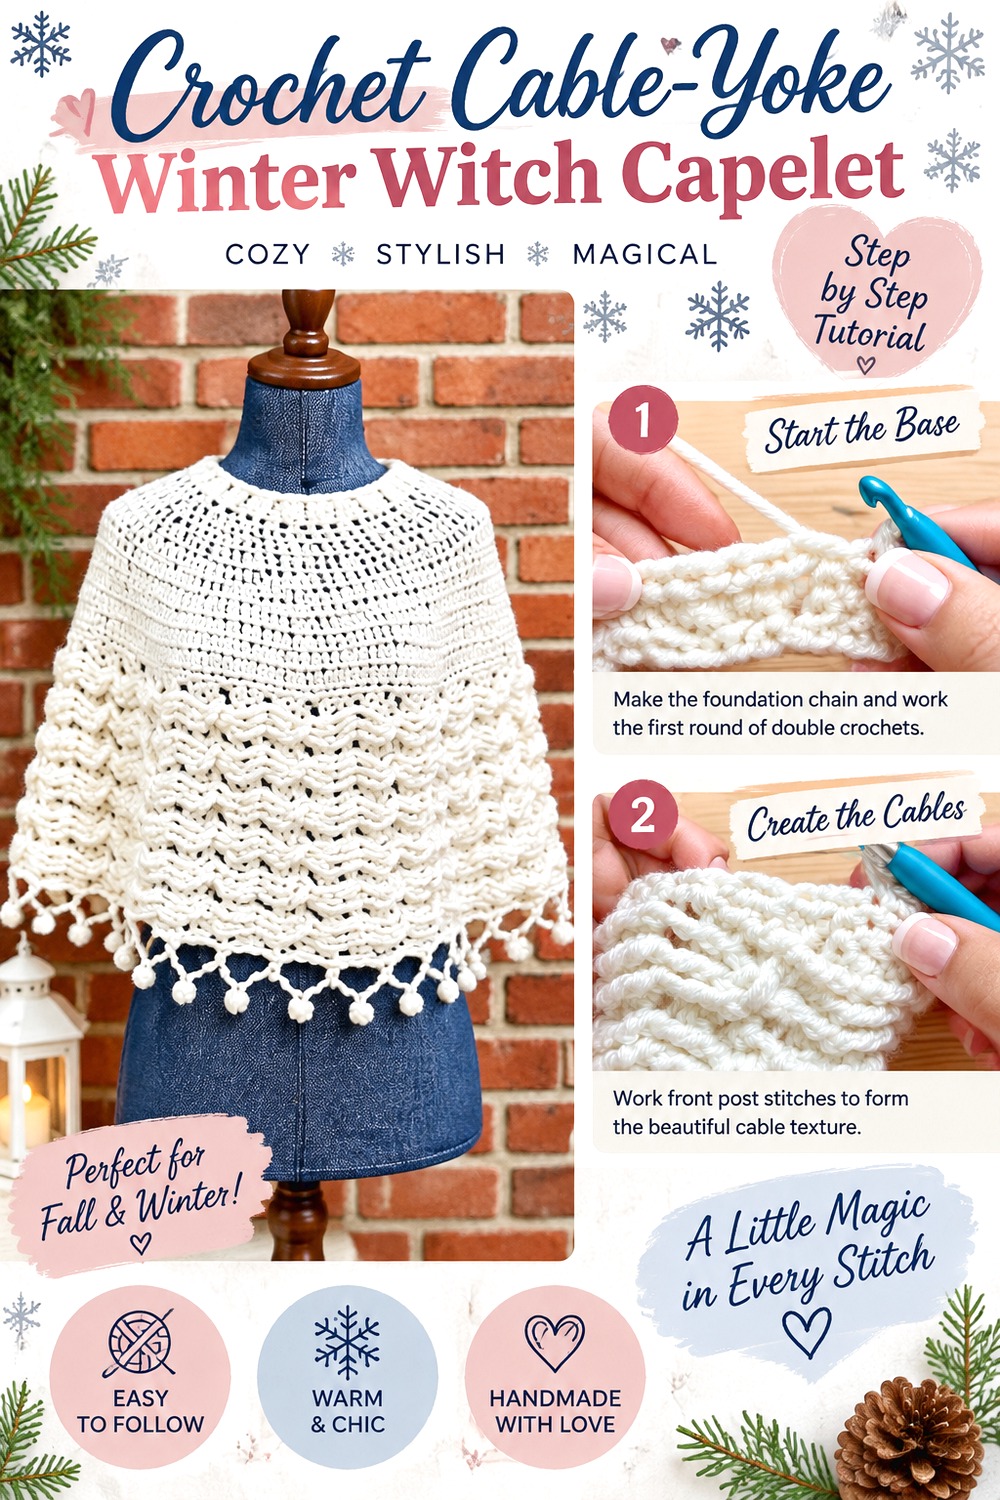
The Snowdrift design from Stitches n Scraps combines a prominent cable section with yoke shaping, creating a winter-weight capelet whose construction and surface look very different from the granny, filet, and vintage projects.
A witch-inspired version can trade the snowy mood for coal, iron, deep spruce, dark aubergine, or stormy blue. This is a strong choice when you want an elegant dark layer for colder weather but do not want a hood. The cable work supplies enough detail to make a one-color garment visually substantial.
Horizontal Texture Draws Attention Across the Shoulders
Cable direction can visually widen and emphasize the shoulder line. That makes the capelet a natural focal layer over fitted sleeves or a relatively plain bodice.
If the clothing beneath is also heavily textured across the shoulders, the two surfaces can compete. Try the cape over simple underlayers before adding more accessories.
Treat the Yoke as Structural, Not Decorative
The upper shaping determines how the wider fabric resolves into the neckline. Yarn substitutions that significantly change gauge or stiffness can therefore affect more than appearance.
Check the source pattern and tutorial guidance carefully before altering yarn weight. A yoke that is too loose can bunch, while one that is too firm may not settle comfortably.
Choose the Border to Match the Witch Mood
A playful dimensional edging can suit a whimsical winter version, while a simpler hem places more attention on the cables.
Decide which part should be dominant before finishing. When both the cable panel and lower edge are highly decorative, neither necessarily gets to function as the visual anchor.
Original Tutorial and Creator Credit
Creator: Stitches n Scraps
Crochet Box and Bow Openwork Witch Capelet
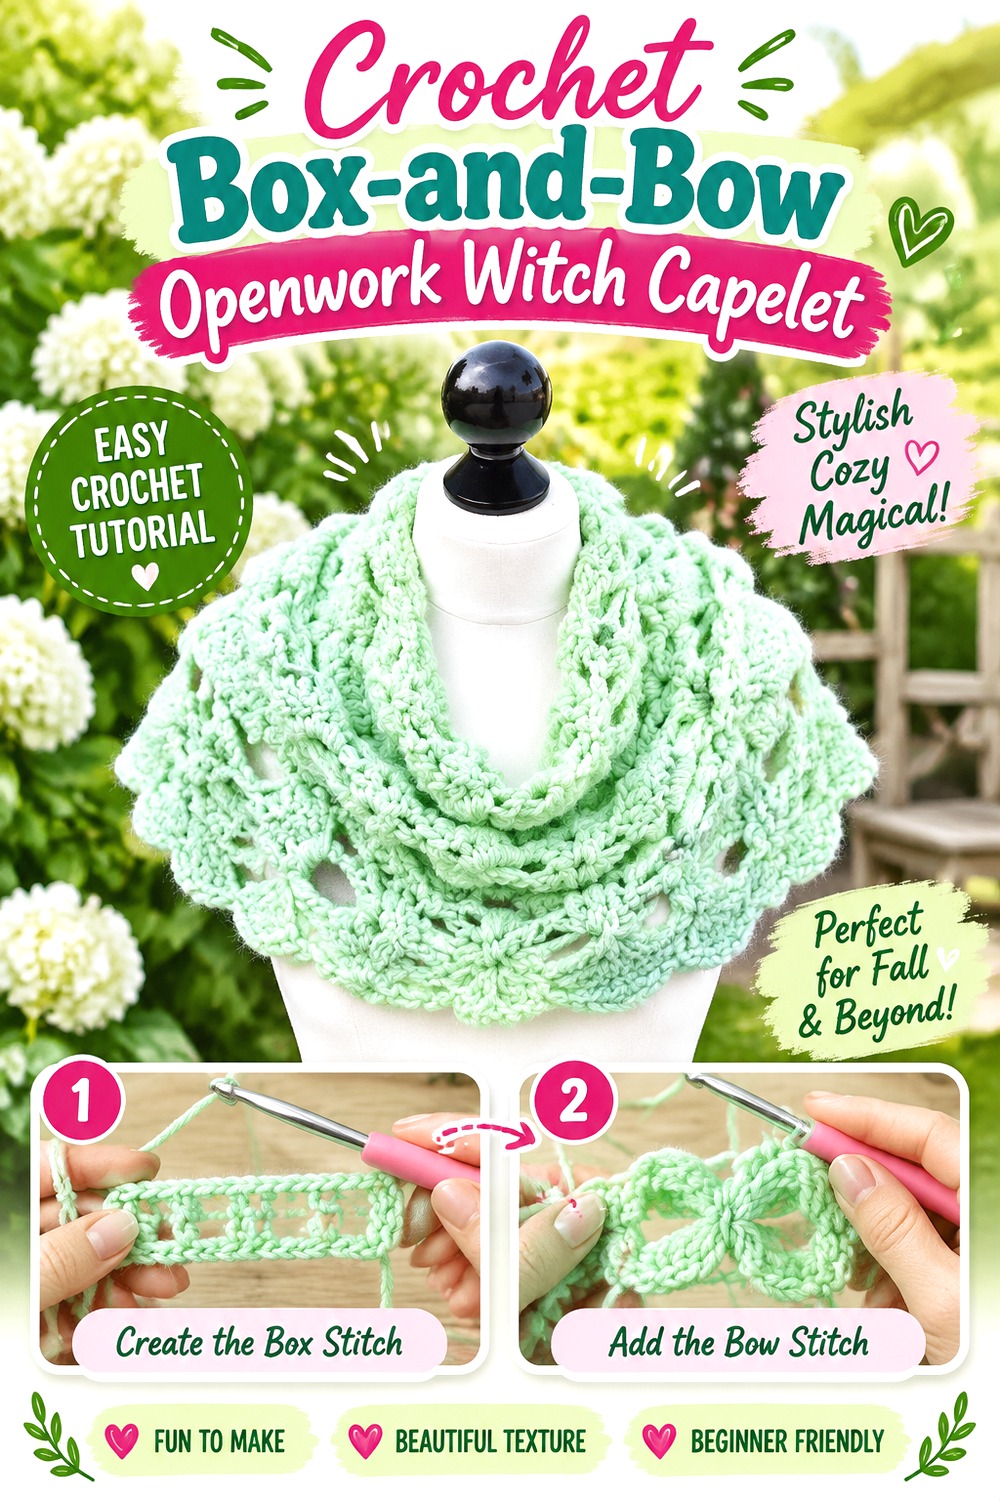
The Secret Yarnery’s design uses alternating open areas and more solid box-like sections, giving the capelet a geometric texture instead of the botanical or historical feeling common in witch-inspired crochet. The source can be worked as a capelet, cowl, or neck warmer, so proportion is an important part of choosing the correct version.
In blackened copper, smoky blue, dark olive, ink, or espresso, the structure can look almost architectural. This project works well for a modern witch wardrobe where unusual stitch geometry matters more than a hood or antique border.
Preserve the Difference Between the Capelet and Cowl Versions
A neck warmer and shoulder capelet may share the same stitch language while requiring noticeably different dimensions. Make sure you are following the creator’s capelet guidance rather than assuming that a cowl will automatically stretch over the shoulders.
The opening needs to relate to the intended wearing position, not simply fit around the neck.
Clear Yarn Shows the Geometry Better
This design depends on visible contrast between open and solid areas. Very fuzzy yarn can soften the lines, while busy variegation may make the repeated structure difficult to read.
Photograph or view your swatch from several feet away. If the boxes disappear at normal viewing distance, a smoother or quieter yarn may serve the design better.
Original Tutorial and Creator Credit
Creator: The Secret Yarnery
Crochet Shell Scallop Twilight Witch Capelet
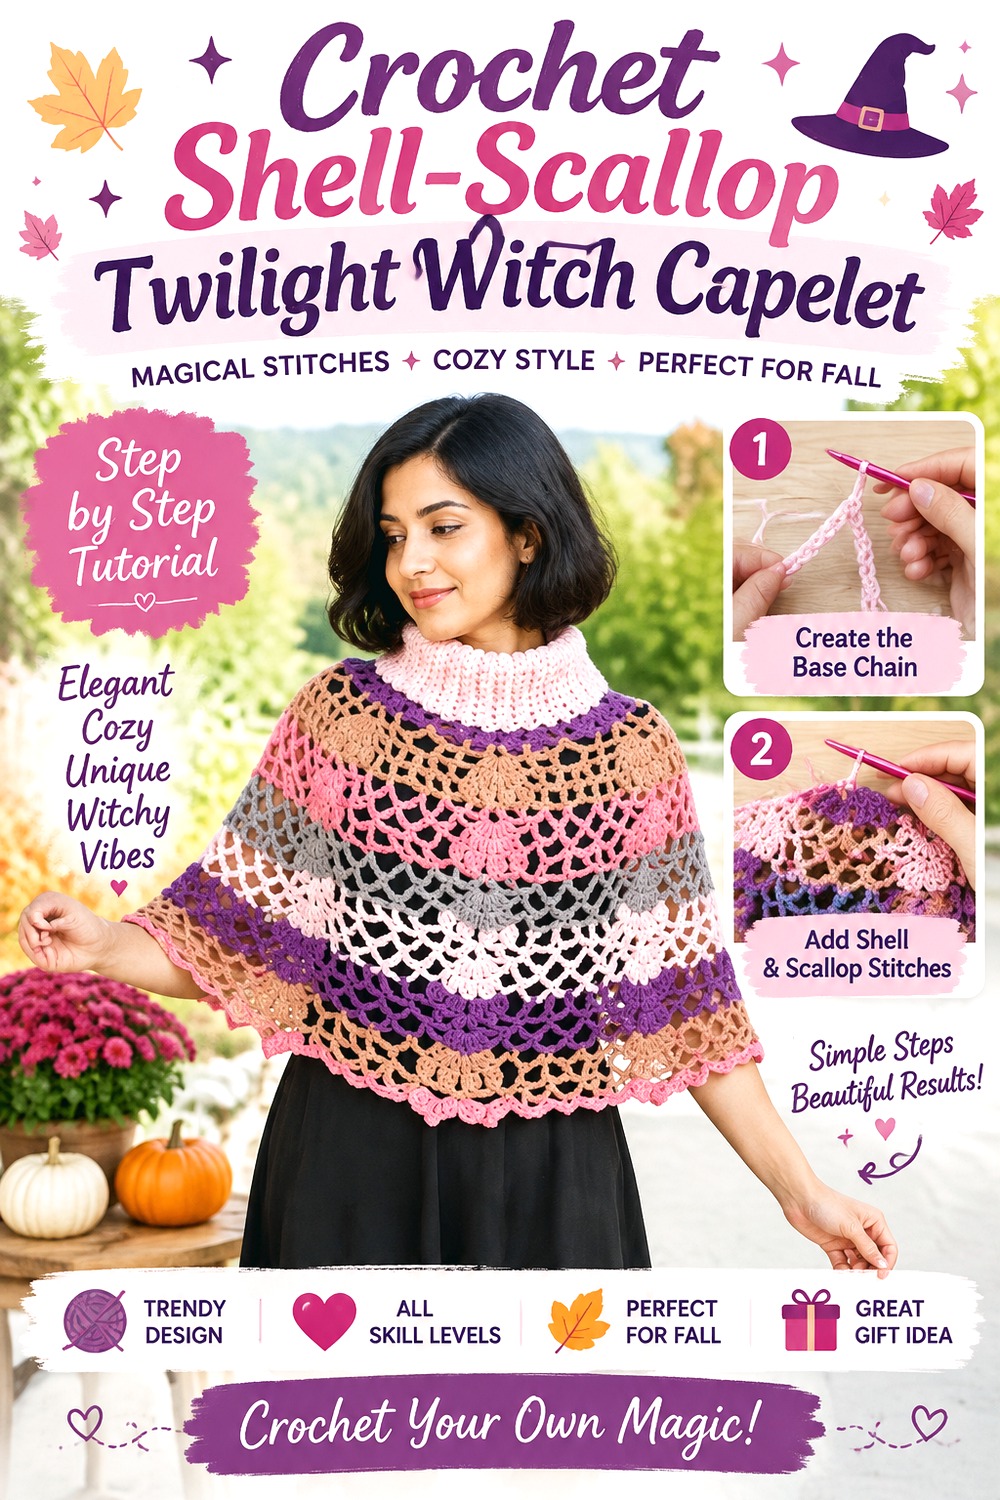
Crafting Shed’s capelet uses shell and scallop detailing, creating a decorative curved surface that sits between airy mesh and dense winter crochet. The finished effect makes the lower edge part of the design rather than treating the hem as a simple stopping point.
That works beautifully for a romantic witch look in plum, ink blue, dark cherry, smoke, deep teal, or muted black. Compared with a hooded cape, this version keeps the neckline and head completely open, making it easier to pair with hats, jewelry, elaborate collars, or styled hair.
Give the Scalloped Edge a Simple Background
Curved decorative hems are easiest to appreciate against clothing that does not already contain a strong competing print.
Try the capelet over a plain long-sleeved dress or fitted top first. The negative space around each scallop becomes part of the visual effect when the background is calm enough to see it.
Color Changes Should Follow the Surface Rhythm
If you want more than one shade, avoid placing color changes randomly simply because a skein ends. Look at where the visible shell sections begin and finish.
Tonal bands that respect the stitch rhythm can reinforce the design, while abrupt high-contrast changes may break the flowing appearance into unrelated stripes.
Original Tutorial and Creator Credit
Creator: Crafting Shed
Crochet Draped Shell Neck Witch Capelet
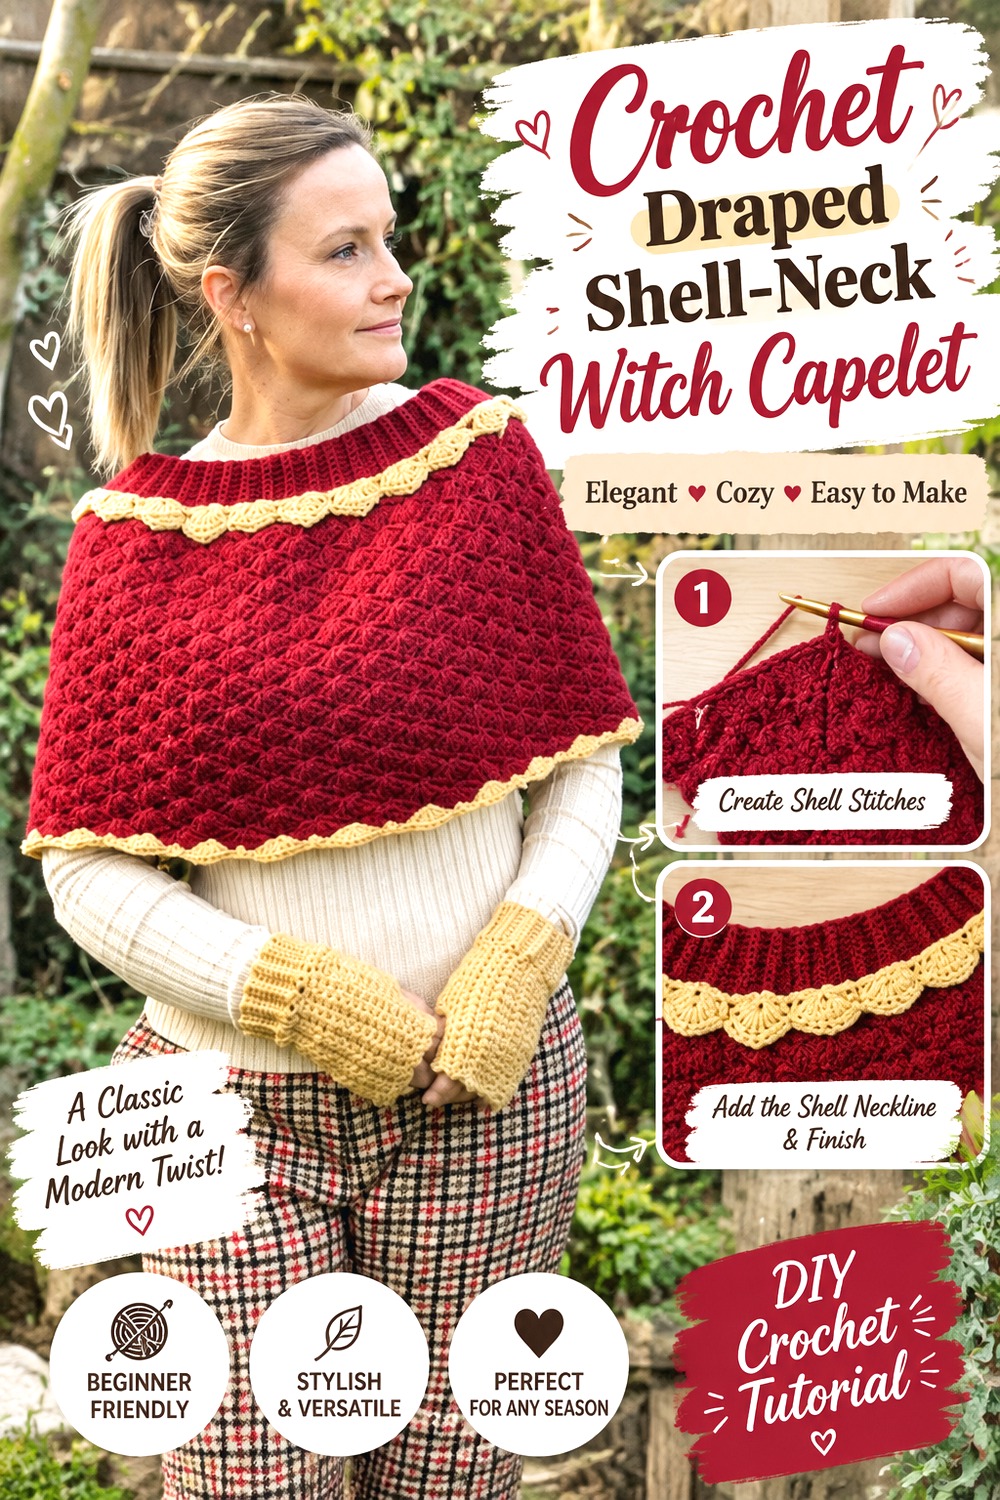
Loopy Mabel Crochet’s Beatrice design sits between a capelet and a small poncho, with shell detailing around the neckline giving the upper edge more visual interest than a basic round opening.
For witch styling, this is an adaptable middle ground: more coverage than a tiny Victorian cape but less costume-like than a dramatic hood. Deep blackberry, charcoal, dark moss, smoky rose, or midnight can make the shell neckline stand out while keeping the overall silhouette easy to wear with ordinary fall clothes.
The Neckline Is the Natural Focal Point
Because the shell detail sits high on the garment, adding a large necklace or ornate neck brooch may compete directly with it.
Try the finished capelet first with minimal jewelry. If the neckline already frames the face effectively, you may only need earrings, a hat, or another accent positioned away from the crochet detail.
Compare Flat Measurements With How the Cape Hangs
A capelet can look wider laid flat than it feels once gravity pulls the fabric down around the body. Do not judge the finished proportion only from a table or blocking board.
Try it over the type of sleeves you expect to wear, then check whether the shoulder and upper-arm coverage matches your goal.
Original Tutorial and Creator Credit
Creator: Loopy Mabel Crochet
Crochet Relaxed Shawl Poncho Witch Capelet
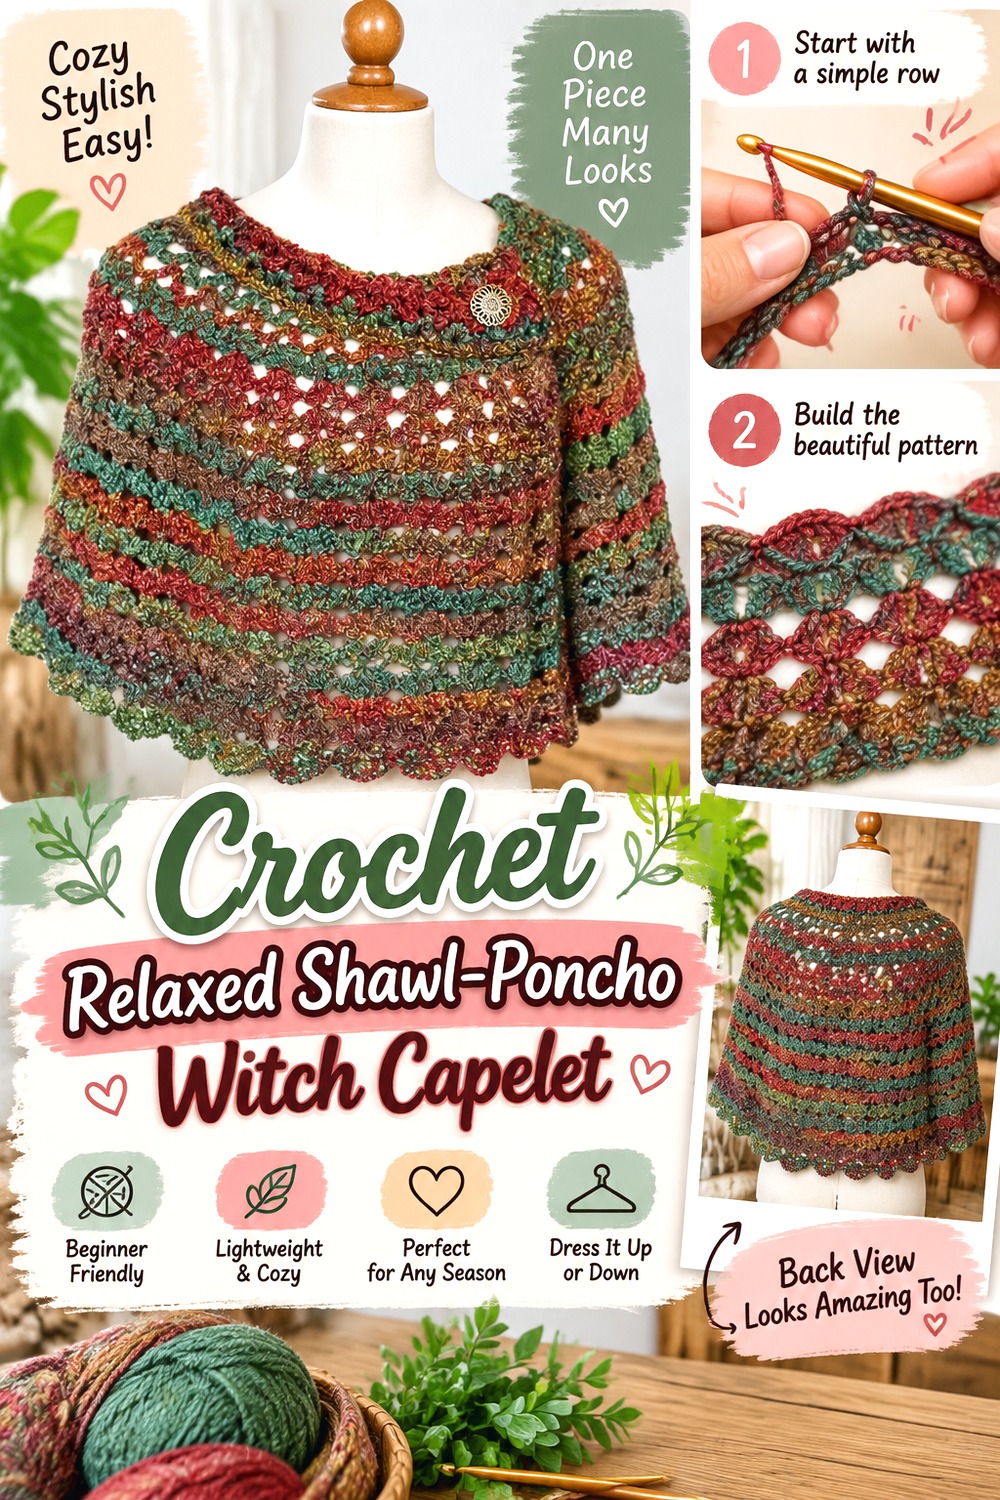
Bag-O-Day Crochet’s tutorial deliberately occupies the space between capelet, shawl, and poncho. That makes it useful for readers who want more relaxed coverage than a tiny shoulder mantle but do not necessarily want a full-length cloak.
A dark chestnut, aubergine, forest, smoky gray, or muted wine version can work with jeans and boots just as easily as with a themed dress. This is one of the more casual directions in the collection, so it suits a witch-inspired everyday wardrobe rather than a strongly historical costume.
Extra Width Makes Drape More Important
The more fabric a cape carries, the more strongly its weight affects the neckline. A yarn that feels slightly stiff in a small swatch can become much more noticeable when repeated across a broad shoulder garment.
Hold a larger sample vertically and watch how it falls before making a substantial fiber substitution.
Choose This Shape When Coverage Matters
A tiny capelet can leave much of the upper arm exposed. A shawl-poncho shape gives you a different balance between drama and practicality.
If the garment is intended for outdoor fall use, compare the source’s coverage with the compact vintage projects before choosing solely because a shorter capelet looks more traditionally “witchy.”
Original Tutorial and Creator Credit
Creator: Bag-O-Day Crochet
Crochet Fairytale Lace Hood Witch Capelet
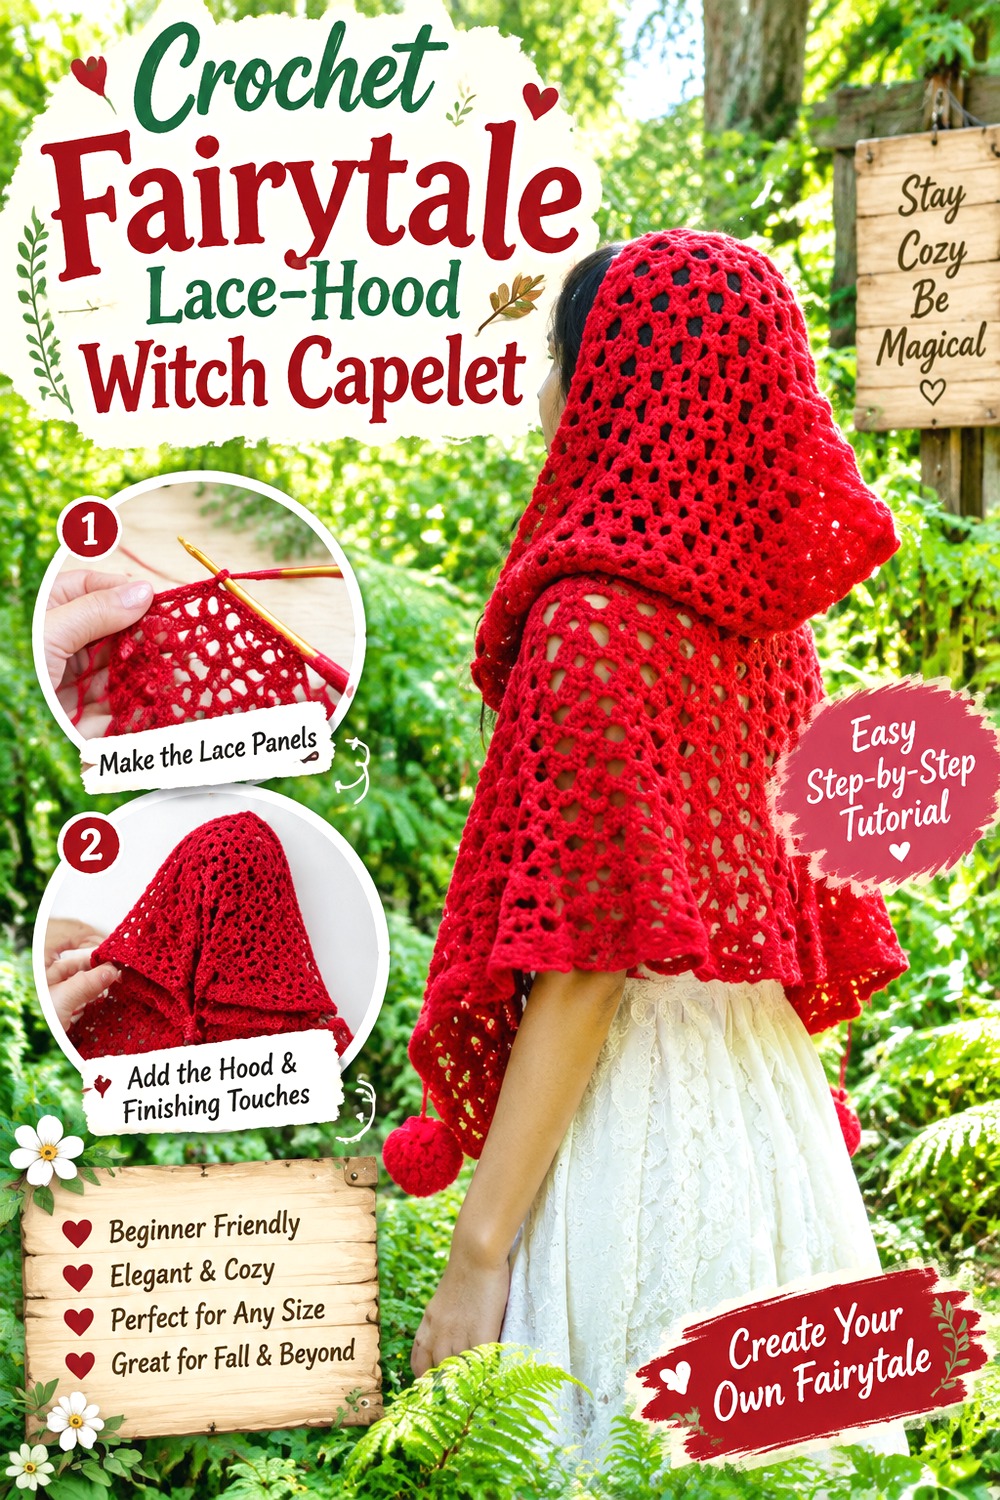
Jennyandteddy crochet.’s hooded cape was designed with a fairy-tale direction and combines an open lace body with a separate hood, making it an obvious base for a storybook or woodland witch layer.
The contrast between the airy cape and more substantial hood gives it a different feeling from the dense moss-textured version. Deep berry, midnight, blackened green, chestnut, or smoke can shift the original fairy-tale mood toward a darker fall wardrobe while preserving the recognizable hooded silhouette.
The Separate Hood Creates a Useful Fit Check
Because the hood and cape body are separate components before assembly, you have an opportunity to judge both pieces independently.
Check whether the hood feels proportionate to the cape before joining. If you changed yarn substantially, this is the point where unexpected weight or stiffness will become easier to notice.
Open Lace and Hood Weight Need Balance
A very heavy hood attached to a comparatively airy cape can pull backward at the neckline. The effect may be stronger if you also lengthen the hood or use denser yarn.
When substituting, compare your fabric behavior with the source rather than treating yarn category alone as proof that the two materials will drape similarly.
Simplify Playful Finishes for a Darker Version
The original project includes fairy-tale finishing details. You do not have to reproduce every decorative element to preserve the useful construction.
A simple tie, darker tonal finish, or more restrained edge can make the same hood-and-cape shape easier to integrate into a romantic witch wardrobe.
Original Tutorial and Creator Credit
Creator: Jennyandteddy crochet.
Crochet Full Hood Short Cloak Witch Capelet
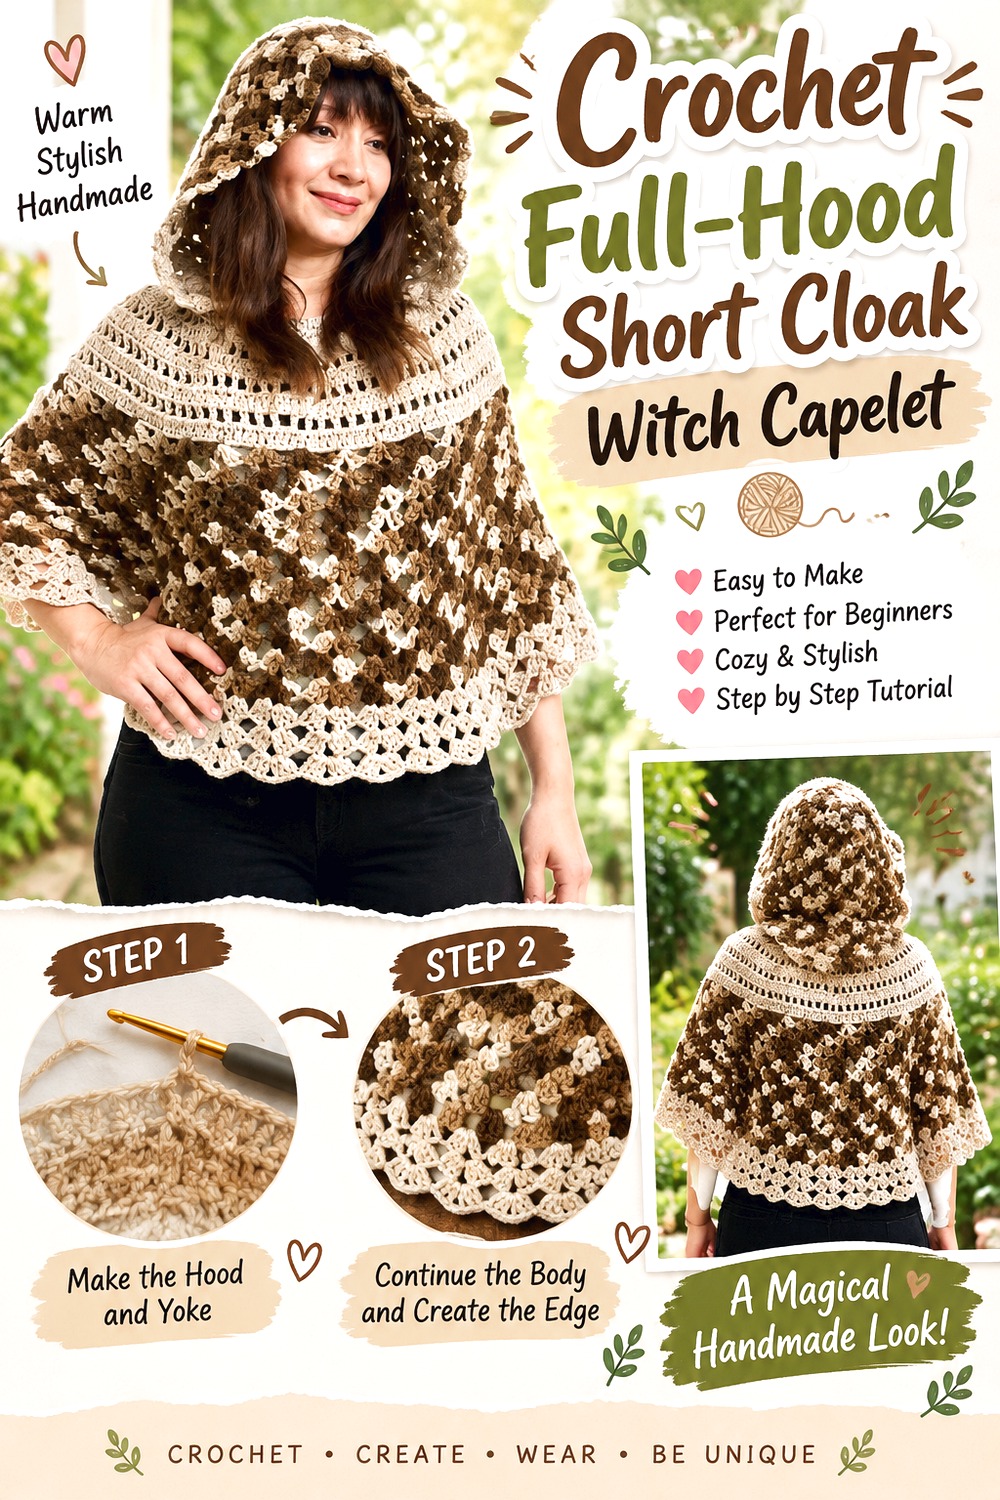
Mariie Crochet’s hooded cape gives more visual mass around the head and shoulders than the tiny mantle-style projects. Its strong hood-and-cape silhouette makes it a useful option when your idea of a witch capelet is closer to a shortened cloak.
A monochrome charcoal, deep red, violet-black, forest, or dark brown version can look dramatic without requiring appliqués or several different trims. Because the hood already frames the face strongly, this is one of the projects where restraint elsewhere can make the final result feel more deliberate.
Consider Hair Volume Before Judging Hood Fit
A hood that sits comfortably over straight loose hair may feel different over curls, braids, buns, or another head covering.
Think about the way you expect to wear it most often. A decorative hood does not need the same room as one intended to be pulled fully over styled hair outdoors.
More Fabric Makes Yarn Weight Noticeable Faster
A larger hood and fuller cape concentrate considerably more crochet around the neckline than a lace shoulder piece does.
If you want to substitute a denser or heavier yarn, make a generous swatch and physically hold it against your shoulders. This gives you better information than judging softness from the skein alone.
Keep the Front Hardware Secondary
With a large hood already creating a strong frame around the face, an oversized clasp can make the neckline visually crowded.
Start with the simplest secure finish supported by the source. Add decorative hardware only after seeing whether the completed hood already provides enough drama.
Original Tutorial and Creator Credit
Creator: Mariie Crochet
Crochet Top Down Hooded Witch Poncho Capelet
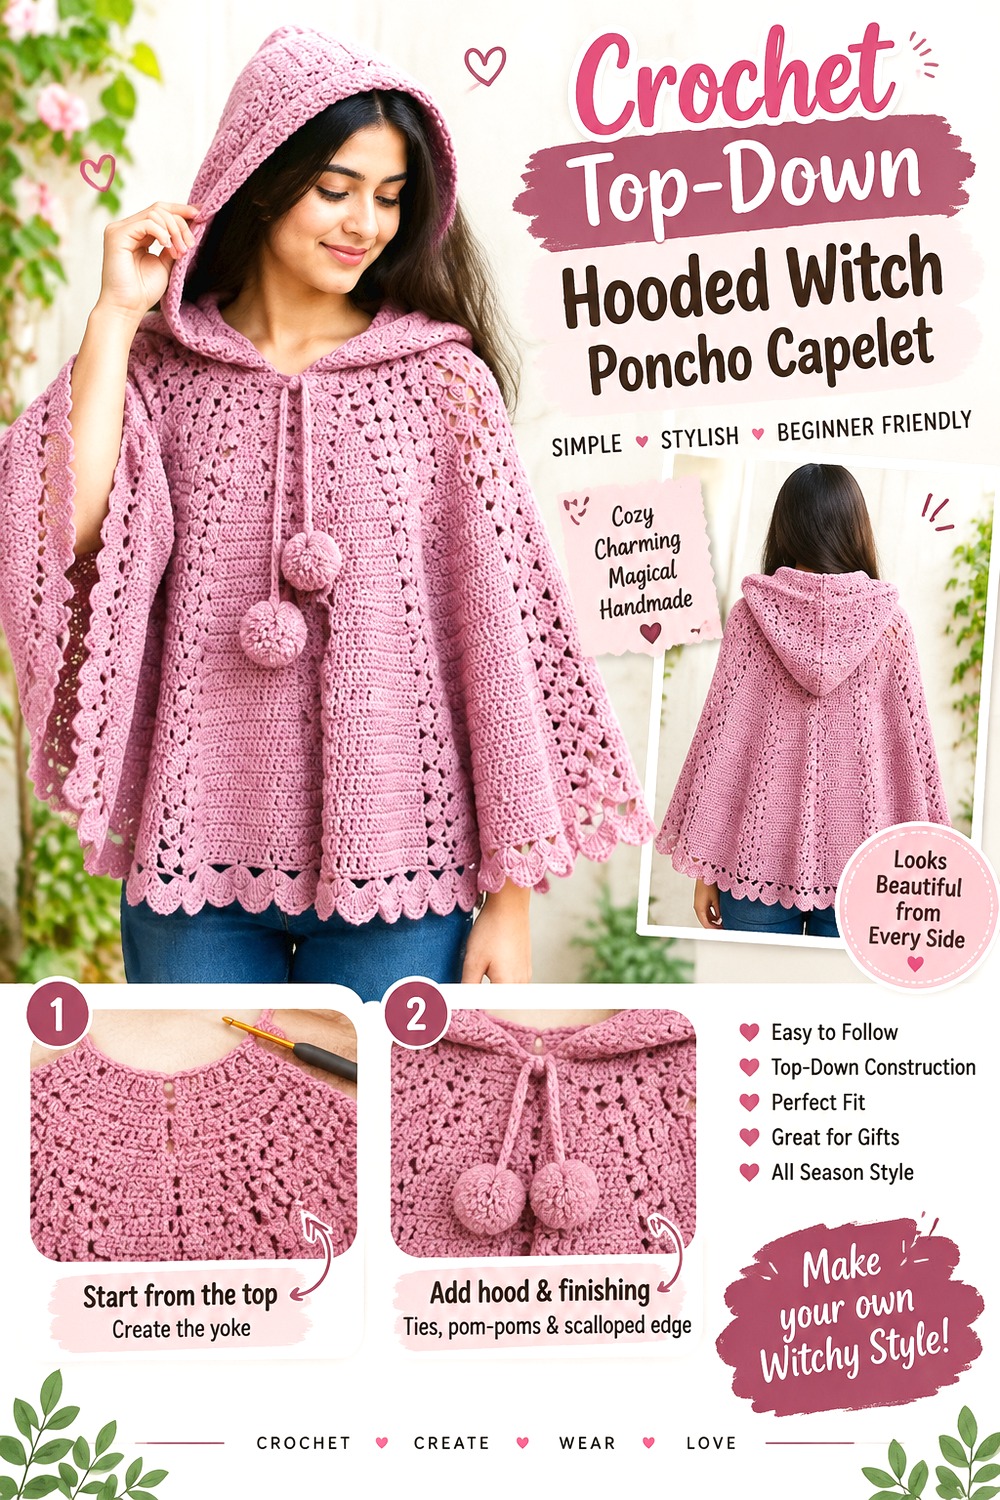
Crochet-crosia’s hood poncho begins from the neckline and expands downward, giving this project a top-down direction that differs from separately assembled hooded capes. The source is presented as a hooded poncho rather than a compact adult capelet, so treat it as the roomier end of the witch-cape spectrum.
This is a useful choice when the garment needs to feel cozy and storybook-like rather than historically tiny. To keep the styling witchy instead of overly costume-focused, rely on a dark tonal palette and the hood silhouette rather than attaching many themed decorations.
Top-Down Construction Makes Length a Visible Decision
A growing top-down garment allows you to see the shoulder spread develop before the final lower edge is reached. That is useful when deciding whether you want a fuller poncho or a relatively shorter cape-like proportion.
Follow the tutorial’s sizing logic rather than stopping at an arbitrary point that interrupts the intended stitch repeat or edging.
Check Who the Source Size Is Designed For
The tutorial title includes a girls’ poncho reference, so do not assume the demonstrated dimensions automatically translate to every adult wearer.
Use the creator’s own size guidance where provided and verify neckline and shoulder measurements before treating the source sample as a universal fit reference.
Original Tutorial and Creator Credit
Creator: crochet-crosia
Crochet Minimal Shoulder Witch Capelet
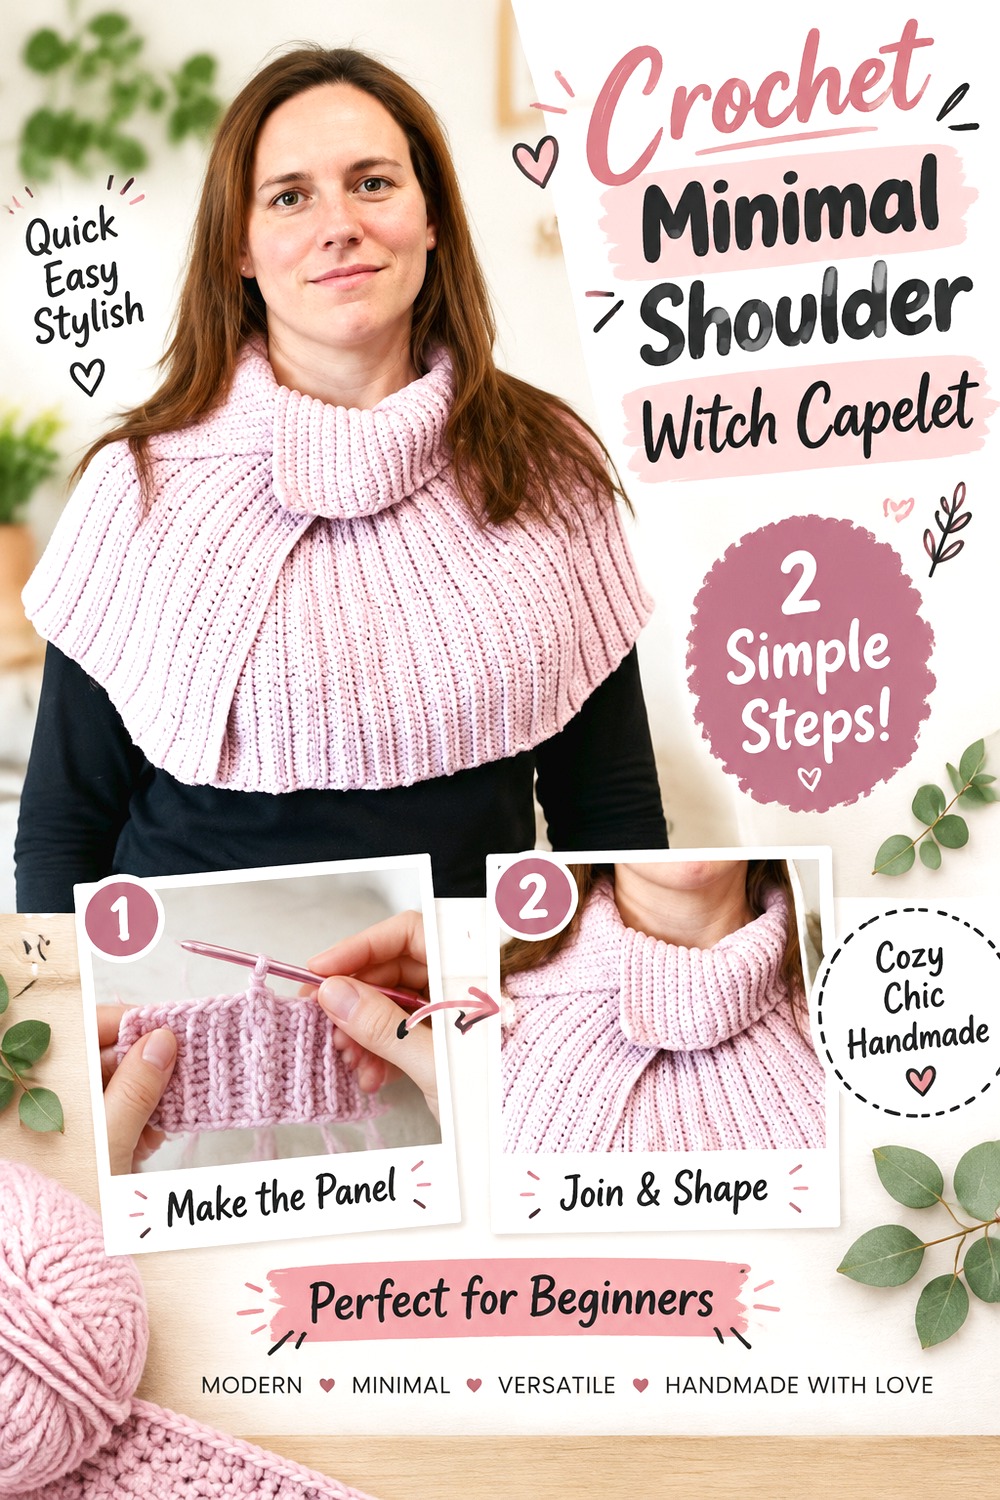
Lanas y ovillos demonstrates a straightforward crochet cape, making this a useful base when you want the silhouette to stay simple and let color, clothing, or a removable accessory create the witchy mood.
A plain cape is valuable in a collection like this because not every witch-inspired garment needs lace, cables, fringe, or a hood. Dark chocolate, charcoal, mulberry, black, or deep green can create a restrained shoulder layer suitable for regular fall outfits. It can also provide visual breathing room when the dress, hat, or jewelry underneath is already elaborate.
Simplicity Makes Fit More Noticeable
When the surface is uncomplicated, the eye pays more attention to proportion and finishing. Make sure the neckline sits where you expect and the lower edge falls evenly around the body.
A plain cape with clean shaping often looks more polished than one overloaded with optional decorations added to disguise an awkward fit.
Use One Accent Instead of Several
A minimal cape gives you space for a single strong styling choice: perhaps a brooch, contrasting edge, vintage button, or dramatic hat.
Adding all of them at once changes the project from versatile layering piece to costume accessory. Decide which item should carry the witch identity before adding hardware.
Original Tutorial and Creator Credit
Creator: Lanas y ovillos
Crochet Lightweight Poncho Shawl Witch Capelet
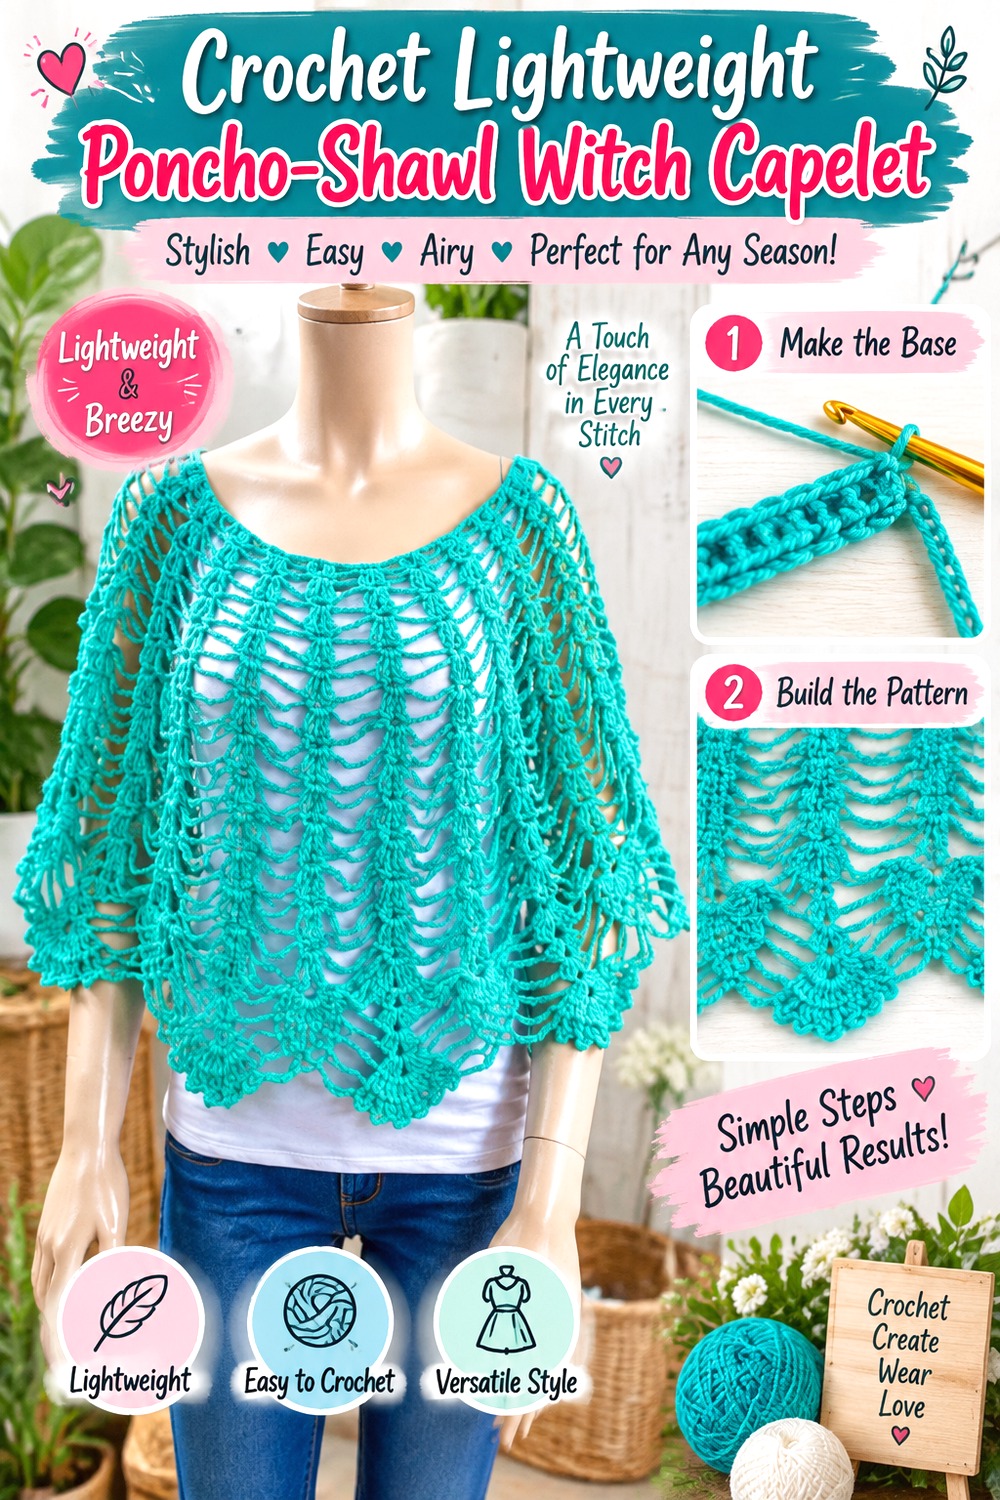
Karen Valladares’ tutorial creates a light cape-poncho-shawl direction that offers more drape than a rigid winter mantle. The source is useful for readers who like a flowing witch layer but do not need a hood, cable texture, or historically close fit.
A soft dark palette can turn the shape into an evening or transitional-weather witch layer without making it feel like costume outerwear. Consider ink, raisin, smoke, forest, or muted wine, then allow the fluid silhouette to provide the movement.
A Flowing Cape Needs Space Around the Arms
Draped poncho-shawl shapes move differently from a close mantle. Wear the garment over the sleeve volume you actually plan to use rather than testing it only over a thin shirt.
Wide or bell sleeves may interact with the cape fabric in ways that are not visible when the garment is laid flat.
Do Not Make a Light Design Heavy by Accident
A yarn substitution that adds substantial density can change the reason this option is appealing. More weight may pull the fabric downward and turn a floating shoulder layer into a much heavier garment.
Compare both texture and hang before replacing the source yarn with something dramatically thicker.
Original Tutorial and Creator Credit
Creator: Karen Valladares
Crochet Textured Fall Cowl Witch Capelet
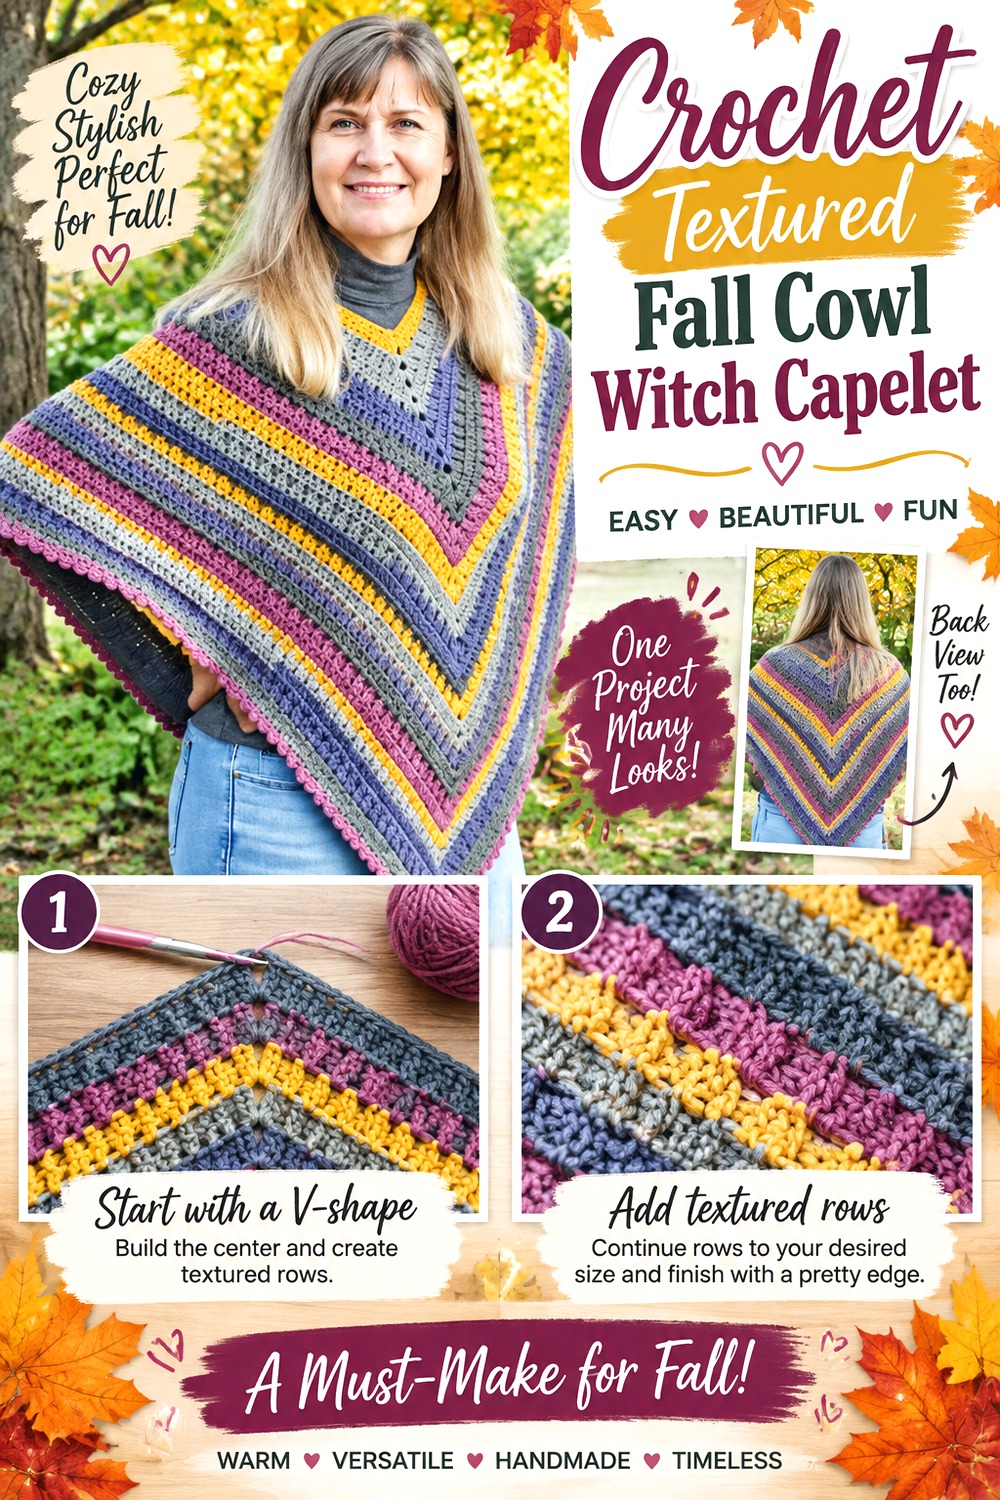
The Crochet Crowd’s fall poncho tutorial gives this collection its broadest practical layering direction. The source project uses a textured poncho shape rather than a tiny capelet, so this idea is best for readers who prioritize fall coverage and an easy dark-witch wardrobe effect over a sharply cropped mantle.
Charcoal, dark plum, fir, espresso, or a restrained tonal yarn can create a subtle witchcore look that still works for everyday errands and outdoor events. The broader silhouette also provides a useful contrast with the delicate Victorian and mesh capelets earlier in the list.
The Wider Shape Changes the Whole Outfit Balance
A poncho occupies more visual space than a close shoulder capelet. Long necklaces, oversized bags, bulky scarves, and very full skirts can compete with that width.
Try the finished garment with one simple vertical element underneath, such as a fitted dress or straight-leg outfit, before adding more volume.
Texture Can Carry the Theme Without Halloween Motifs
Dark color plus a visible textured surface may be enough to create a fall witch mood. This option is particularly useful if you want a garment you will still reach for in November after seasonal decorations have disappeared.
Keep moons, stars, patches, and dangling charms optional rather than treating them as requirements for the theme.
Check the Final Length Against Your Actual Use
A broad cape can move quickly from shoulder layer to substantial poncho as length increases. Decide where you want the hem in relation to your waist, hands, bags, and jacket layers.
If compact capelet proportions are the priority, one of the earlier purpose-built capelet tutorials will require less adaptation.
Original Tutorial and Creator Credit
Creator: The Crochet Crowd
Which Crochet Witch Capelet Direction Should You Choose?
For the strongest fantasy silhouette, the Moss-Hood Forest, Fairytale Lace-Hood, and Full-Hood Short Cloak ideas put the hood at the center of the design. The moss version stays compact, while the fuller hooded options create more cloak-like drama.
For historical styling, compare the Edwardian Ribbon-Tie, Antique Mantle, and Short-Row Highland capelets. They rely more on proportion, neckline treatment, and finishing than obvious witch symbols.
Choose the Spiderweb Crescent or Filet Fringe Gothic capelet when transparency and the clothing beneath should be part of the finished look. For colder weather and stronger texture, the Braided-Cable Drawstring and Cable-Yoke Winter versions provide more visual substance.
If everyday versatility matters most, the minimal cape, relaxed shawl-poncho, or textured fall cowl direction can blend into a regular autumn wardrobe with little or no themed decoration.
Conclusion
The right crochet witch capelet depends less on how many themed details you add and more on the silhouette you actually want to wear. Choose a deep hood for woodland fantasy, a short antique shape for Victorian styling, open mesh or spiderweb crochet for gothic layering, cables for colder weather, or a broader poncho form when practical coverage matters most.
Then compare yarn drape, neckline weight, closure, and hem depth before making major substitutions. A well-balanced dark capelet usually needs fewer decorative additions than expected. Once you have chosen the construction that matches your wardrobe and climate, follow the original creator tutorial for the exact shaping, stitch counts, sizing, and assembly details.
Frequently Asked Questions
Can I make a crochet witch capelet without using black yarn?
Yes. Silhouette, texture, and styling can create a witch-inspired look without black. Deep moss, aubergine, charcoal, oxblood, espresso, midnight blue, muted rust, and bottle green all work well with darker fall wardrobes. Historical capelets can even look convincingly witchy in antique cream or faded neutral shades. Choose a color that still allows important features—such as cables, filet spaces, or moss texture—to remain visible.
Which crochet witch capelet is better for colder weather?
Dense cable, textured, or fuller poncho constructions generally provide more physical fabric than spiderweb or filet mesh designs. The Braided-Cable Drawstring, Cable-Yoke Winter, moss-textured hooded, and broader fall options are therefore more logical places to start when coverage matters. Actual warmth still depends on fiber, yarn construction, garment fit, wind, and what you wear underneath, so follow the source material guidance rather than relying on appearance alone.
Can I add a hood to one of the non-hooded capelets?
Not automatically. A hood adds both weight and fabric at the back of the neckline, which can change how a small capelet hangs. A neckline designed only to support a short shoulder garment may distort when an unrelated hood is attached. If a hood is central to your plan, choosing one of the existing hooded tutorials is the more predictable approach. For any custom adaptation, compare neckline dimensions and construction compatibility first.
How can I stop a crochet capelet from sliding backward?
Start by checking the fit rather than immediately adding a heavy clasp. A loose neckline, stretchy yarn, or substantial hood can all change the balance of the garment. Follow the original tutorial’s fastening method when one is provided. If you add an optional brooch or pin, position it where the fabric is dense enough to support the hardware without visibly pulling open the stitches.
Should I block a witch capelet before adding optional hardware?
When blocking is appropriate for the yarn and the creator’s instructions, establishing the final fabric shape first can make optional closure placement easier. Blocking may change edge alignment, width, drape, and how the neckline settles. Follow care guidance for the actual fiber rather than using one universal blocking method, then test any brooch, button, or clasp on the finished fabric before making its position permanent.
Can a spiderweb shawl really be used as a witch capelet?
It can create the visual effect of a capelet when arranged around the shoulders, but it remains a shawl construction unless the source specifically shapes it as a cape. That distinction matters because it may not have a fitted neckline or built-in fastening. Choose the spiderweb idea when you want dramatic openwork and flexible styling; choose a purpose-built capelet tutorial when secure shoulder fit is more important.